Pinned Post

Chris Ross's avatar

Hello, world. It's been awhile.

(styling unapologetically plagiarized with sincerest thanks to Pure.css)

Welcome, weary traveler. This blog adventure is to sort out all things YARG - what is it, why it is, where it is. A design and build log, an impromptu place to document this project. Just an old guy shaking his fist at the cloud and muttering incoherent rambling.

Probably be easiest if I just c/p the .md file I have in the project. Here goes nothing... (it almost worked. Here's a cleaned up version)

YARG

Yet Another Robotic Garden. Not that there are many out there mind you. 'Adventures in architecting a minimalistic approach to an automated ebb and flow hydroponic garden' seemed too long, and let's be sensible - AIAAMATAAEAFHG is simply gibberish, isn't it.

Completely inspired by LED Gardener and his past projects

General Design Considerations

The core objectives of the YARG project are as follows:

  • To design and implement a fully autonomous hydroponic garden capable of operating independently for extended periods, reducing the need for constant human intervention.
  • To create a self-contained system that functions without relying on cloud-based services, ensuring data privacy and security.
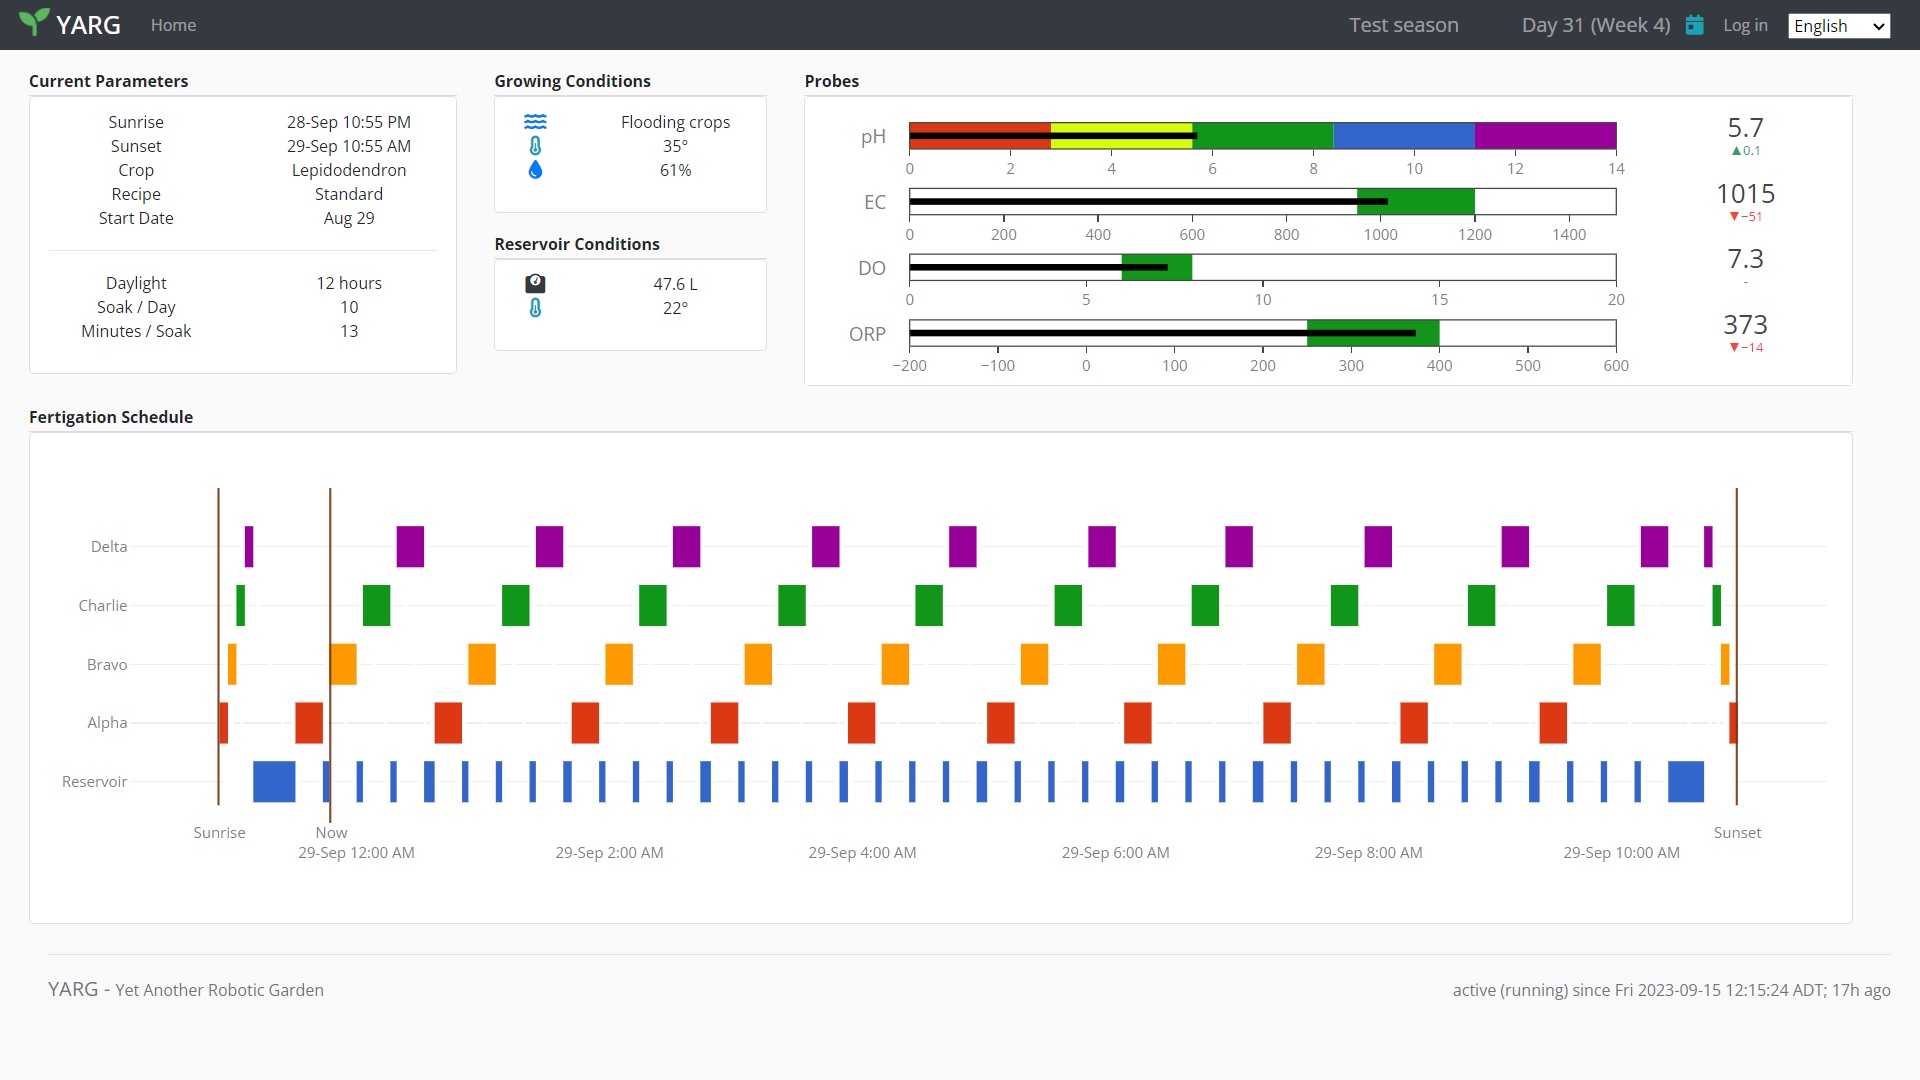
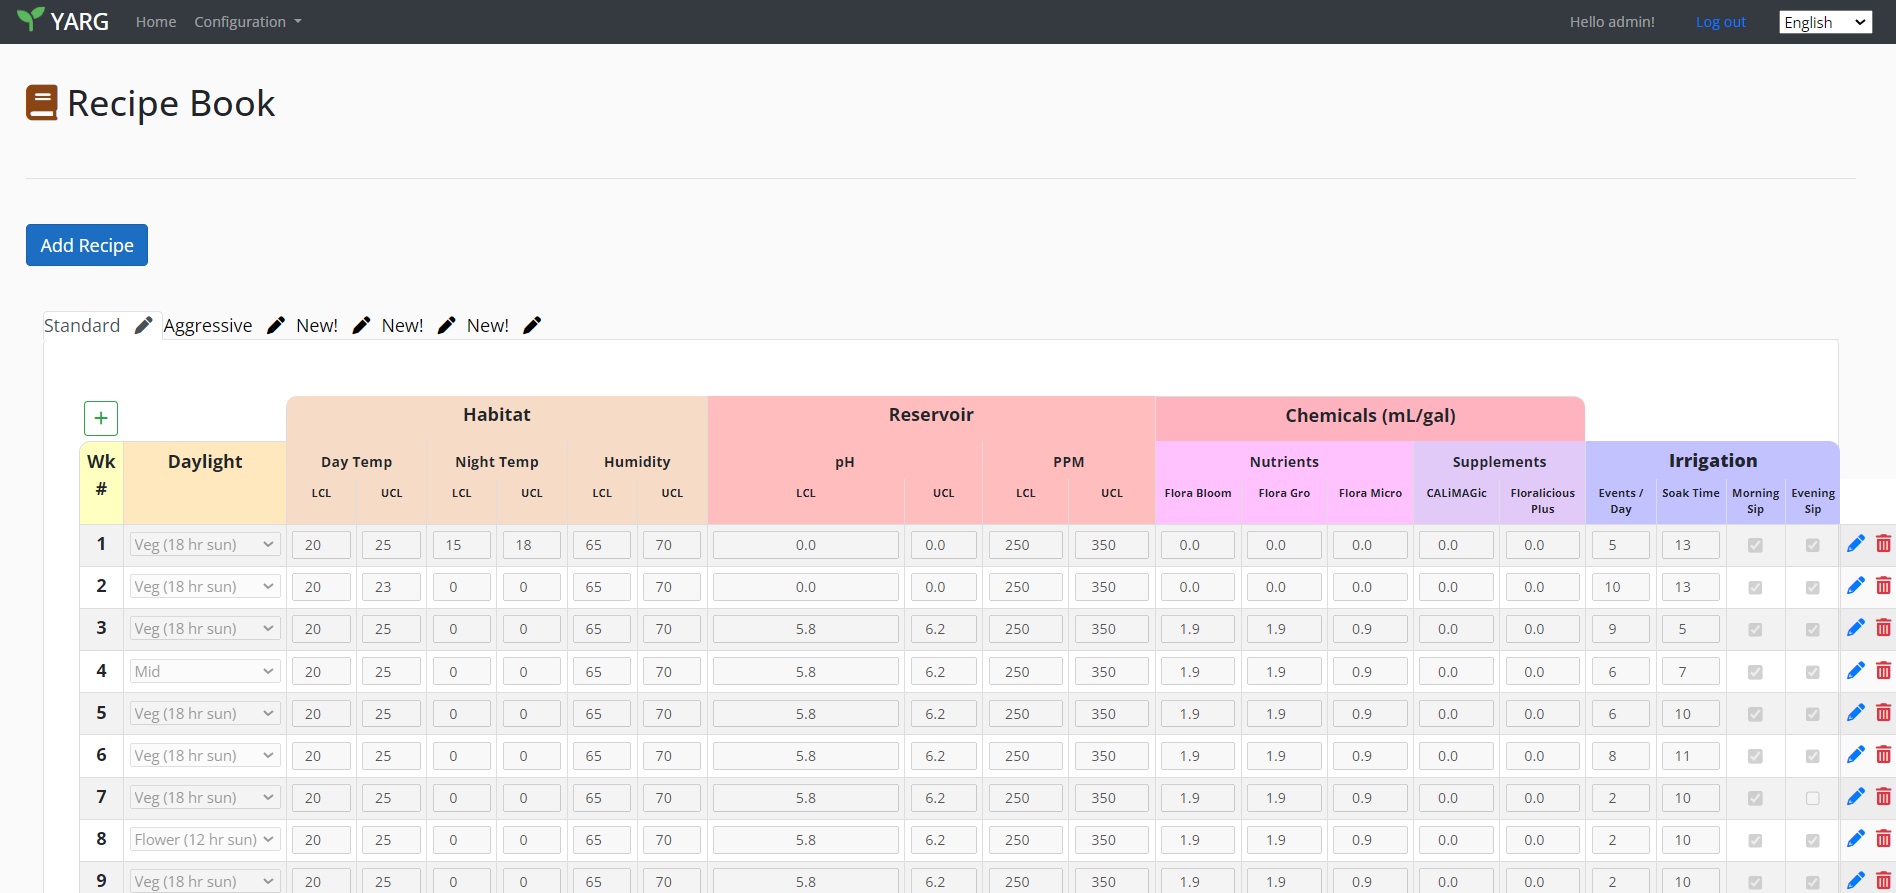
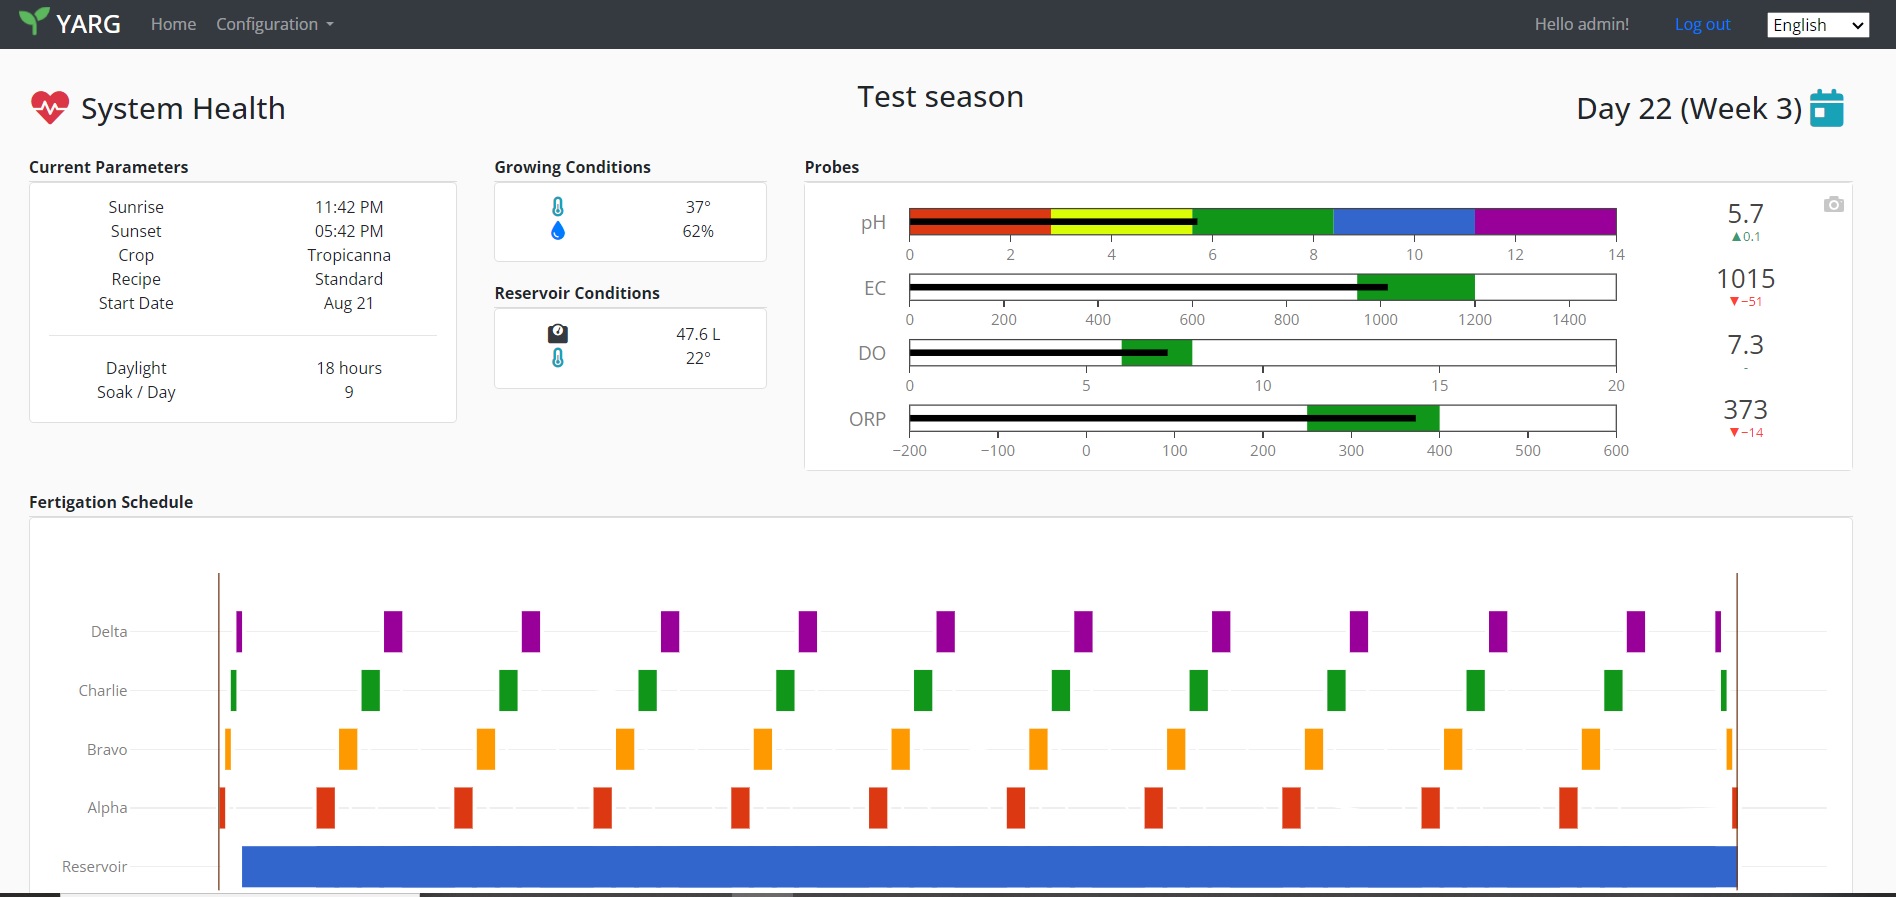
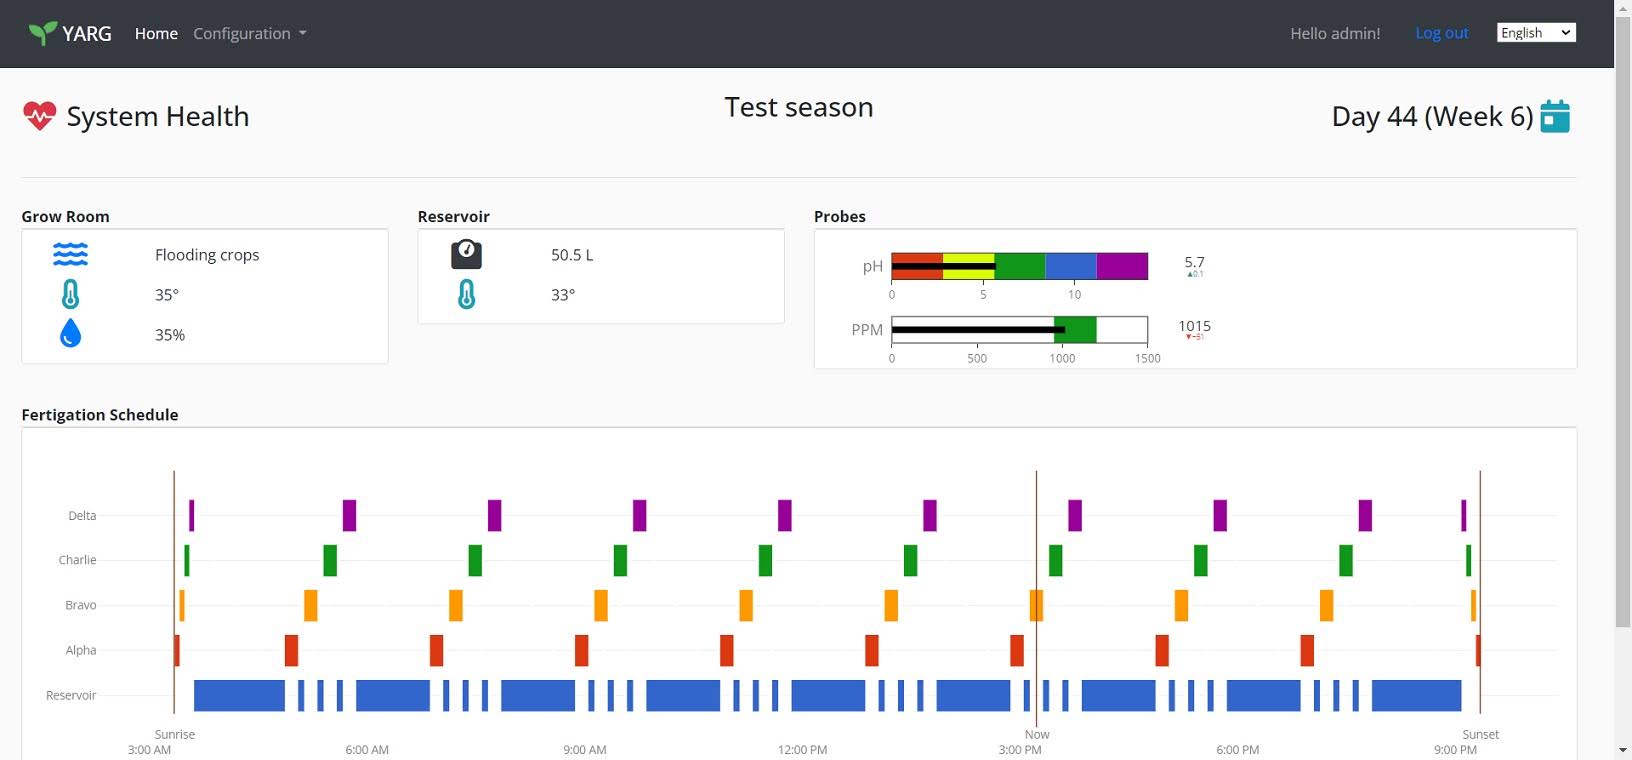
  • To develop a comprehensive scheduling system for managing the entire growing season, encompassing feeding, lighting, environmental conditions (temperature and humidity), and reservoir management.
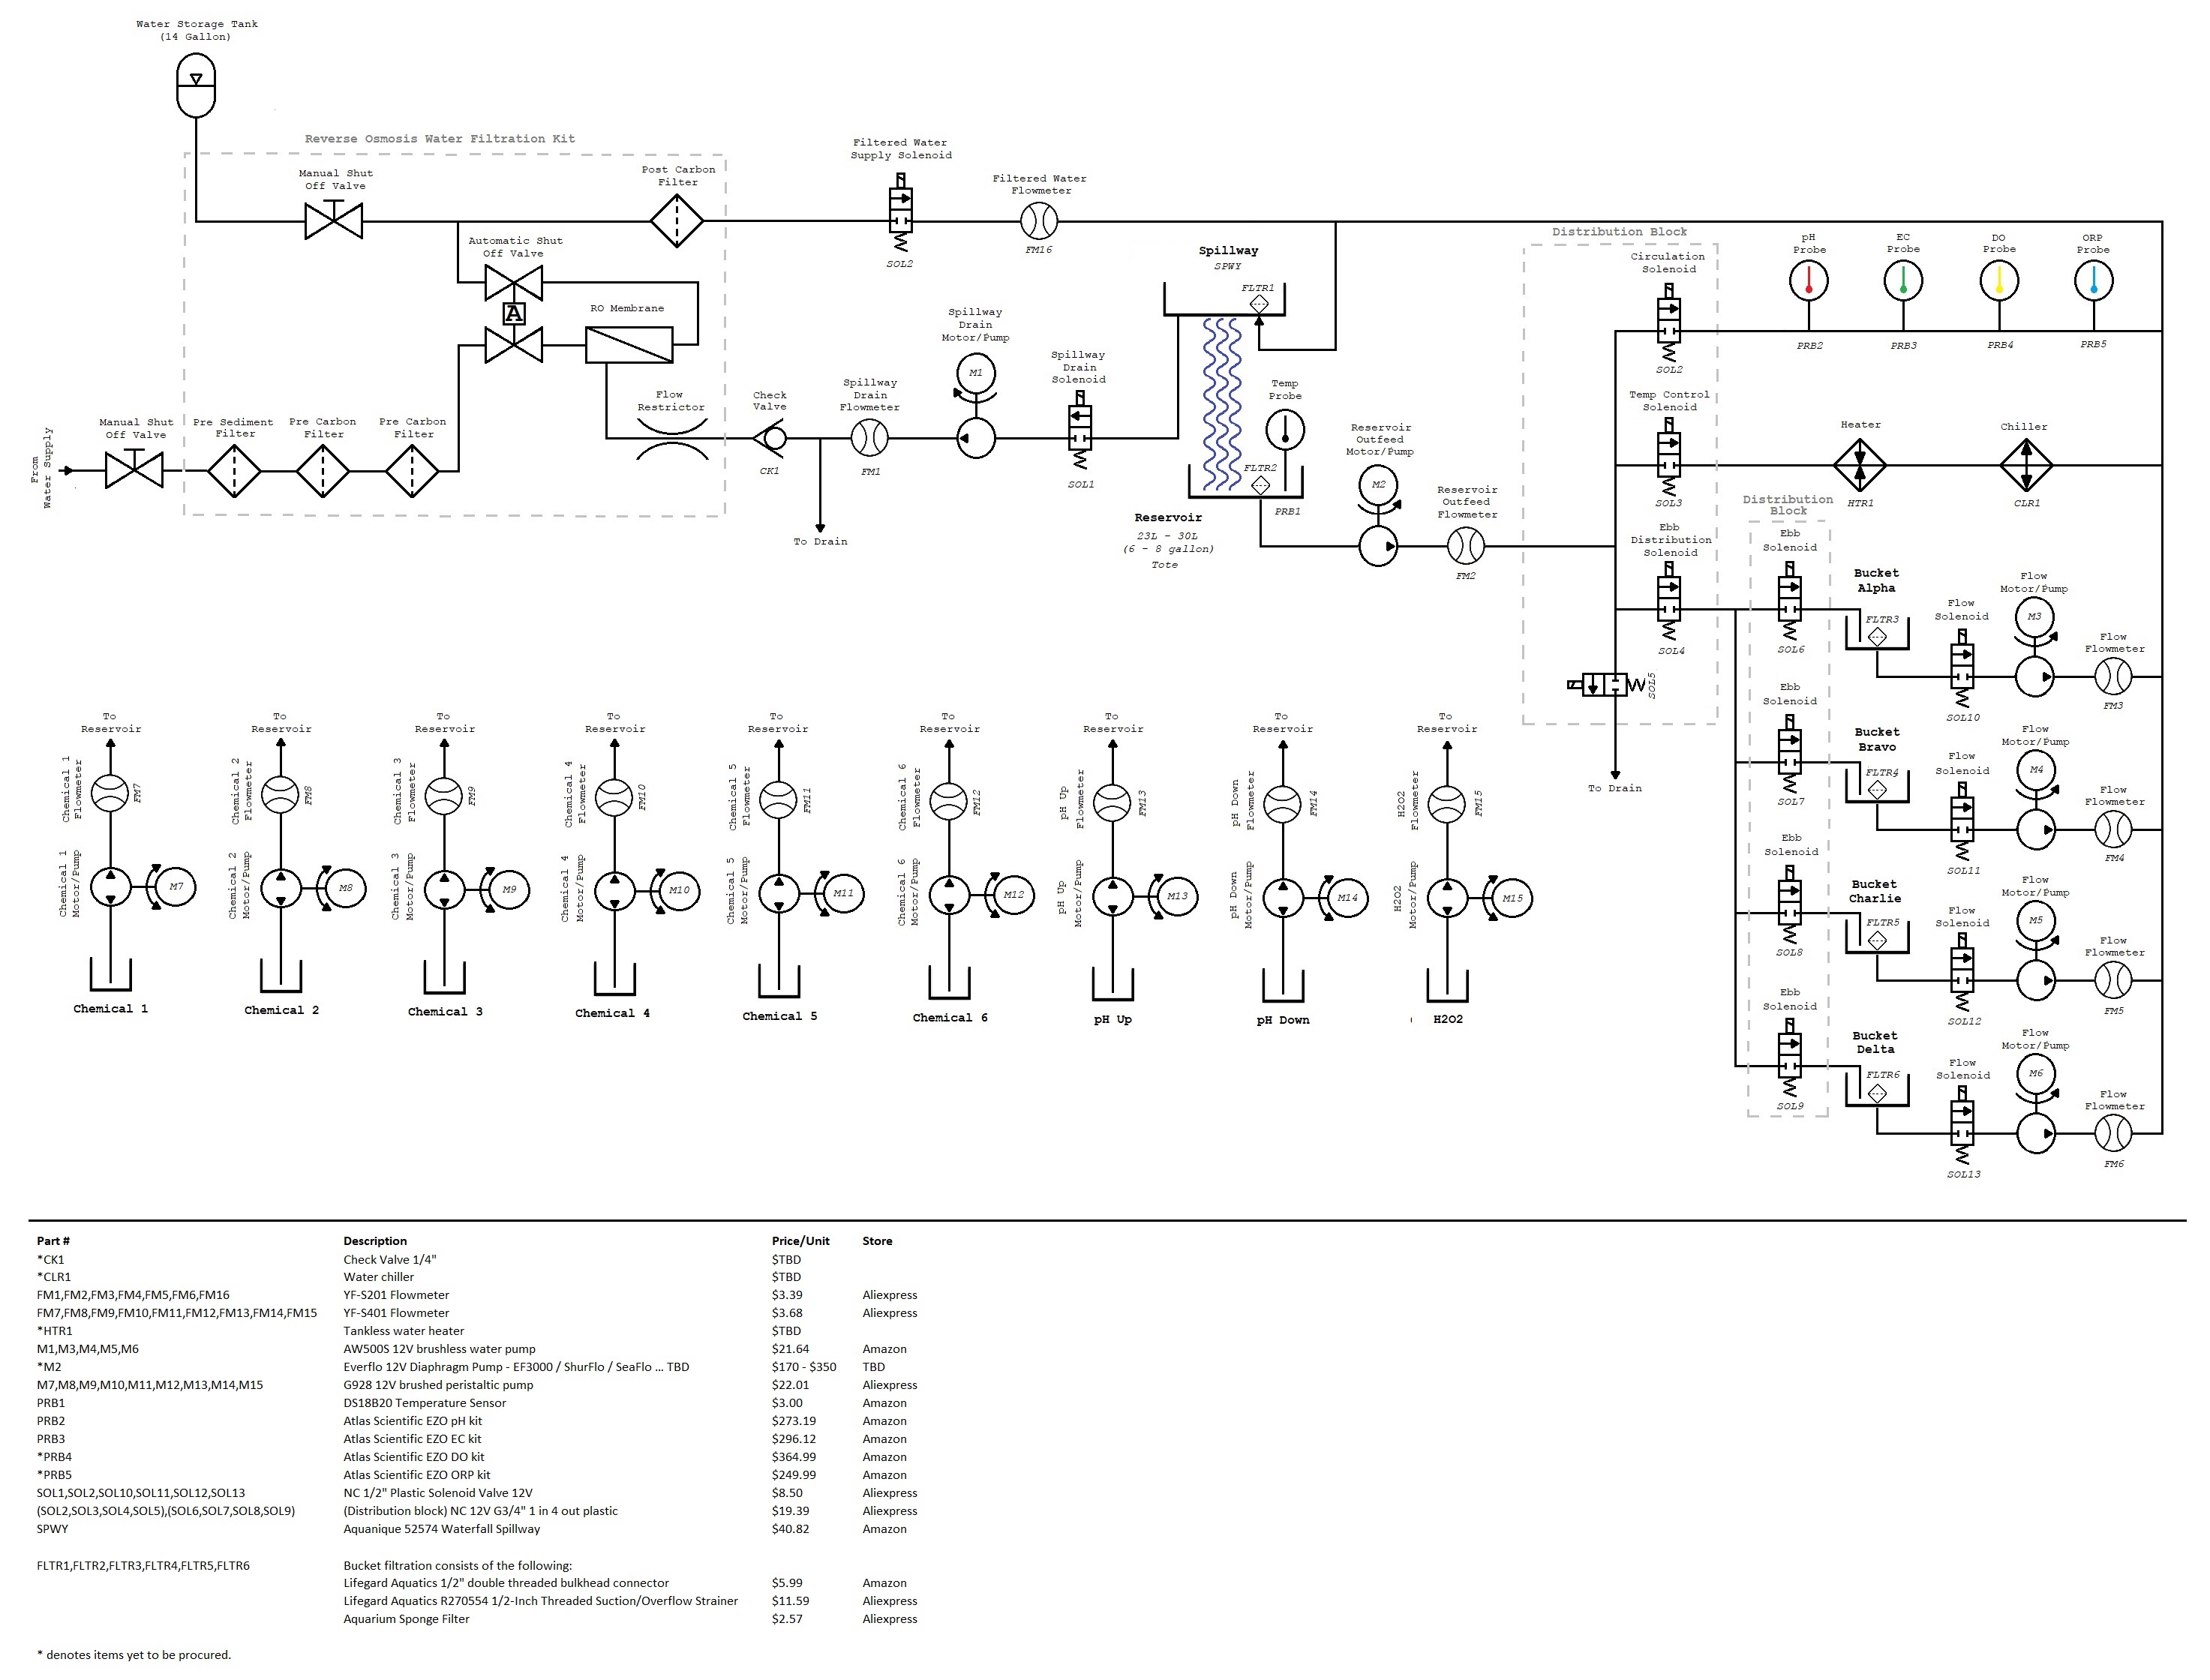
  • To integrate automatic pH and EC measurements using Atlas Scientific sensors, with the potential for expansion to include dissolved oxygen (DO) and oxidation-reduction potential (ORP) readings.

Technical Aspects:

The YARG project encompasses several technical components:

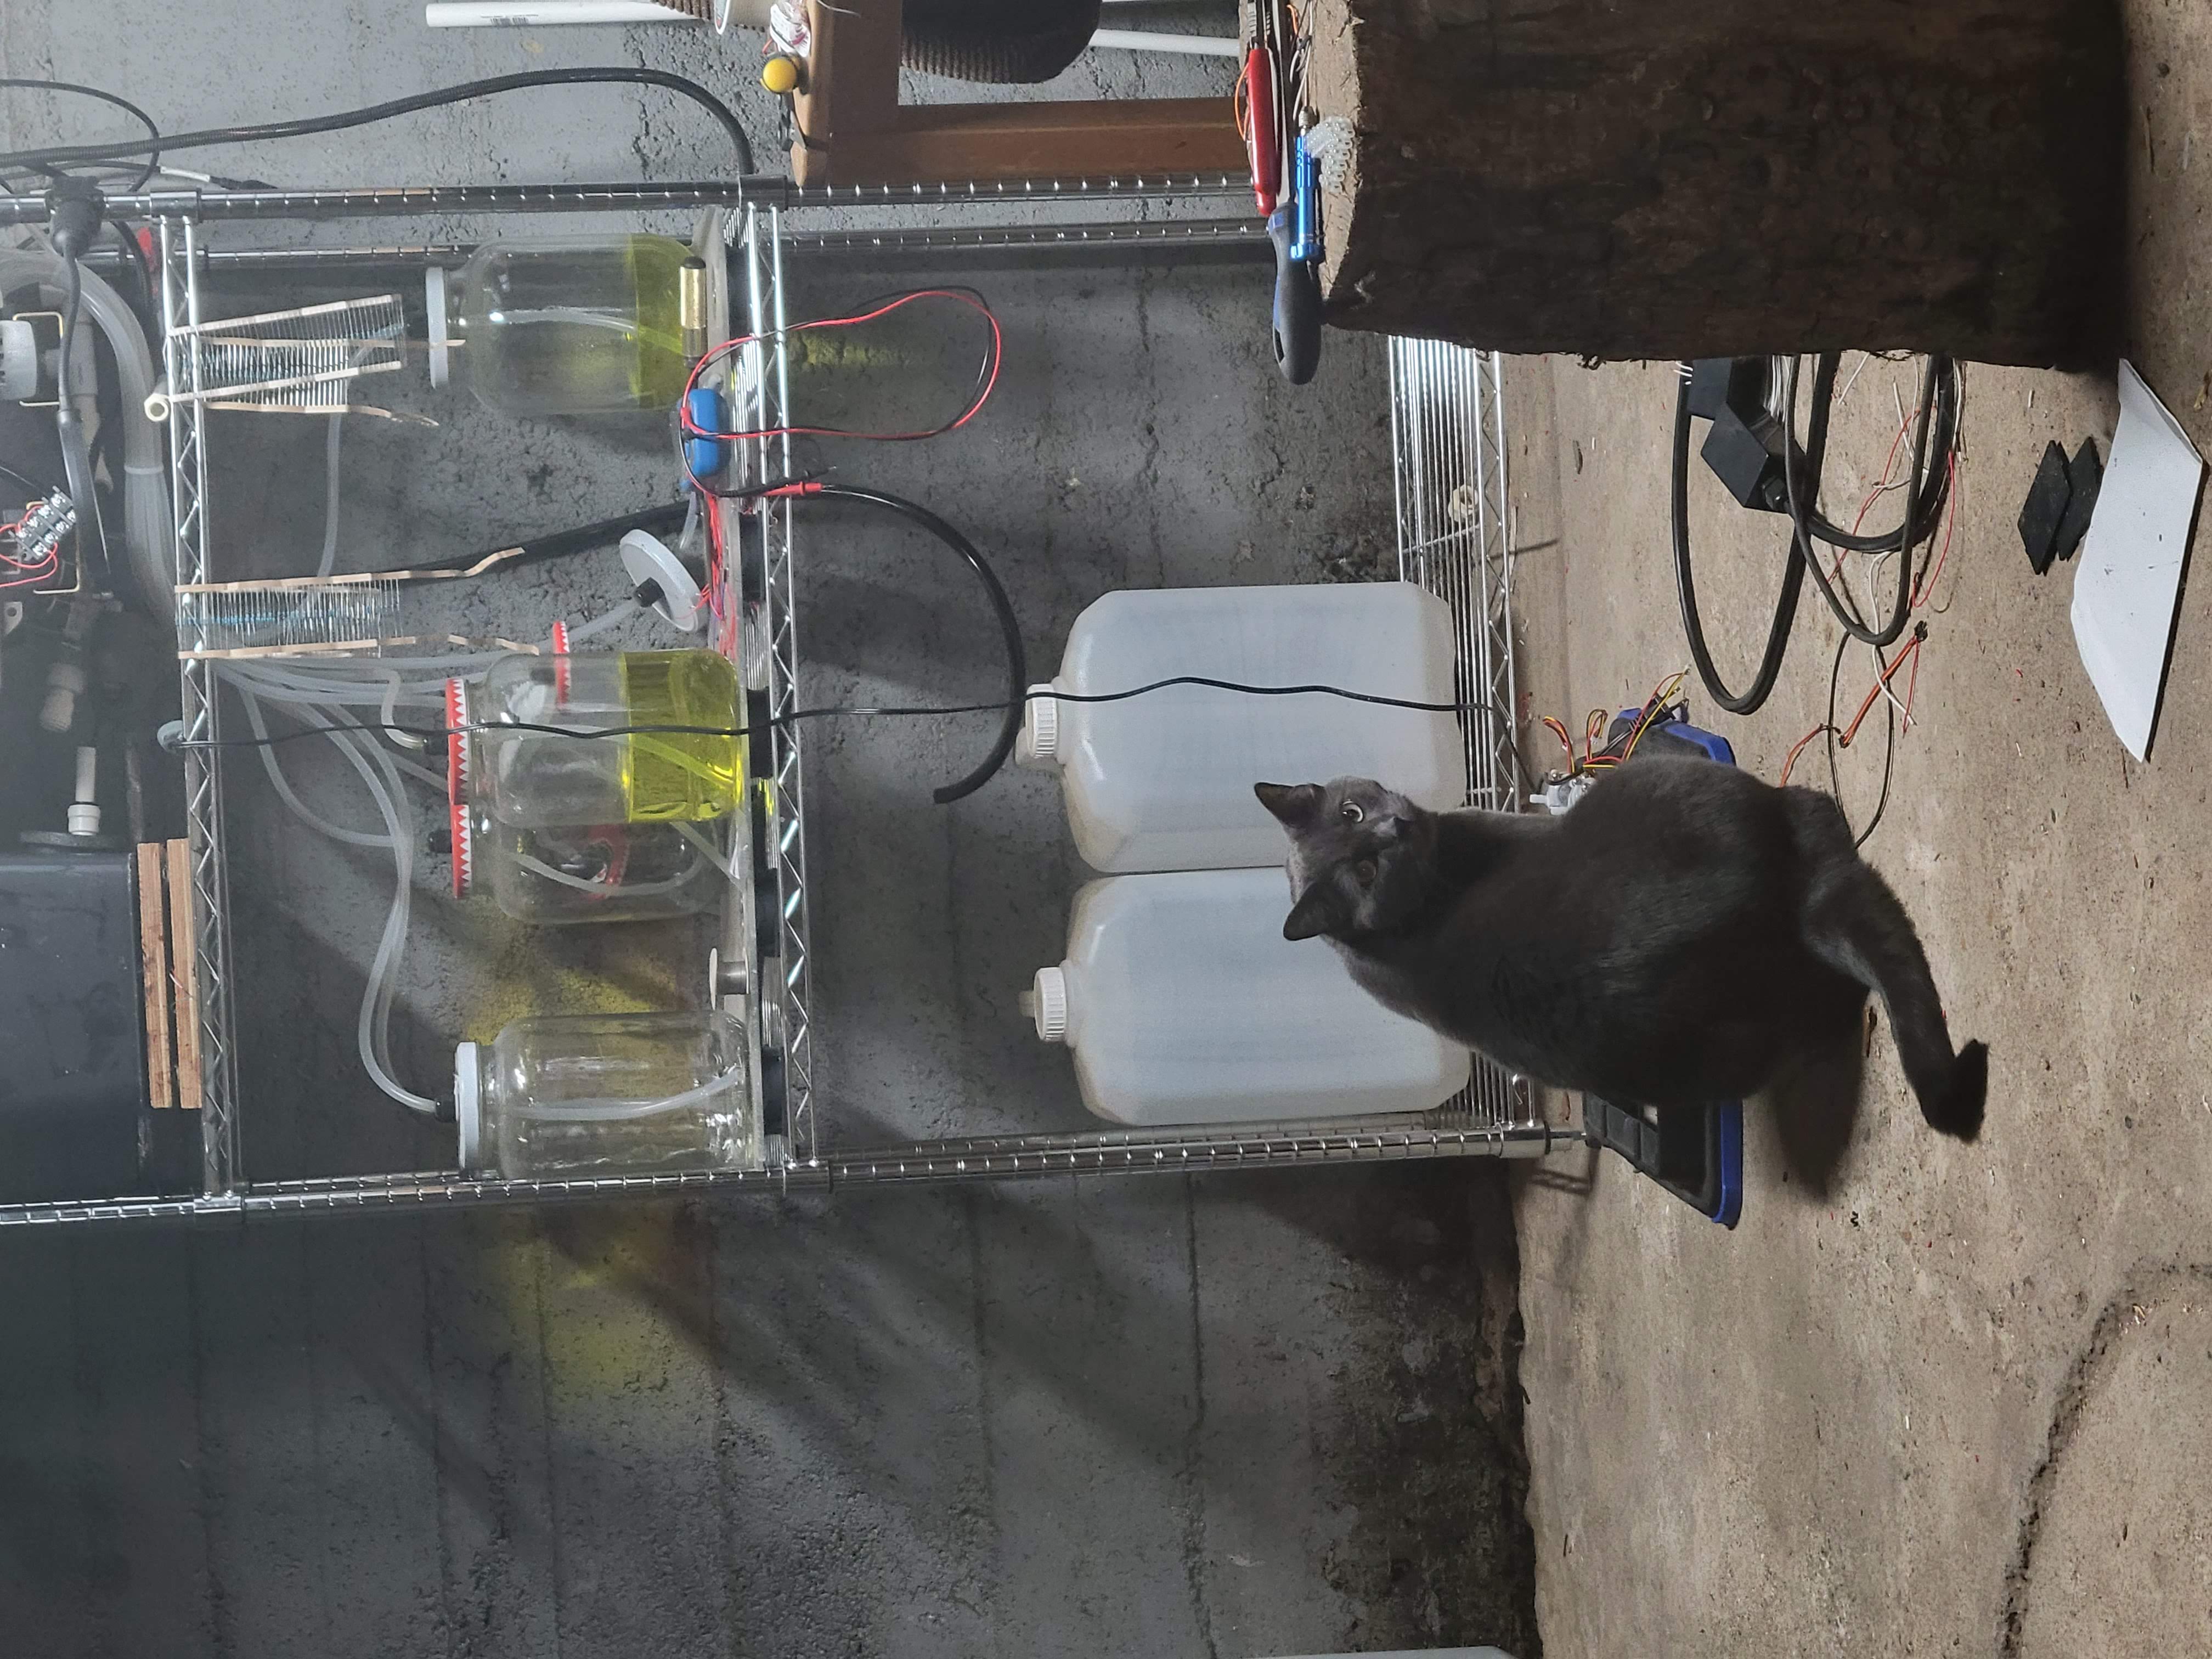
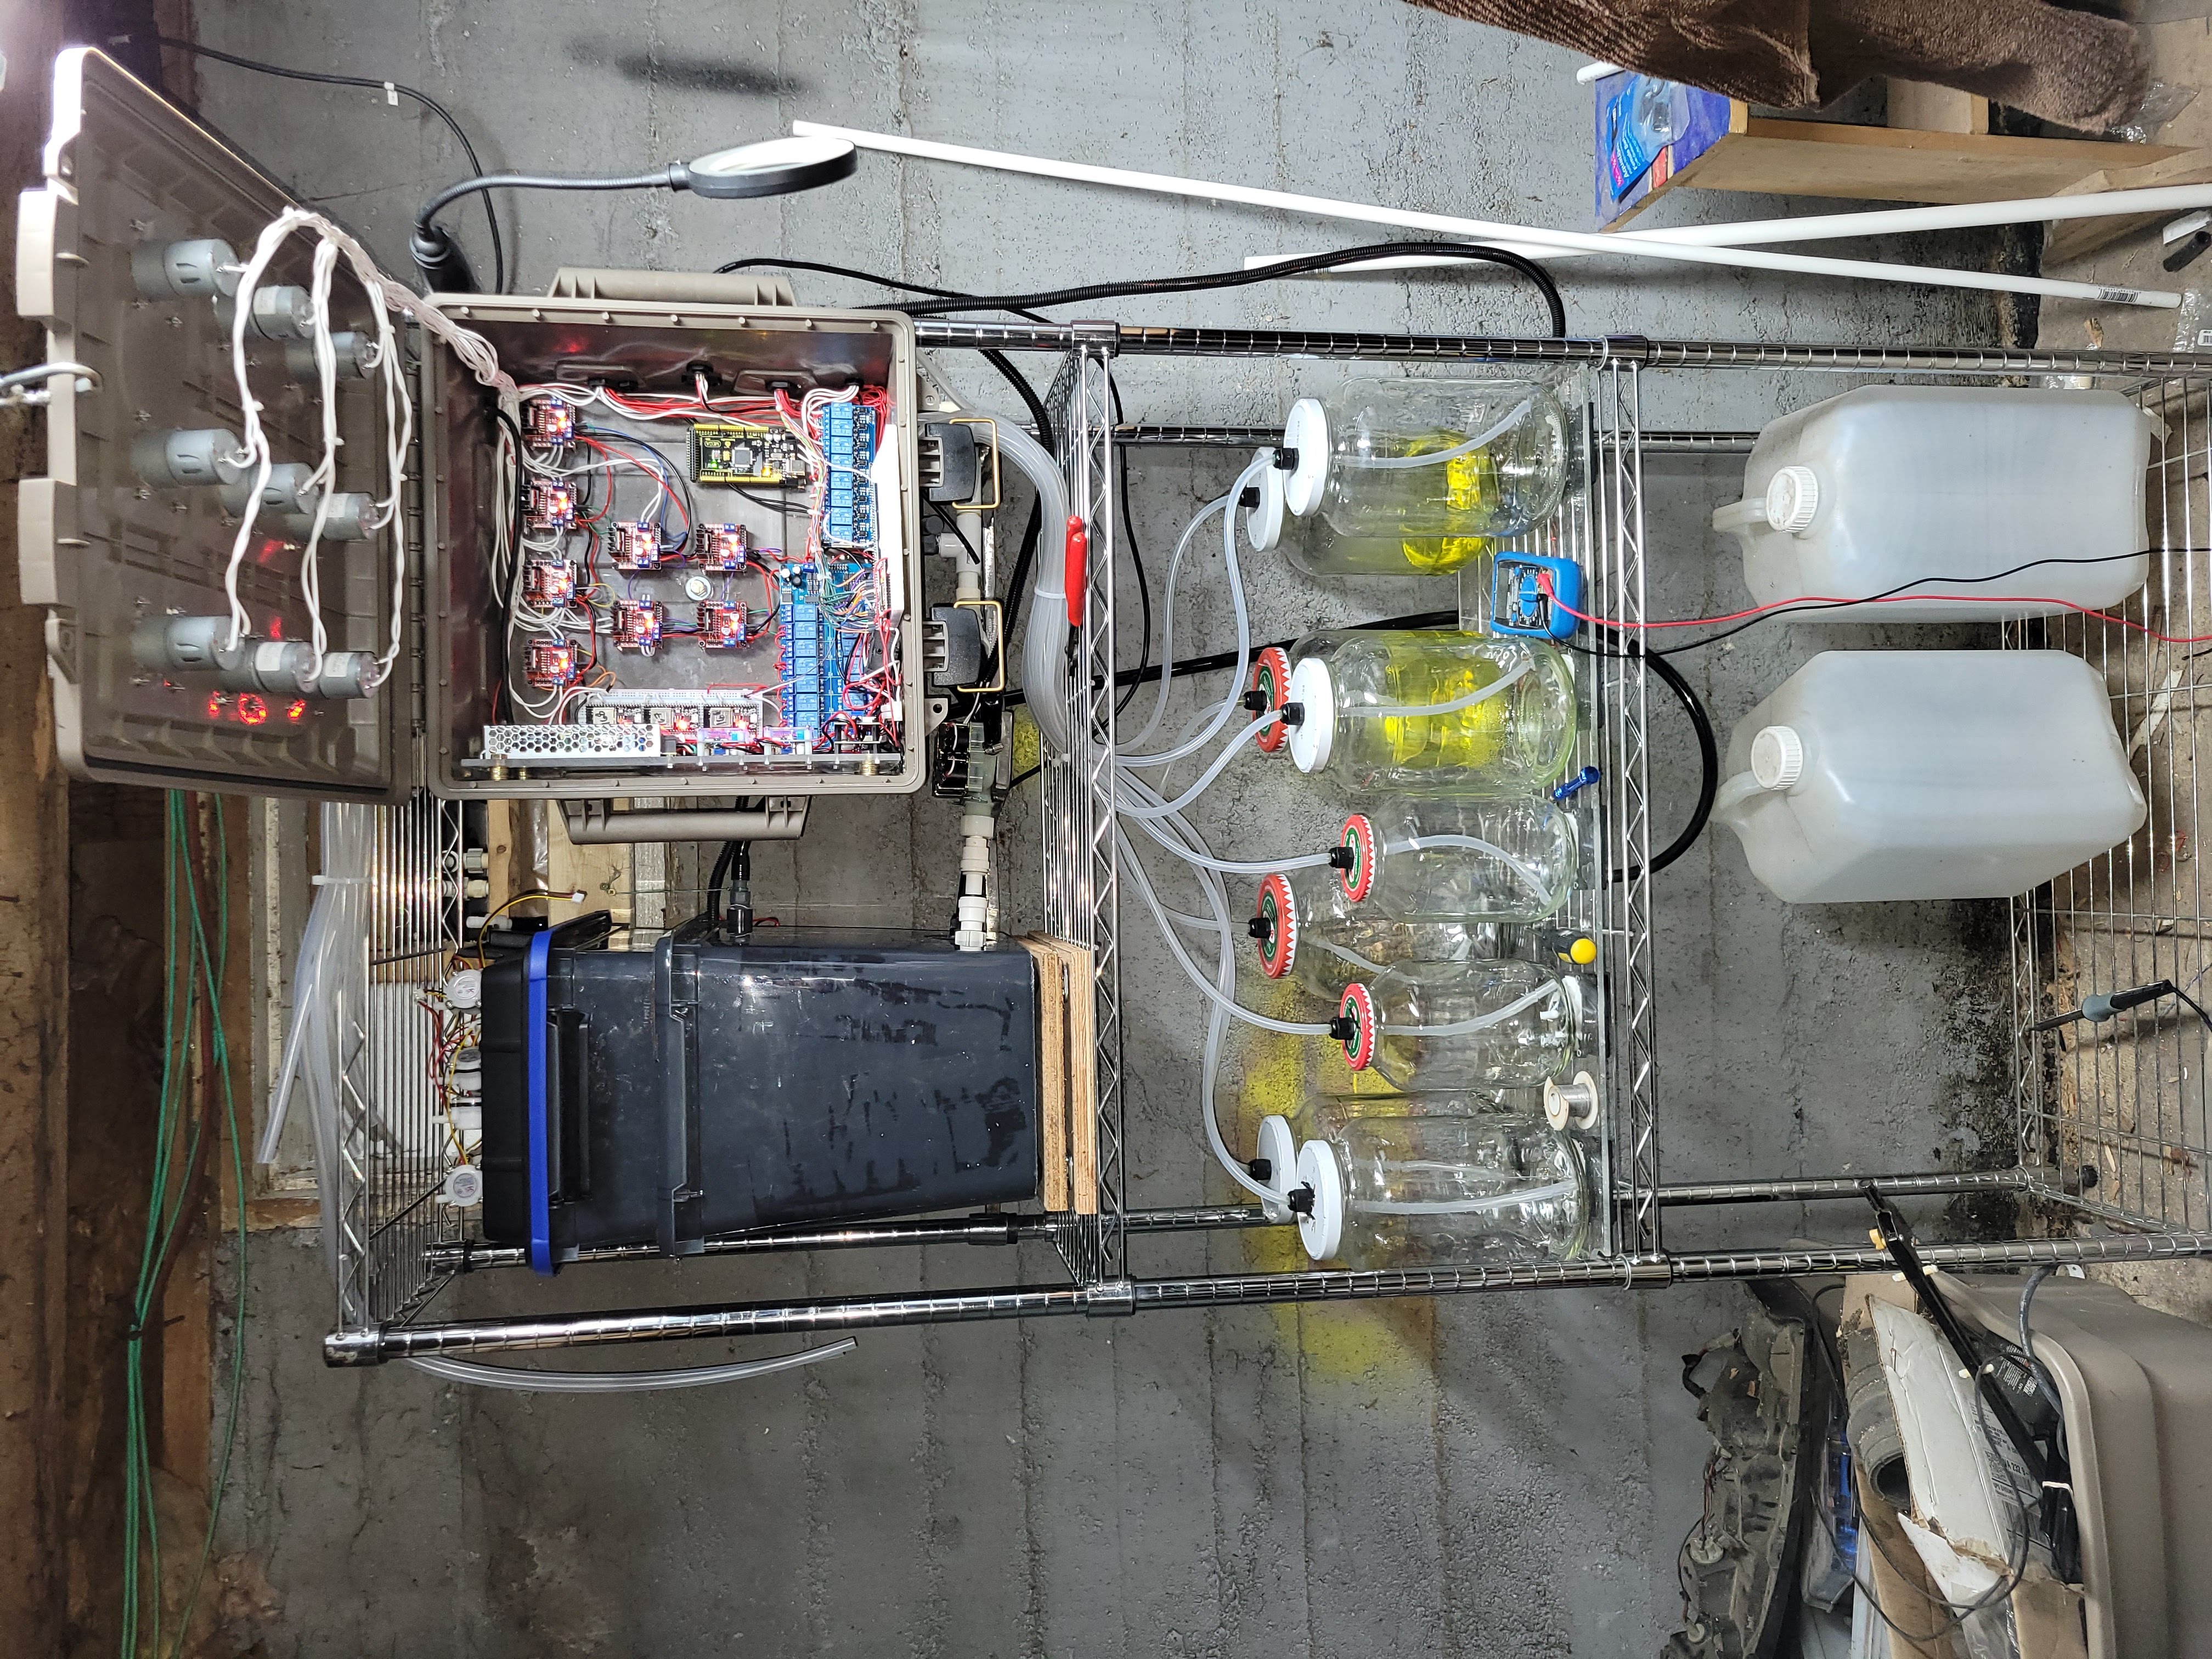
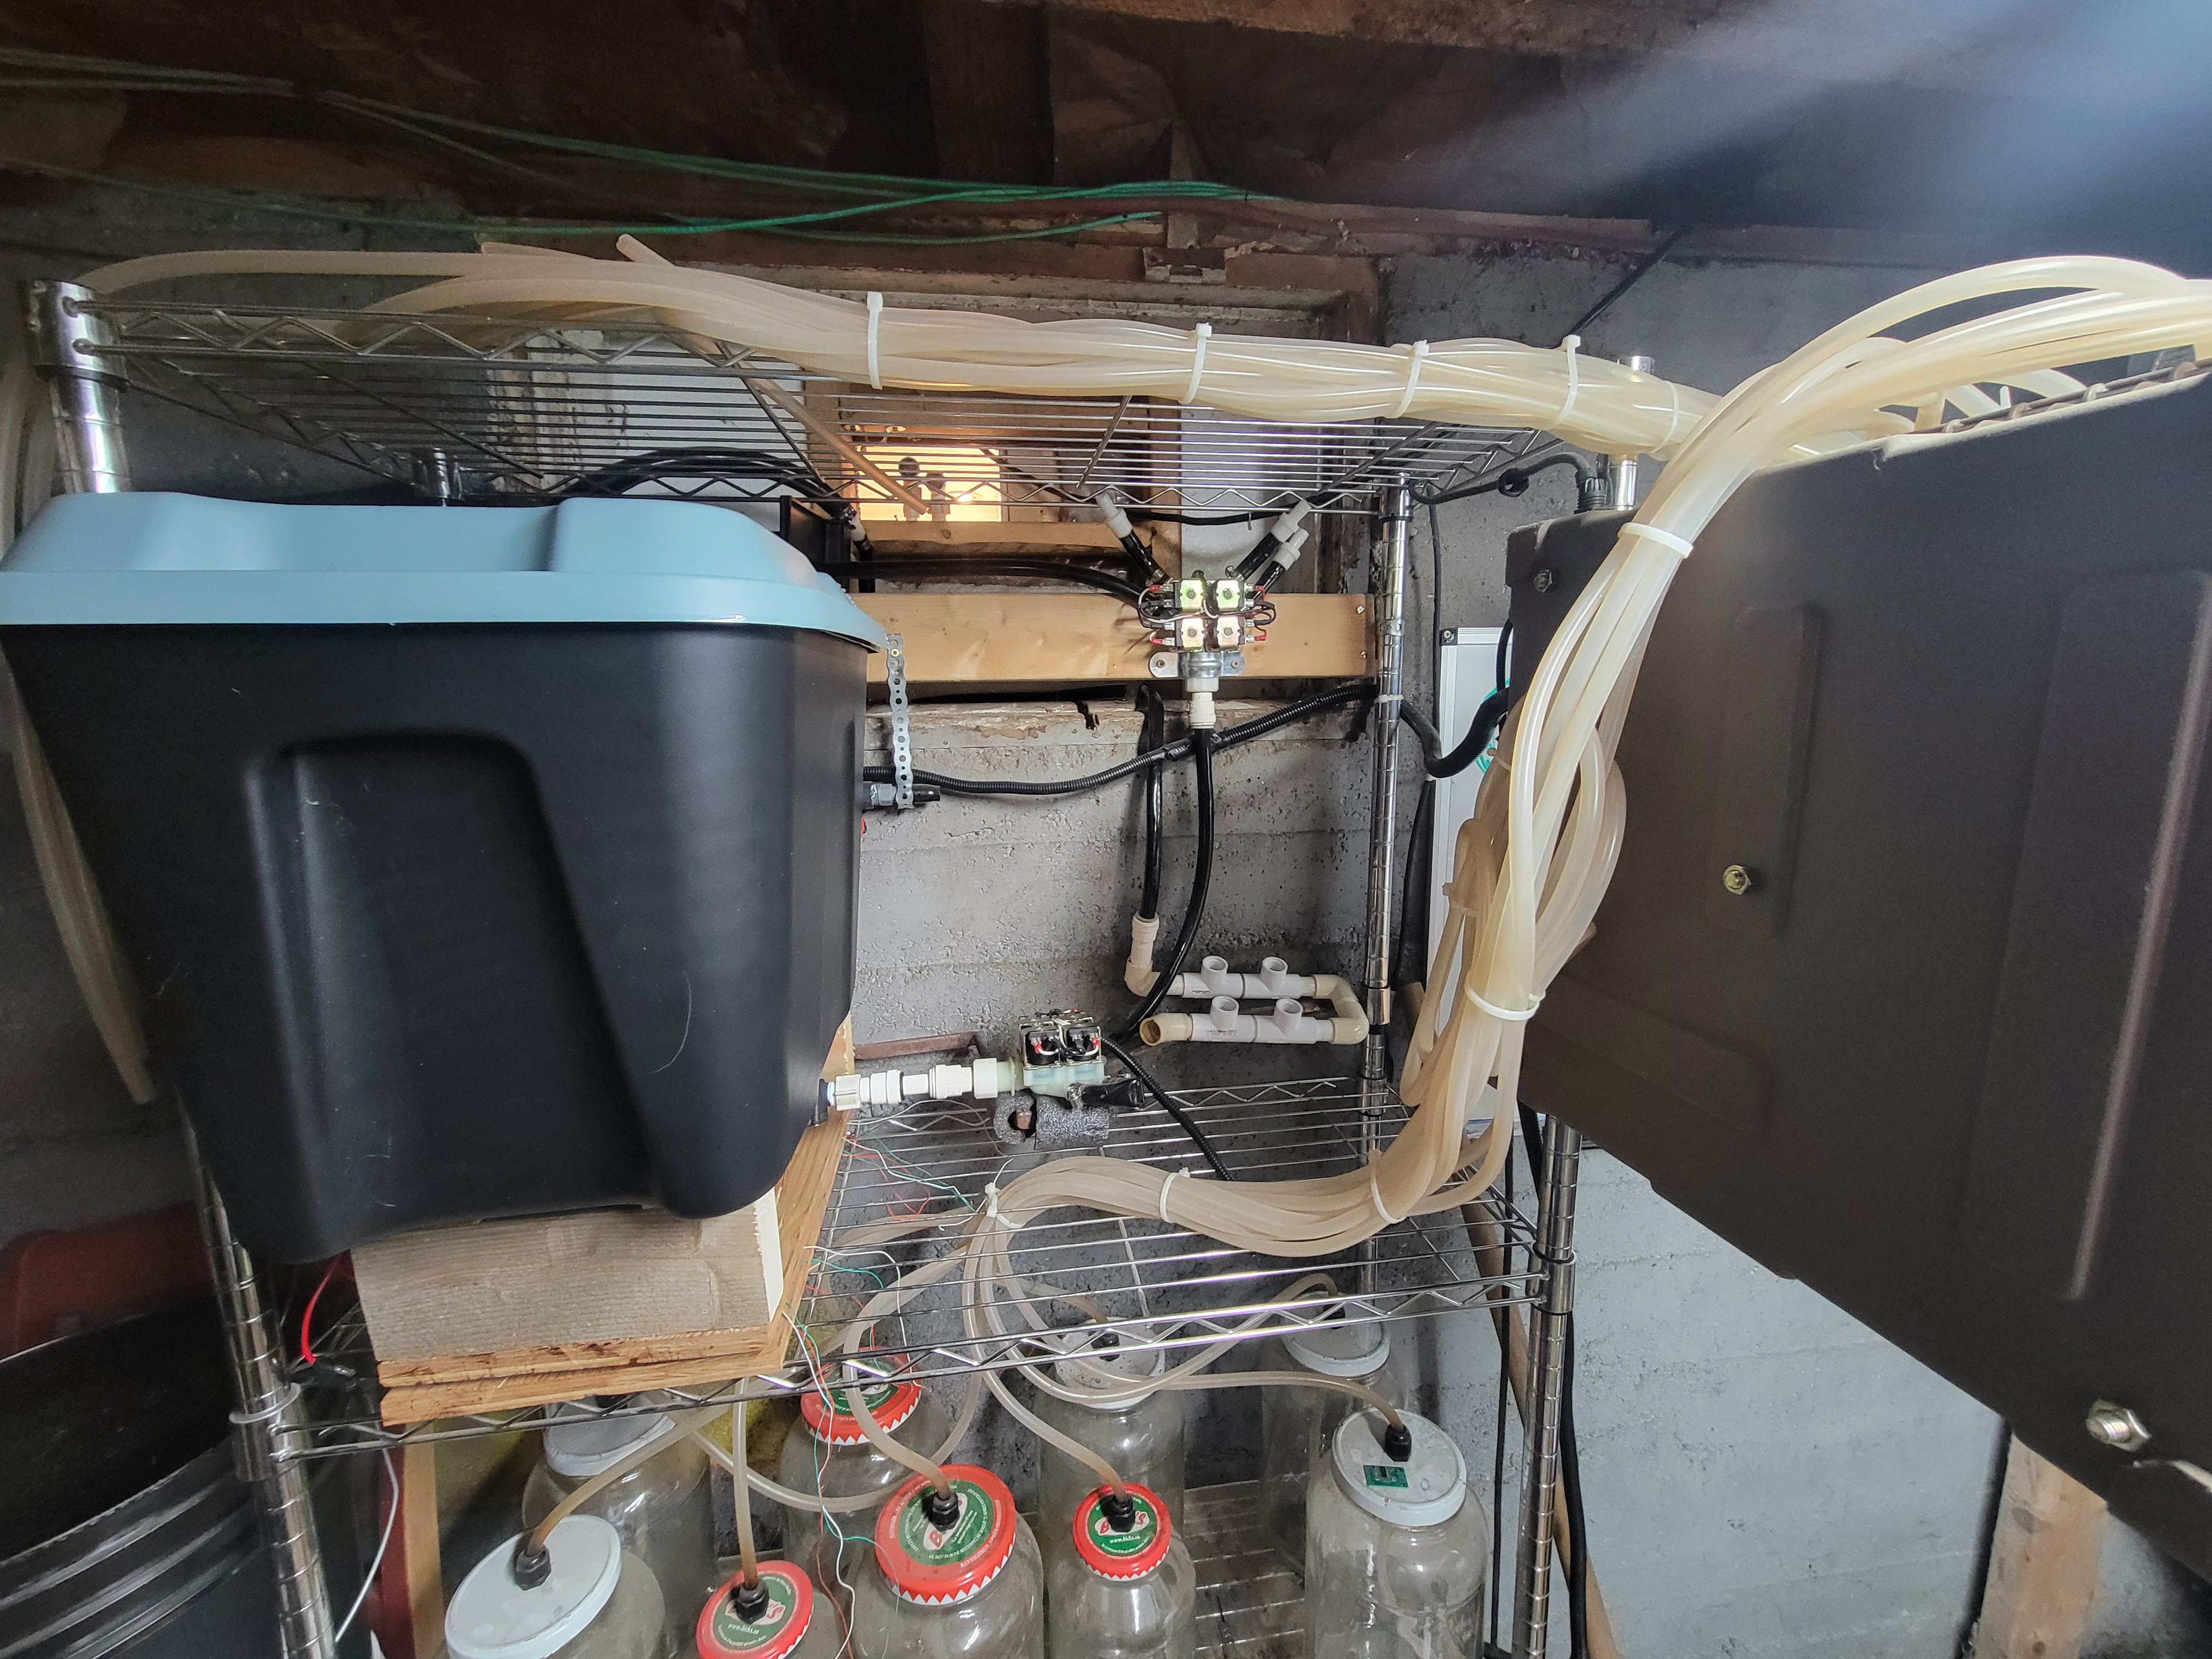
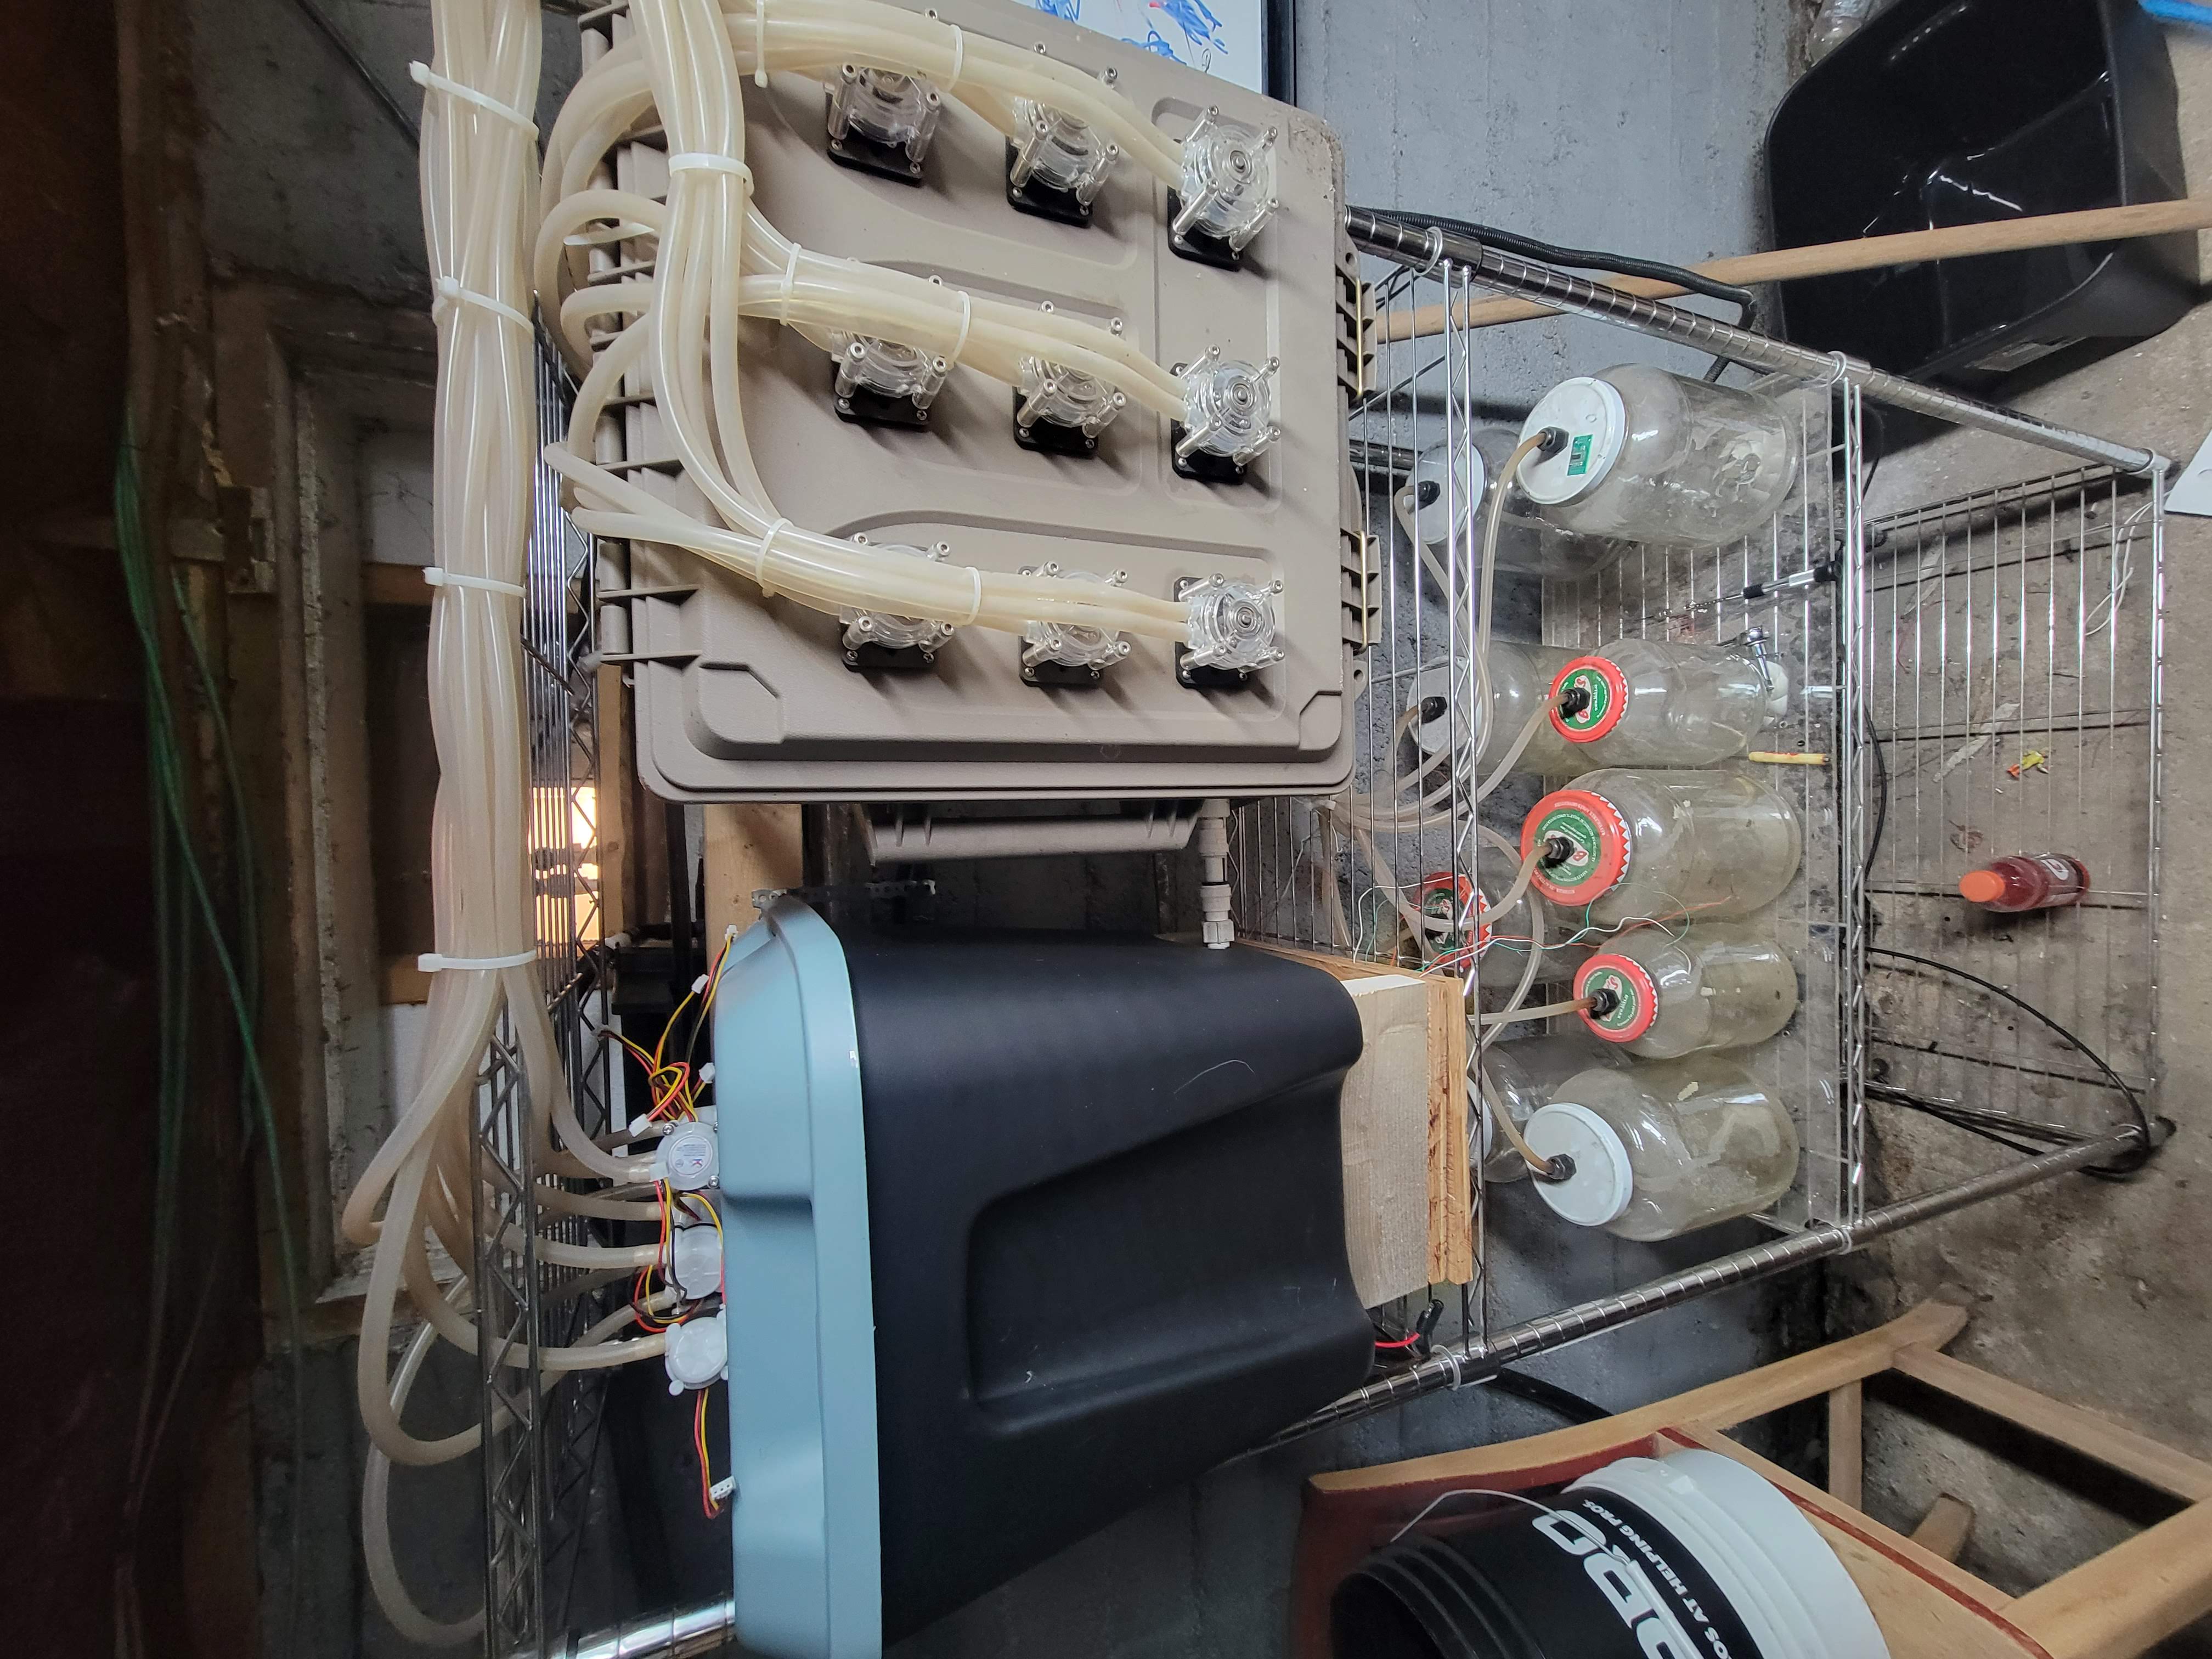
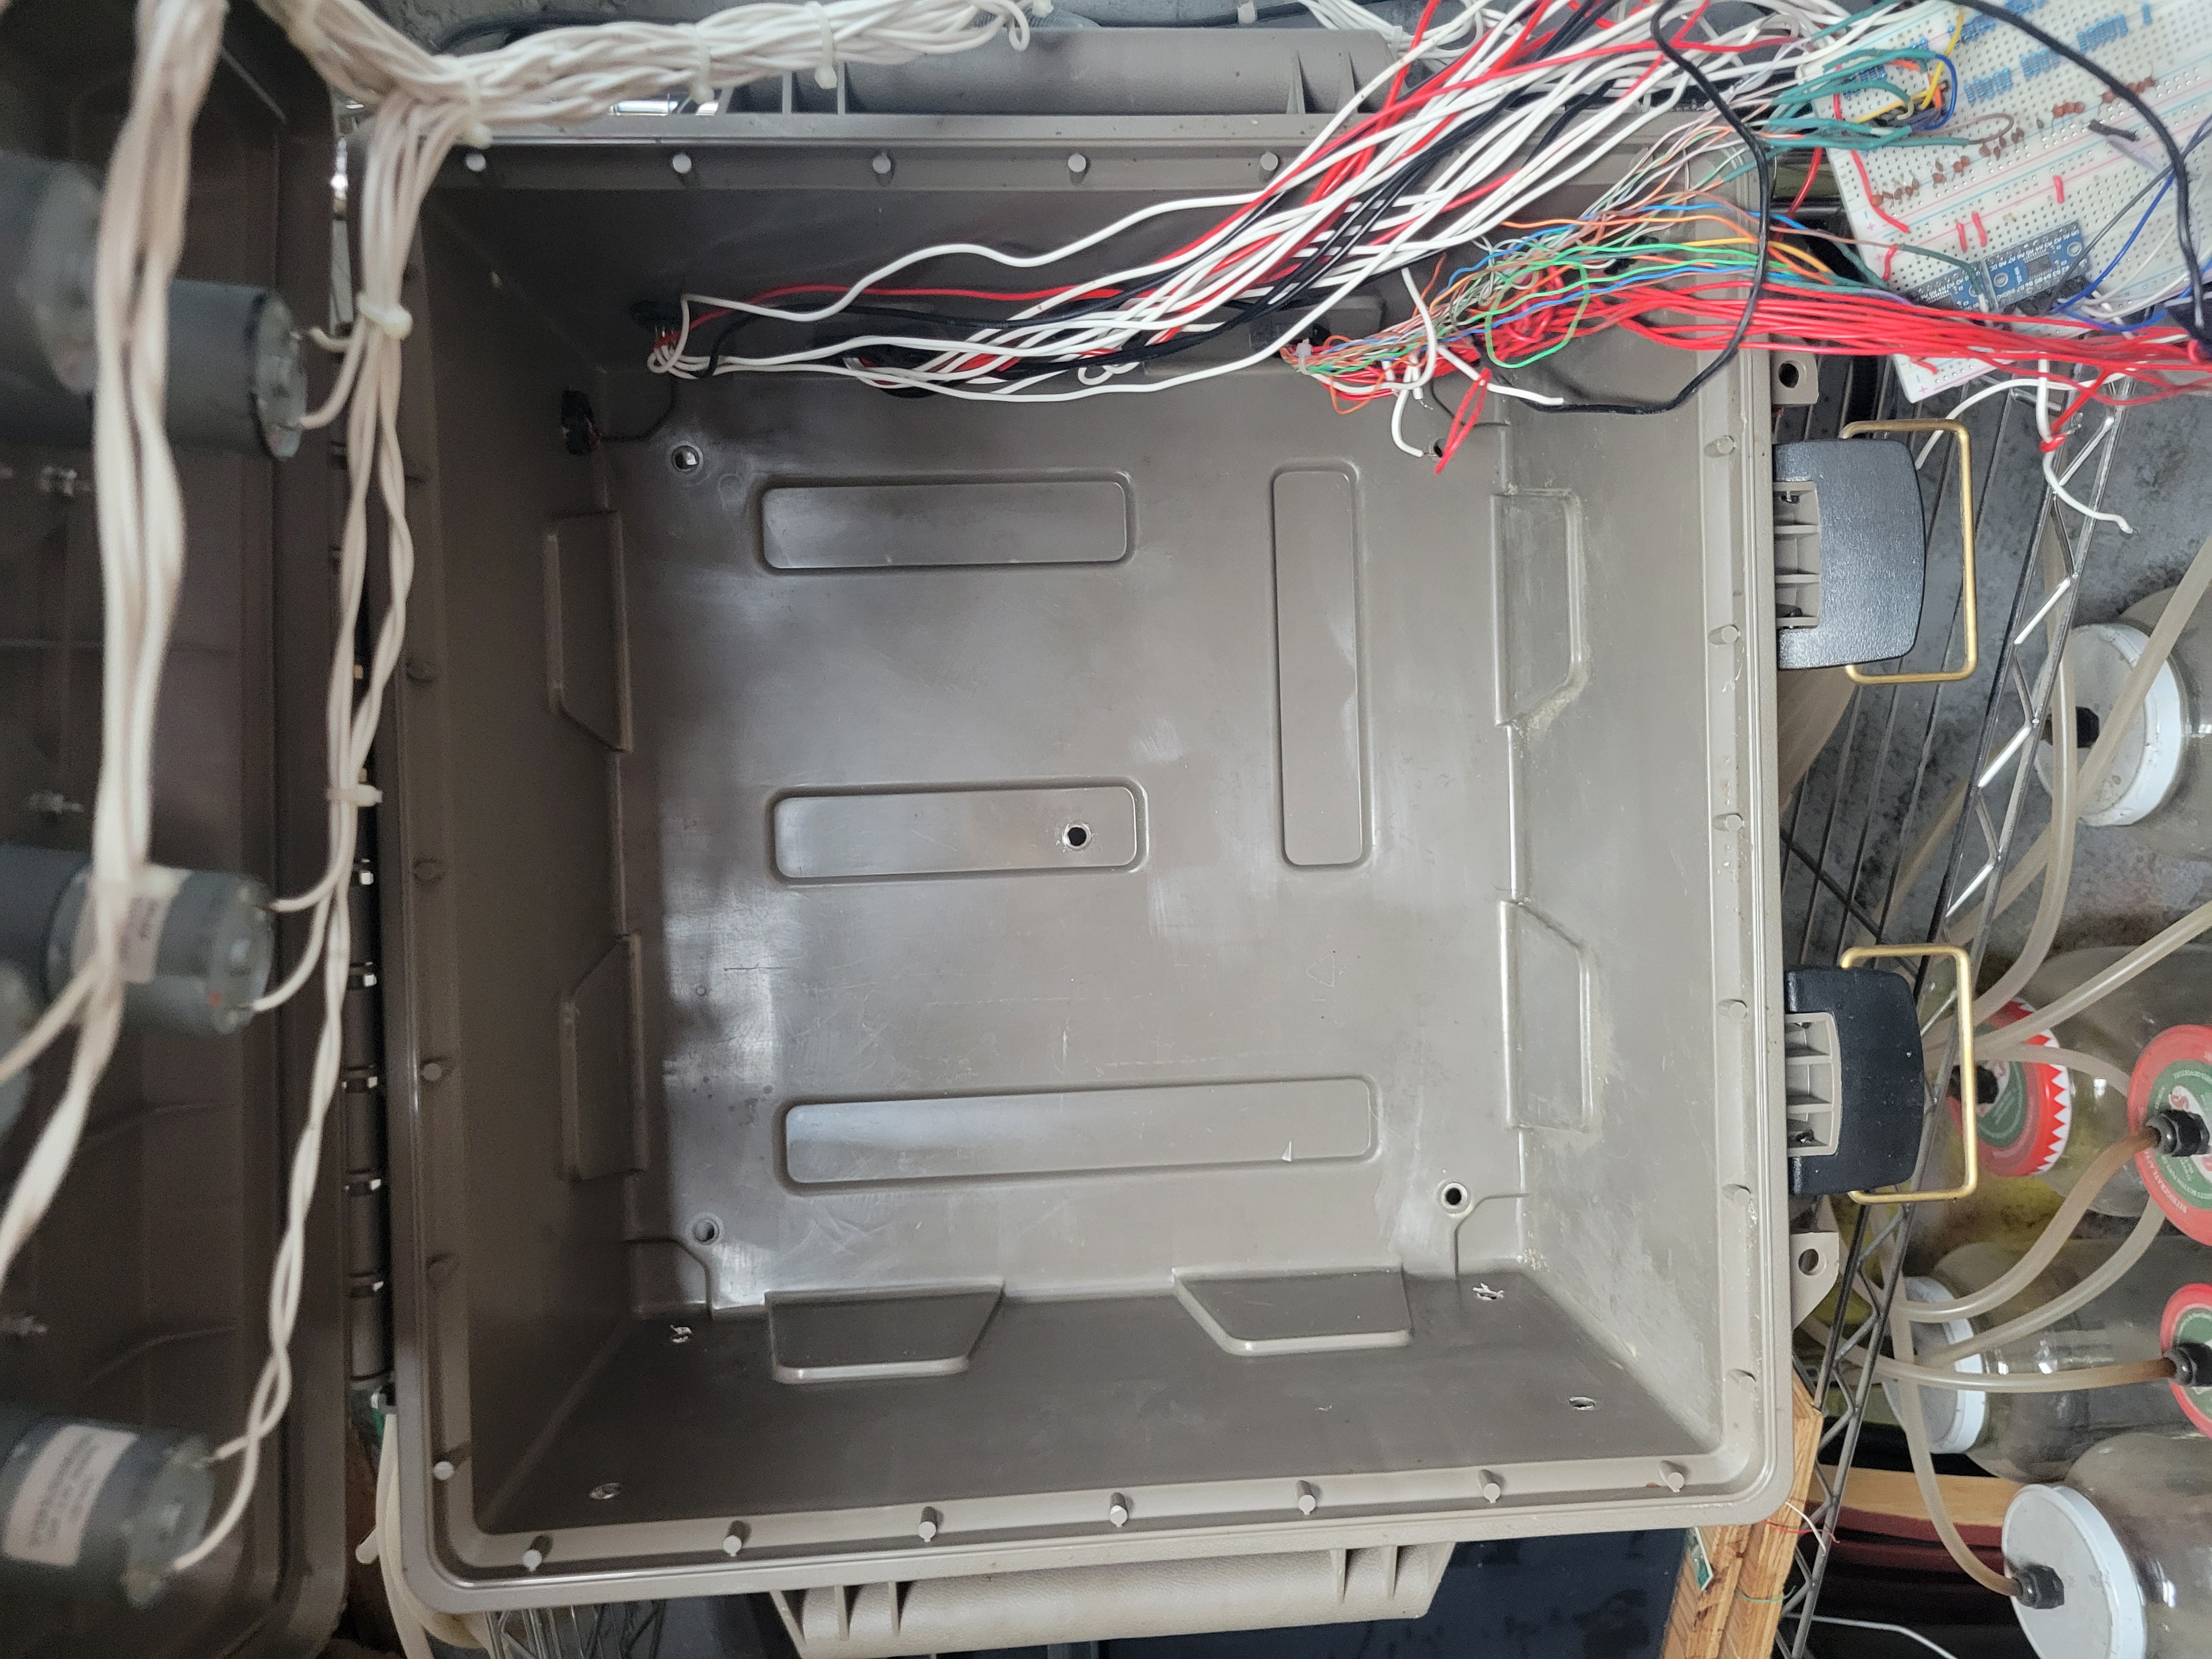
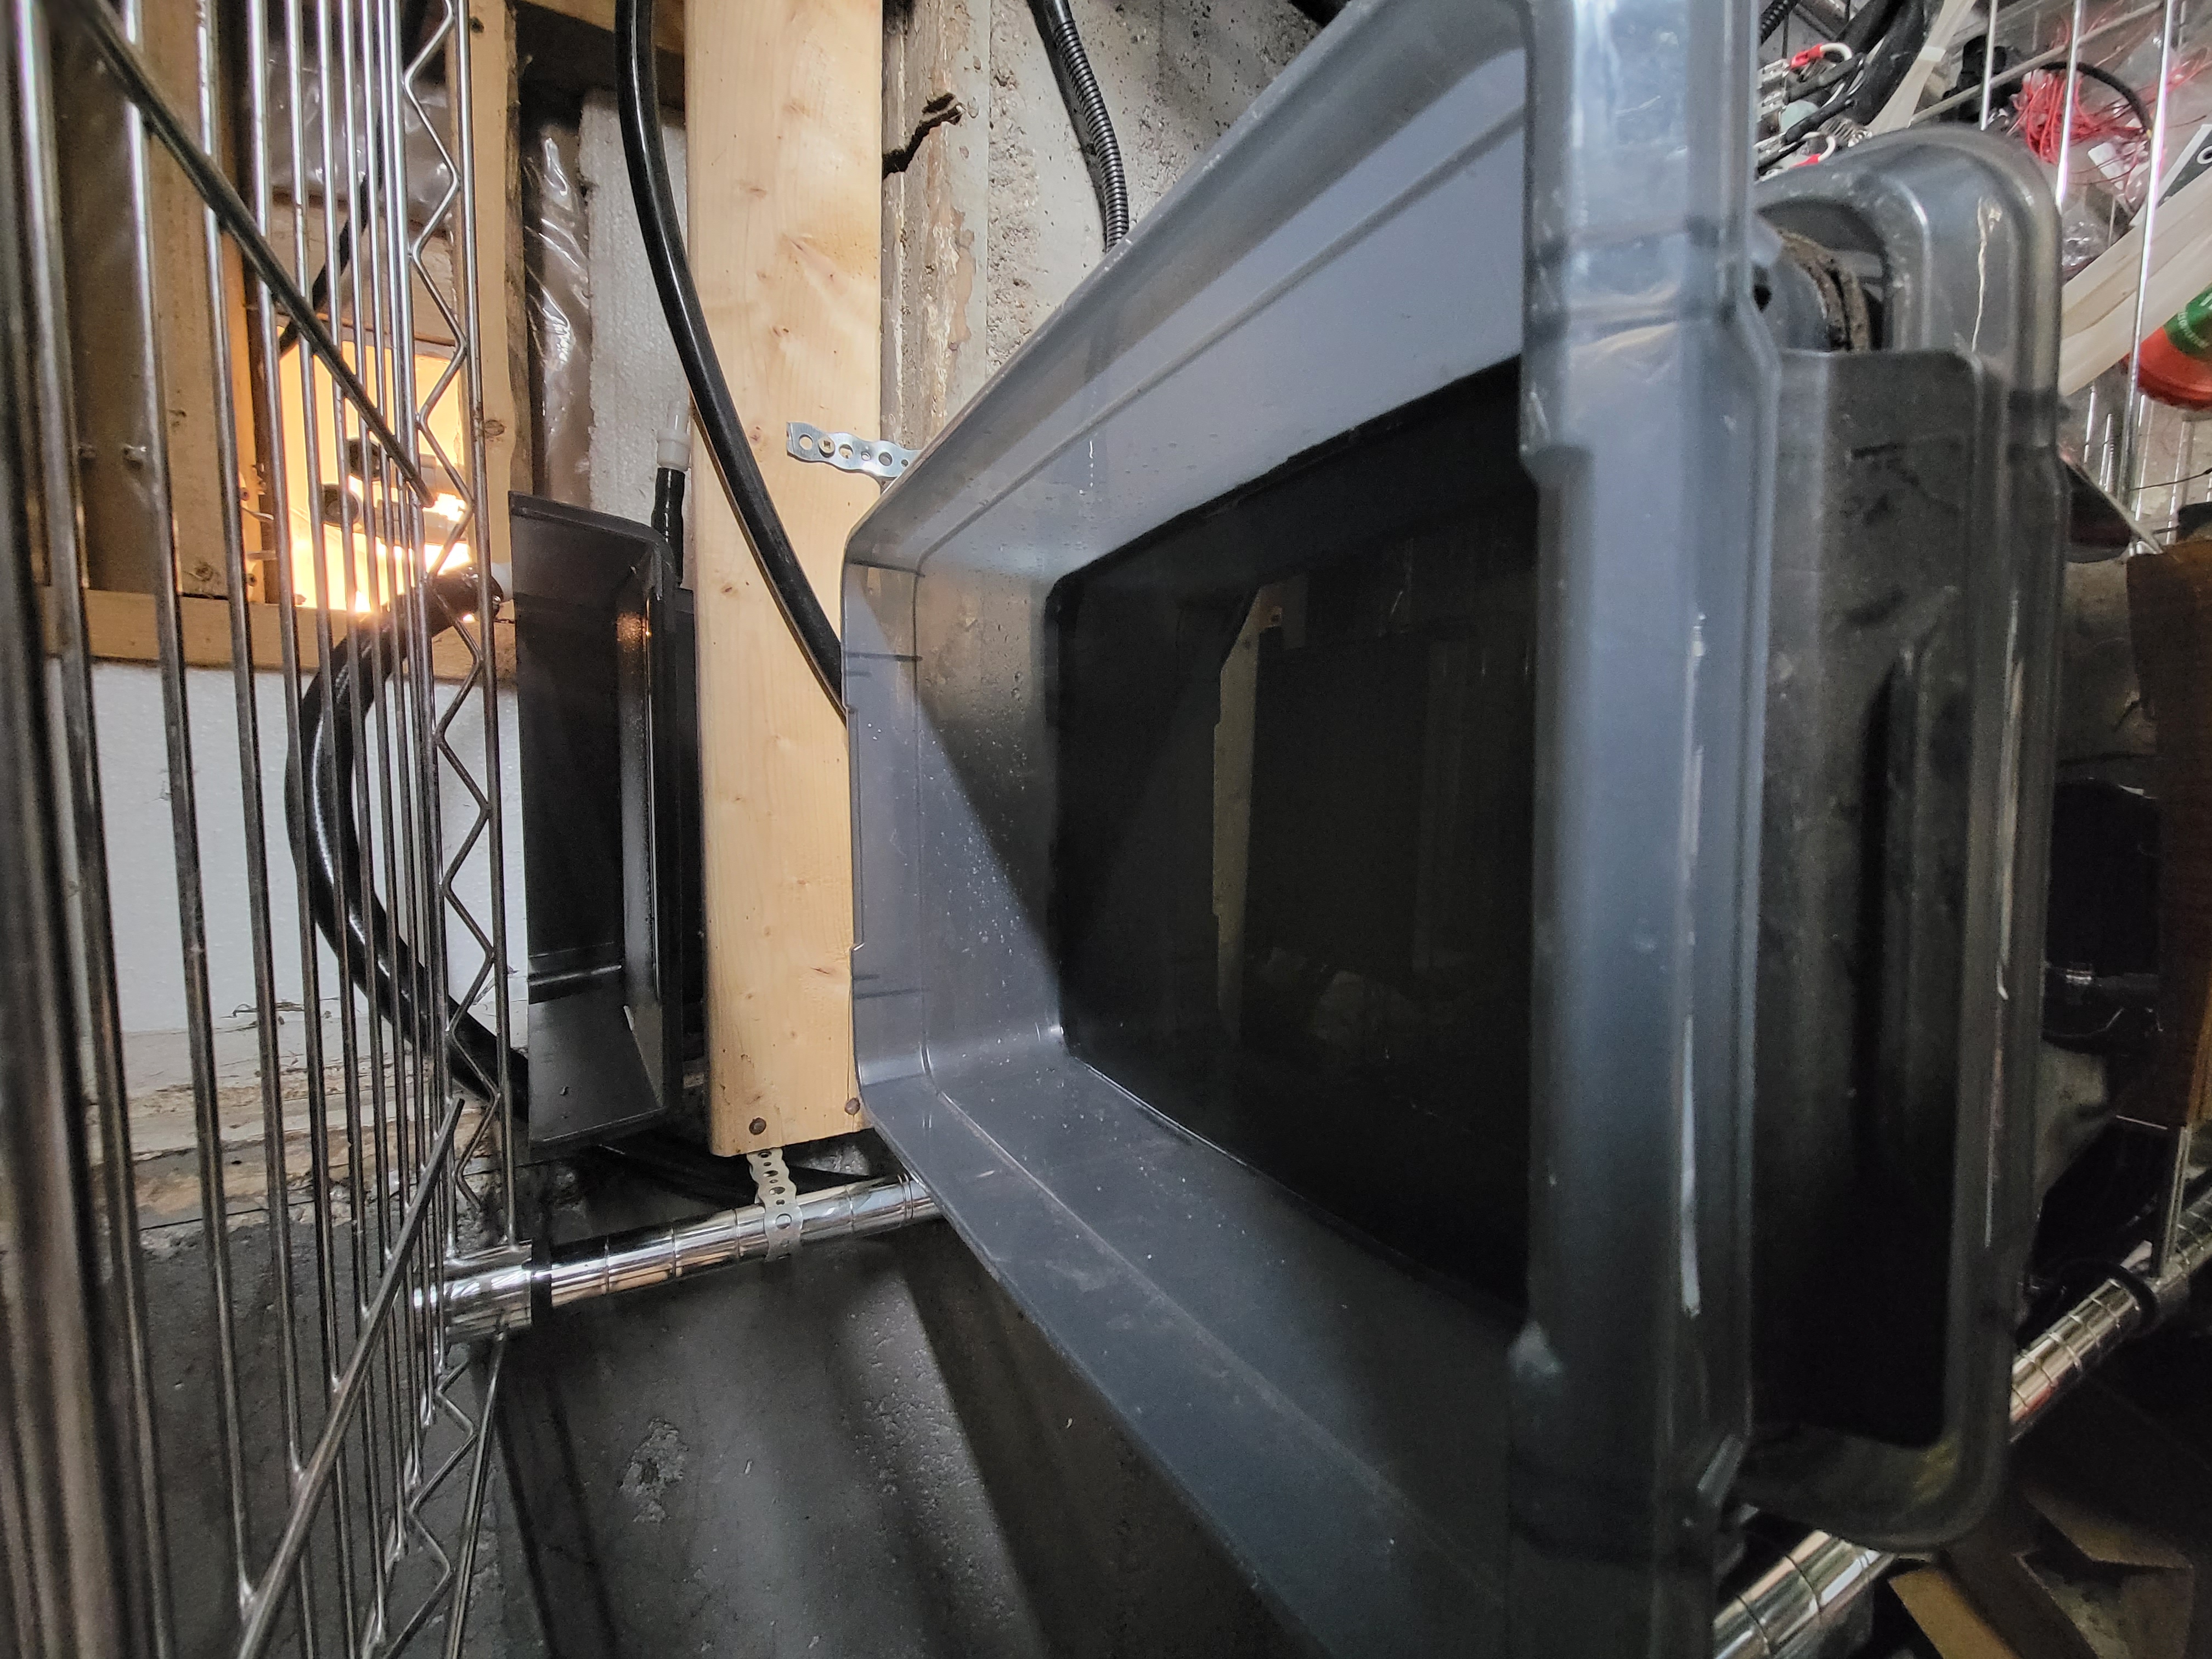
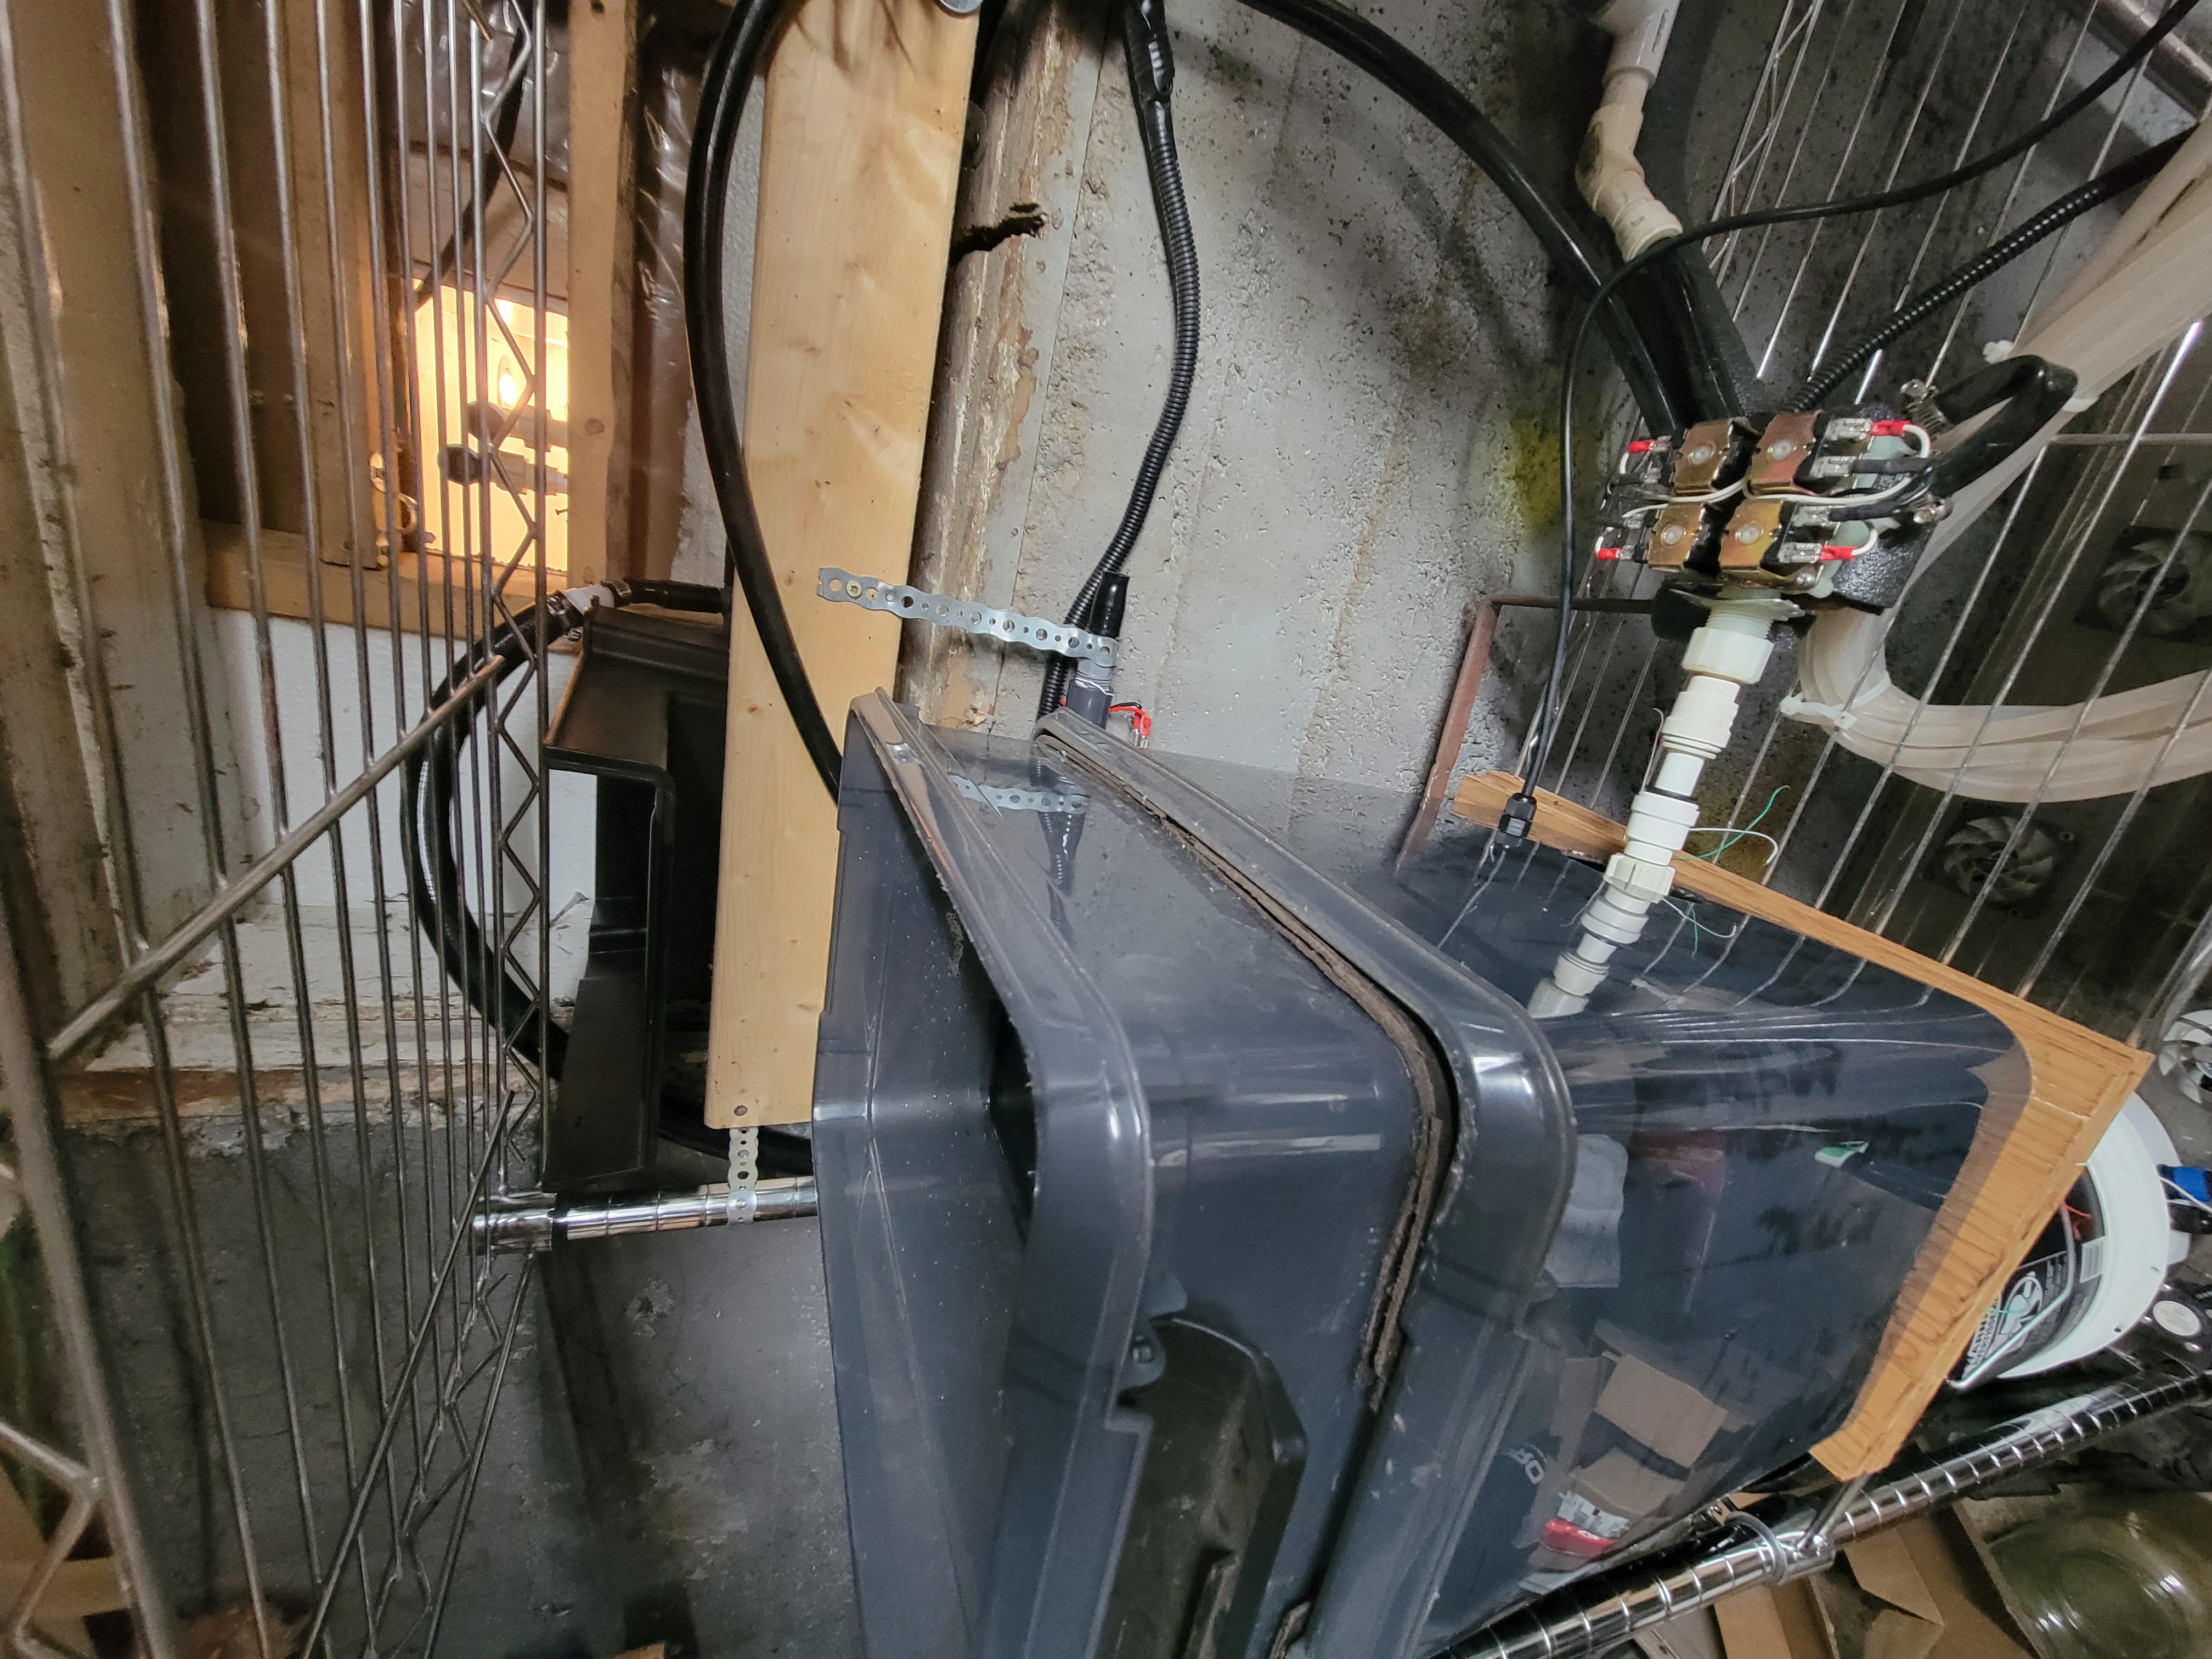
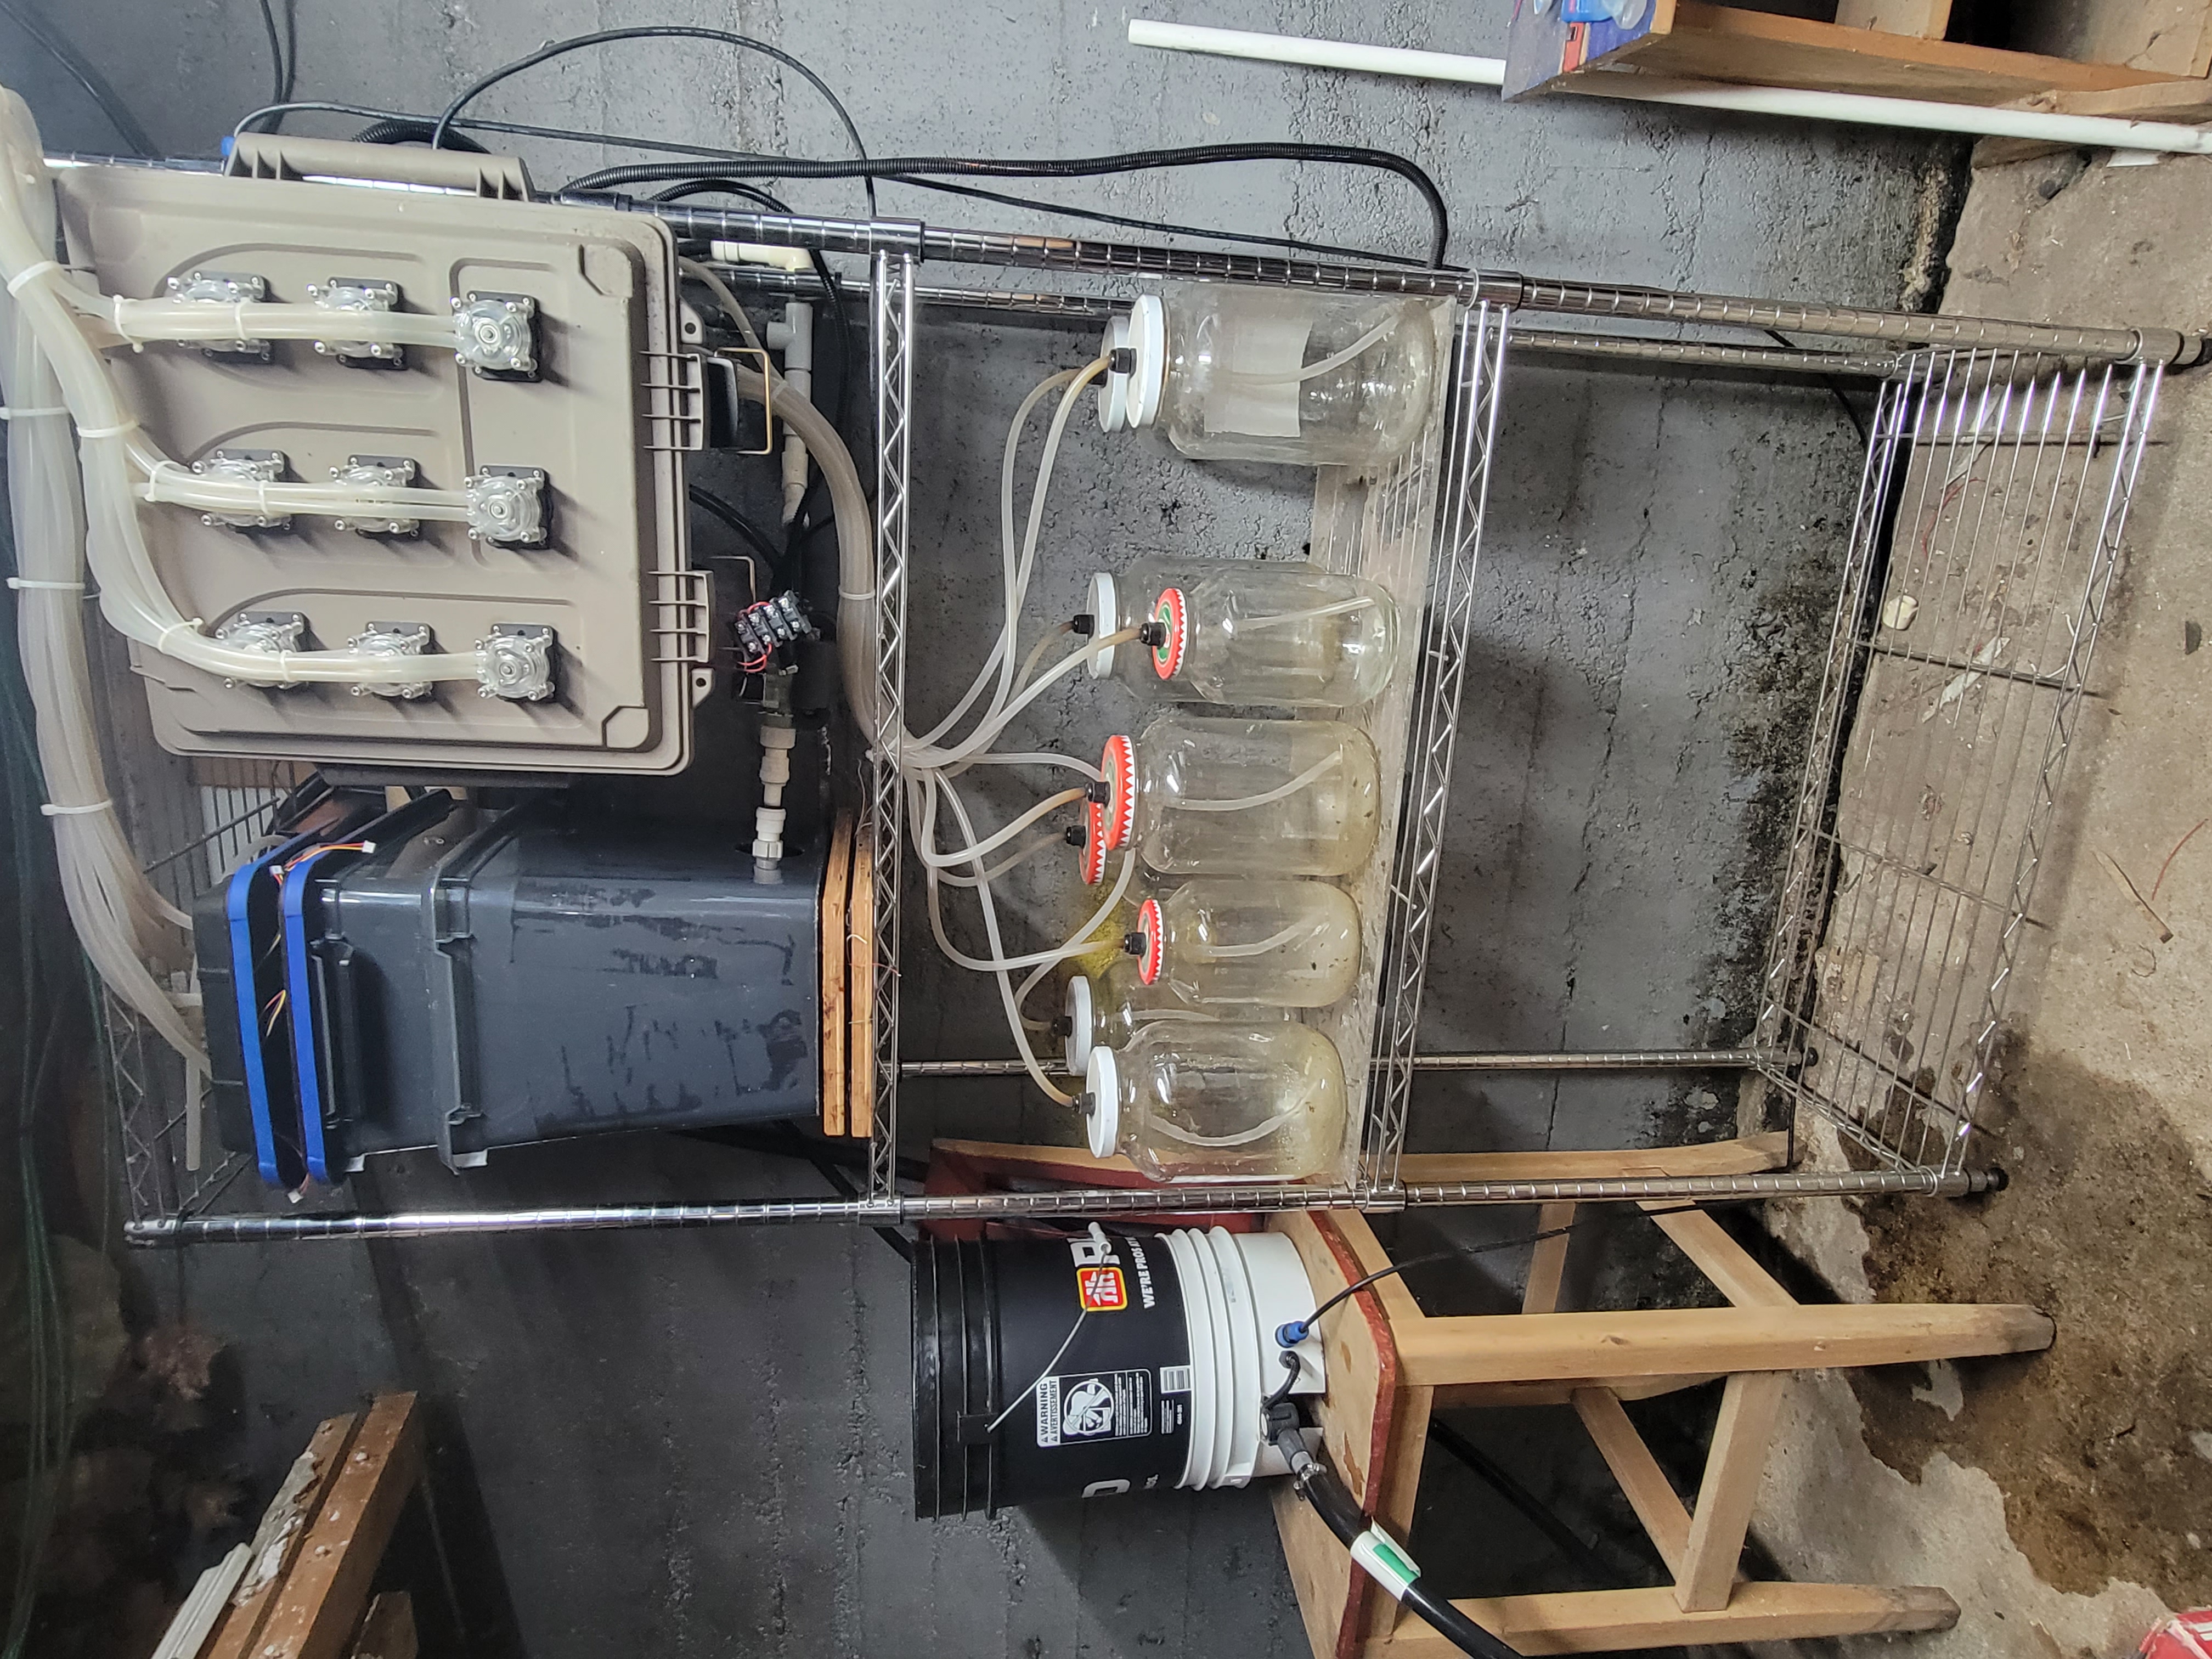
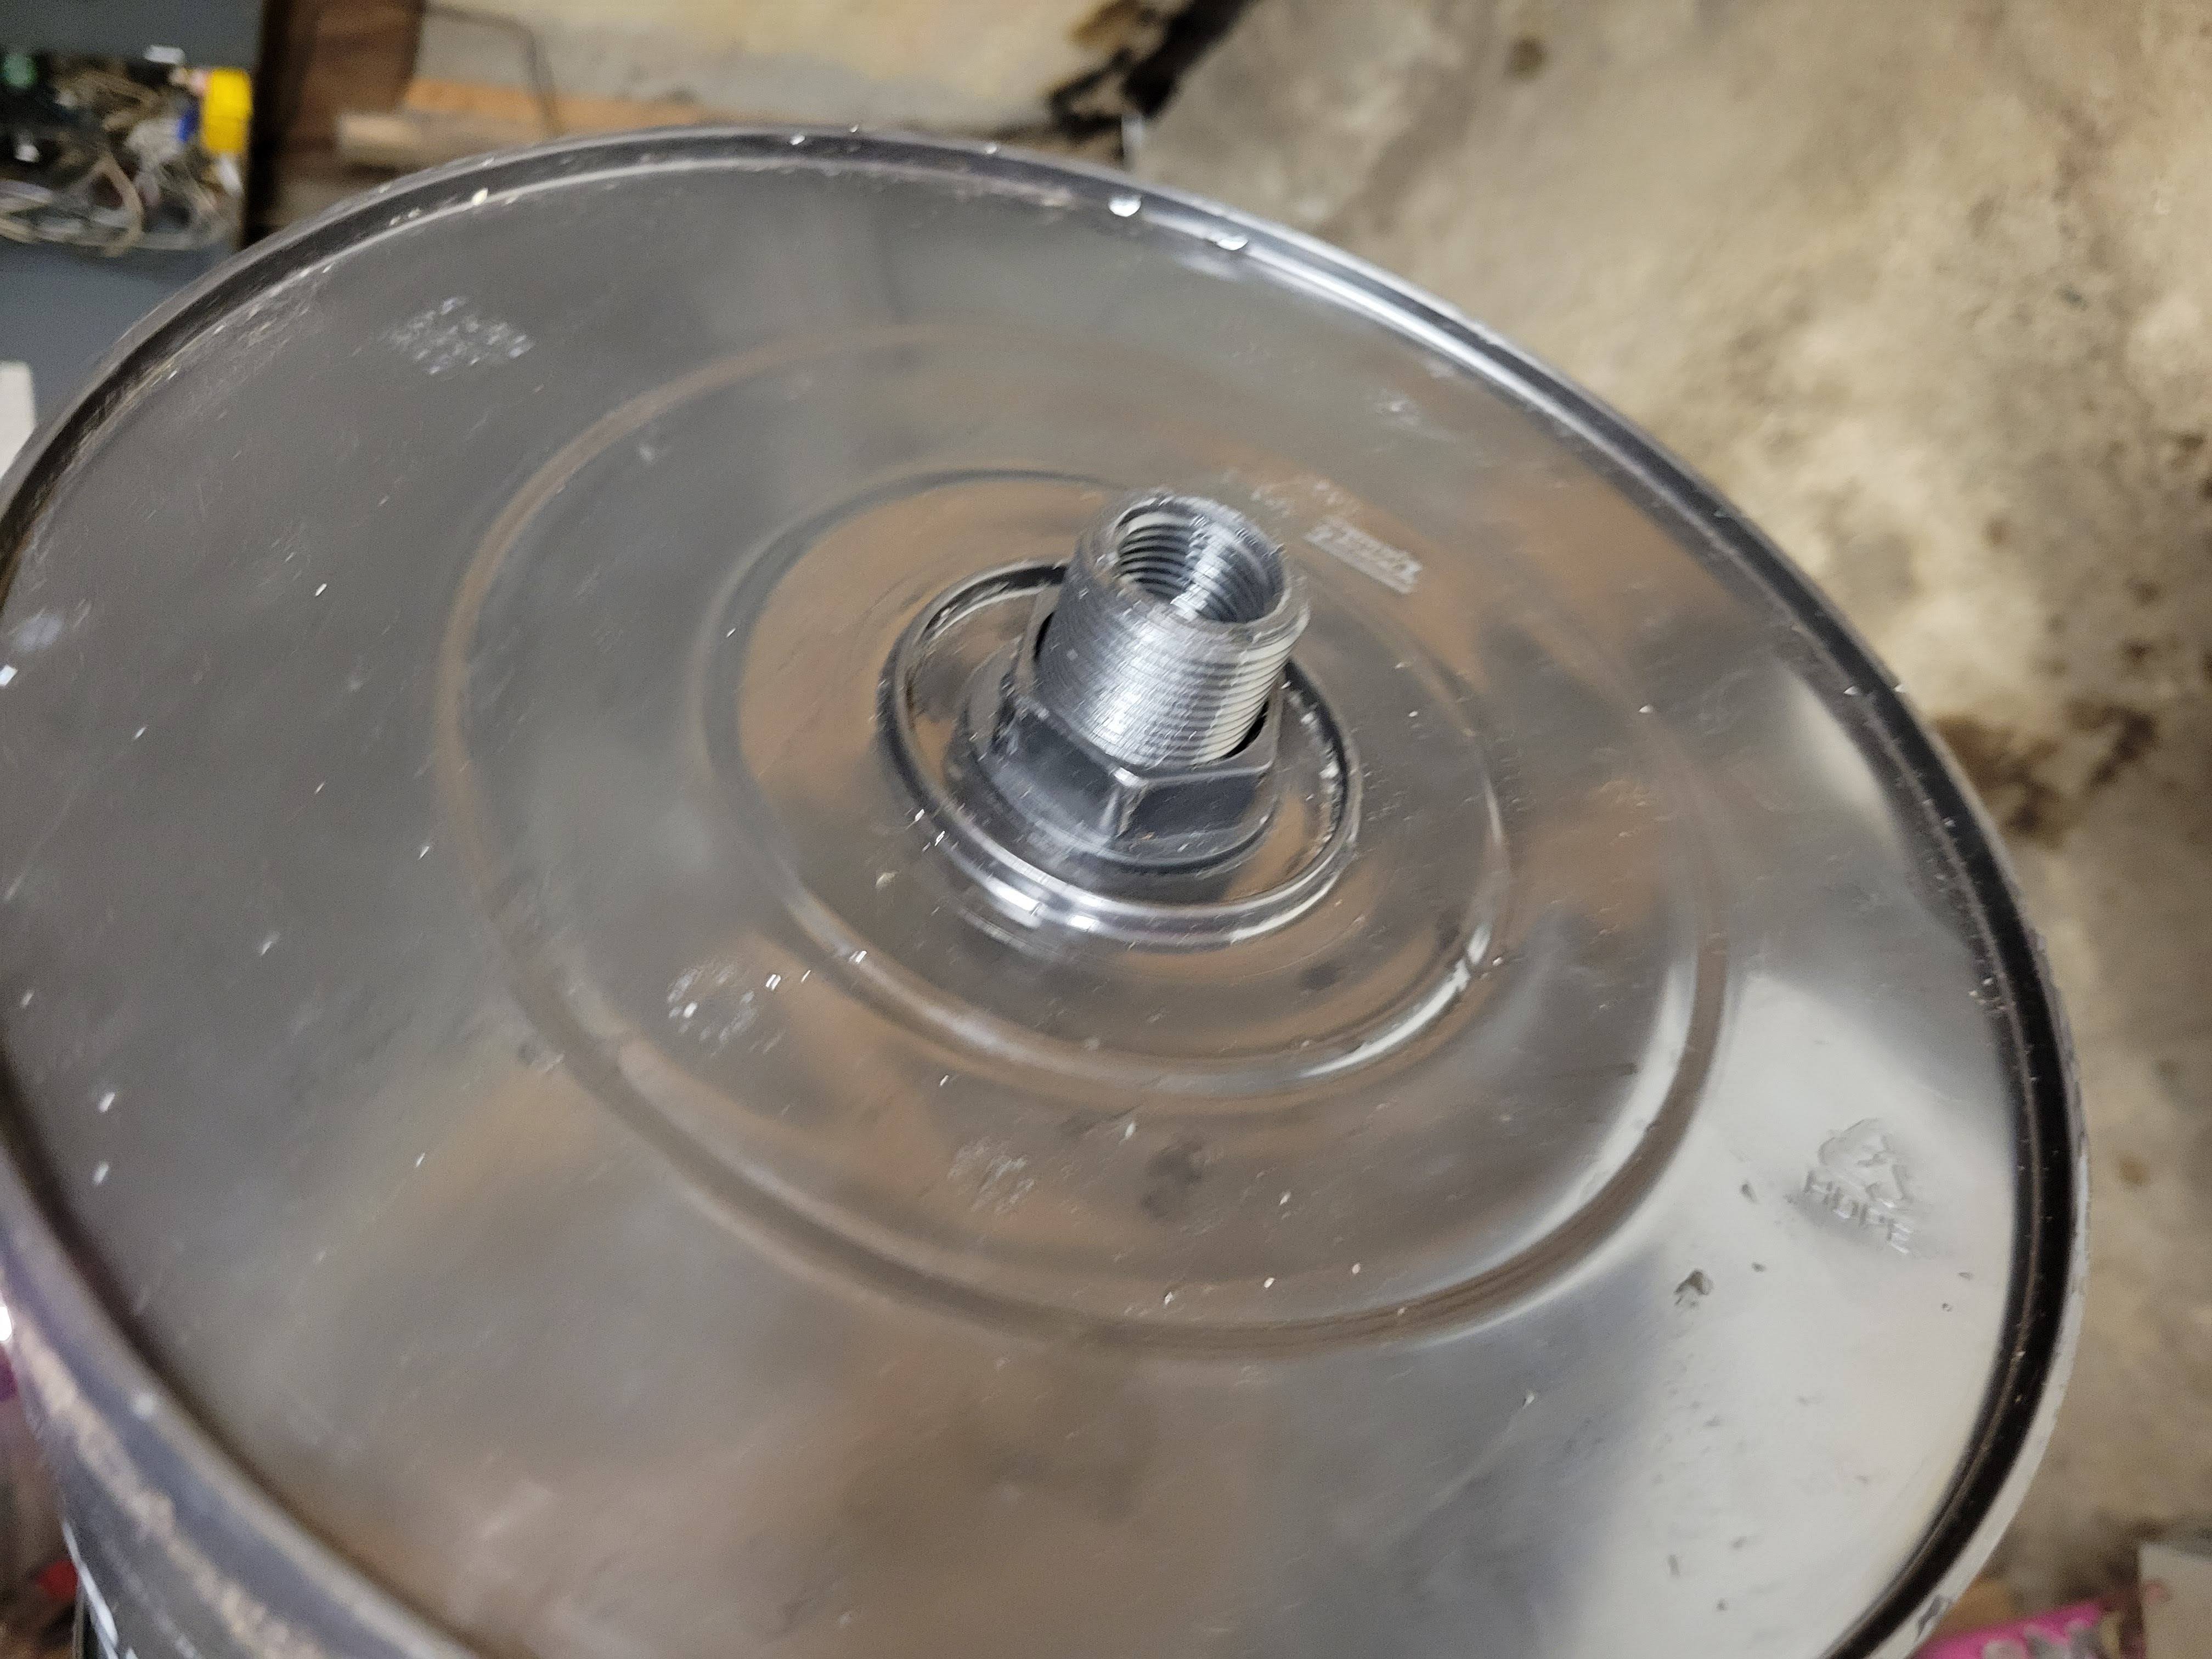
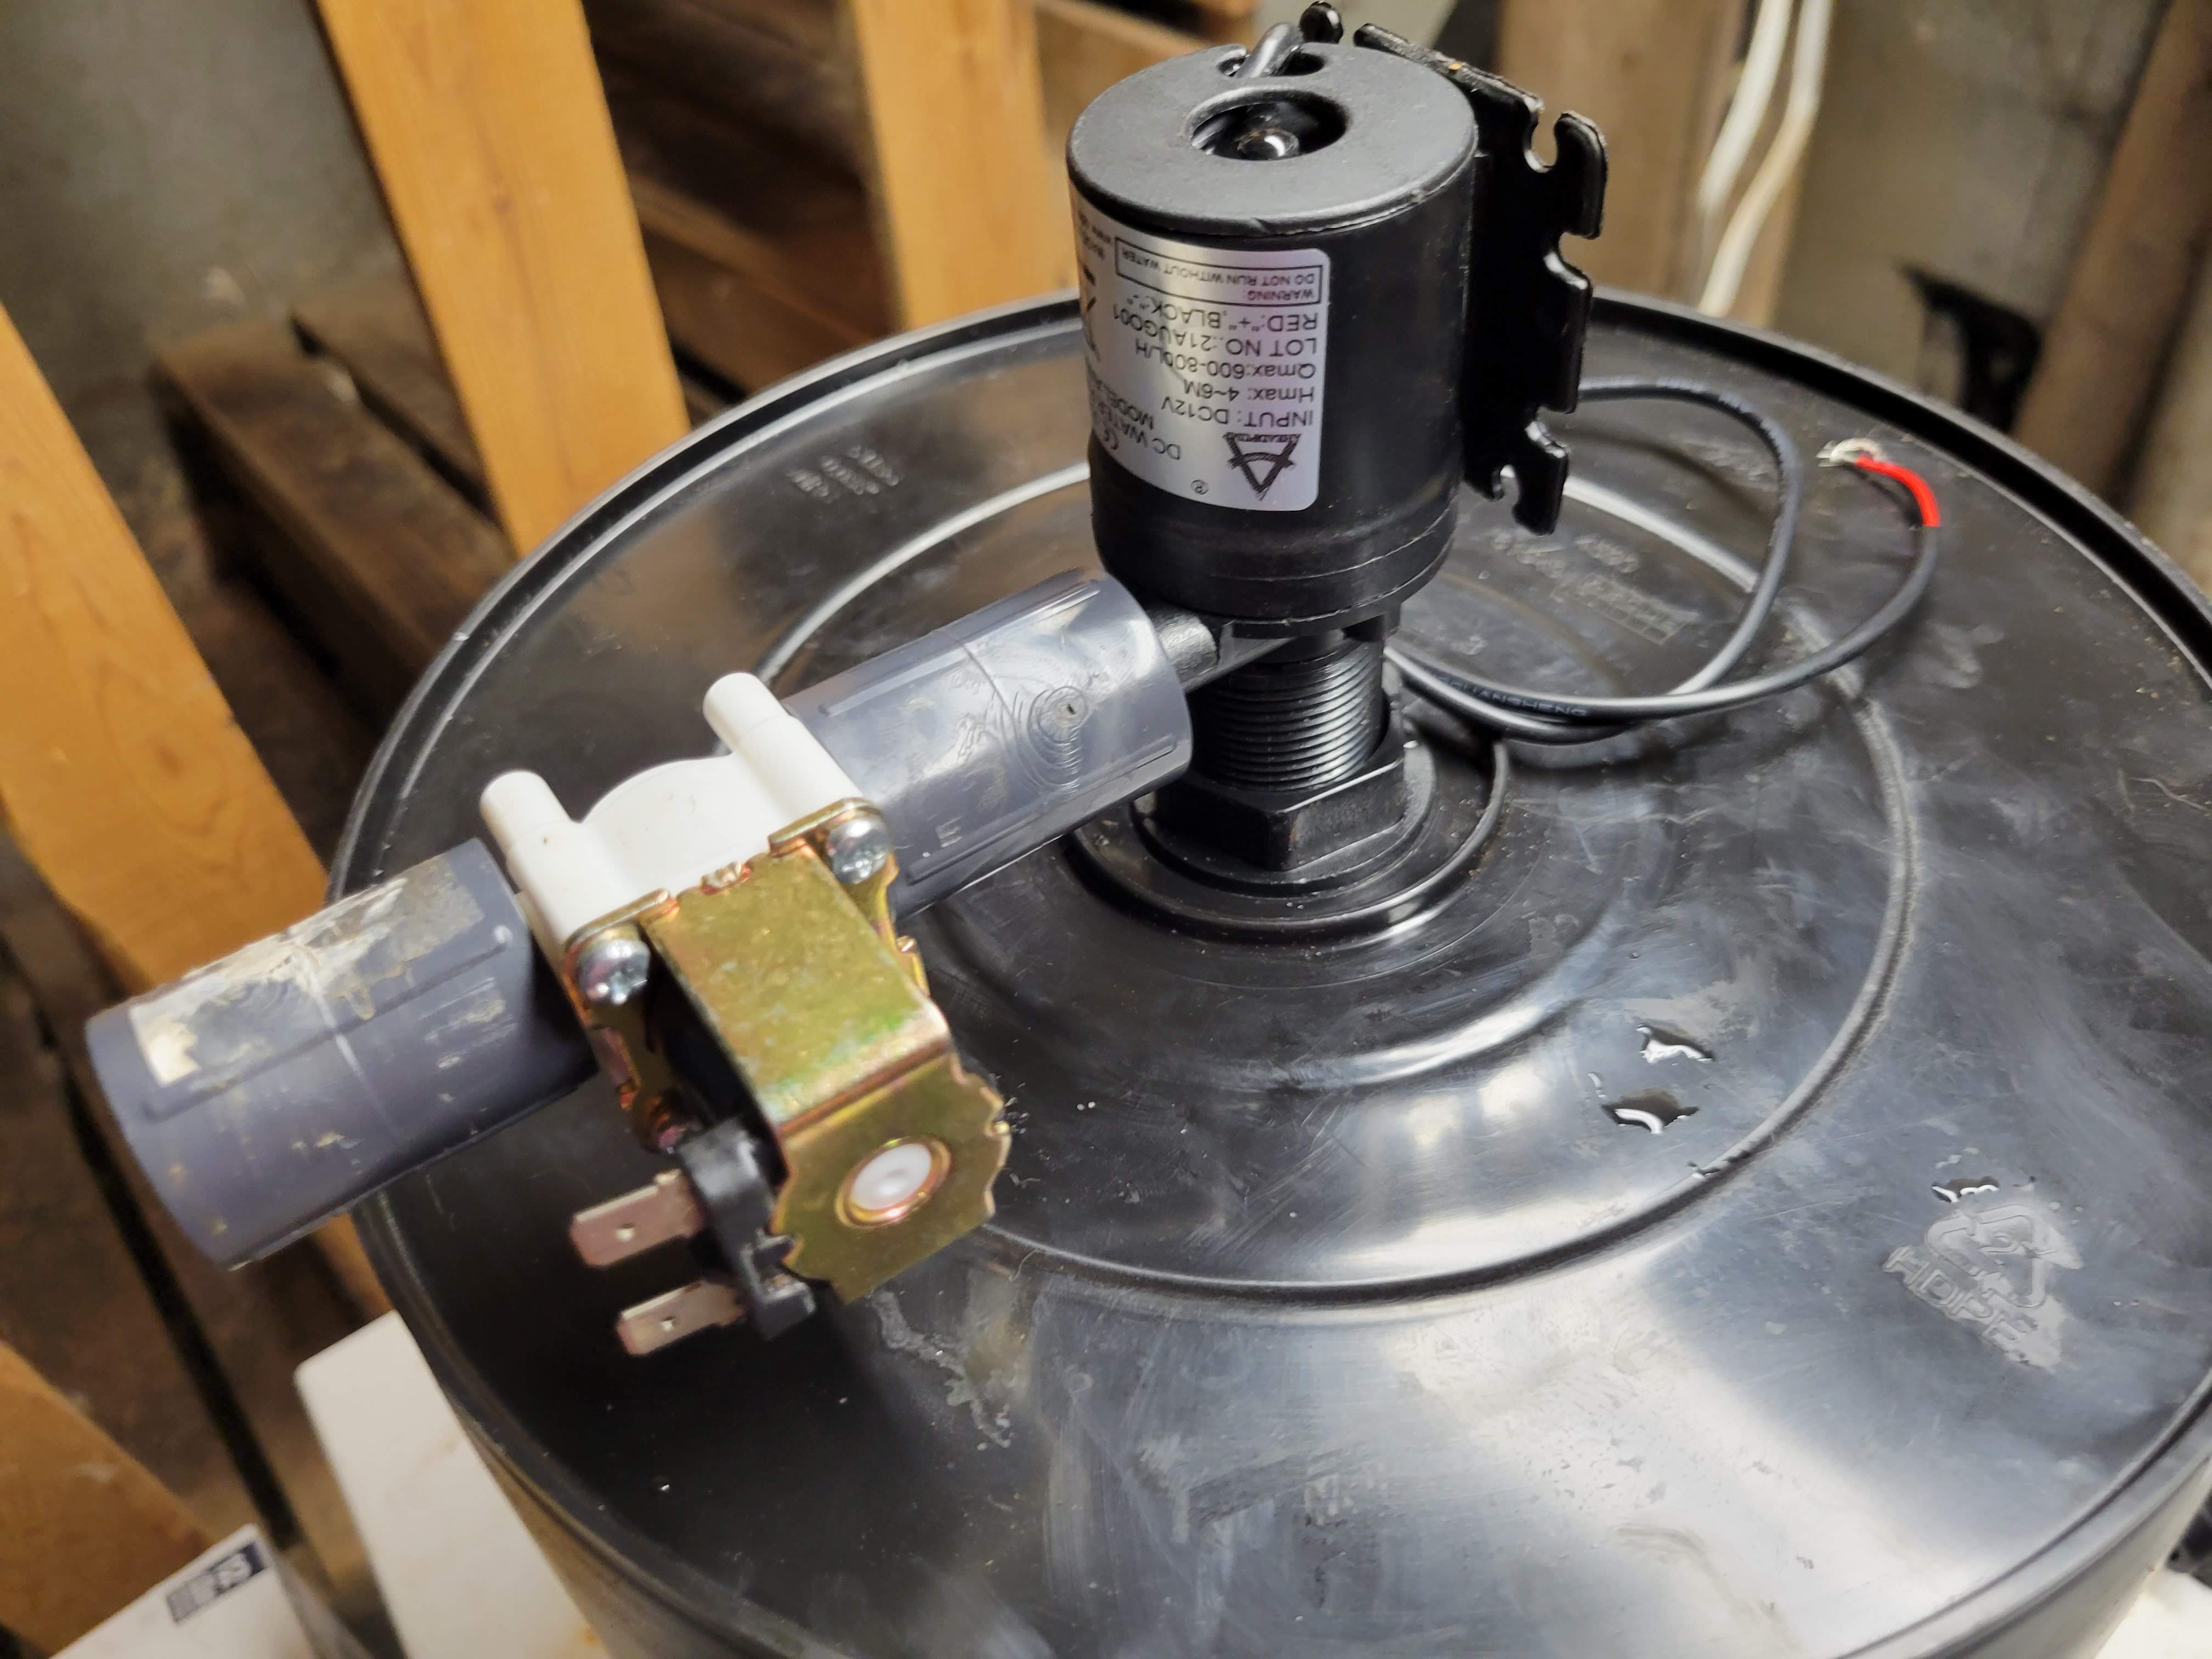
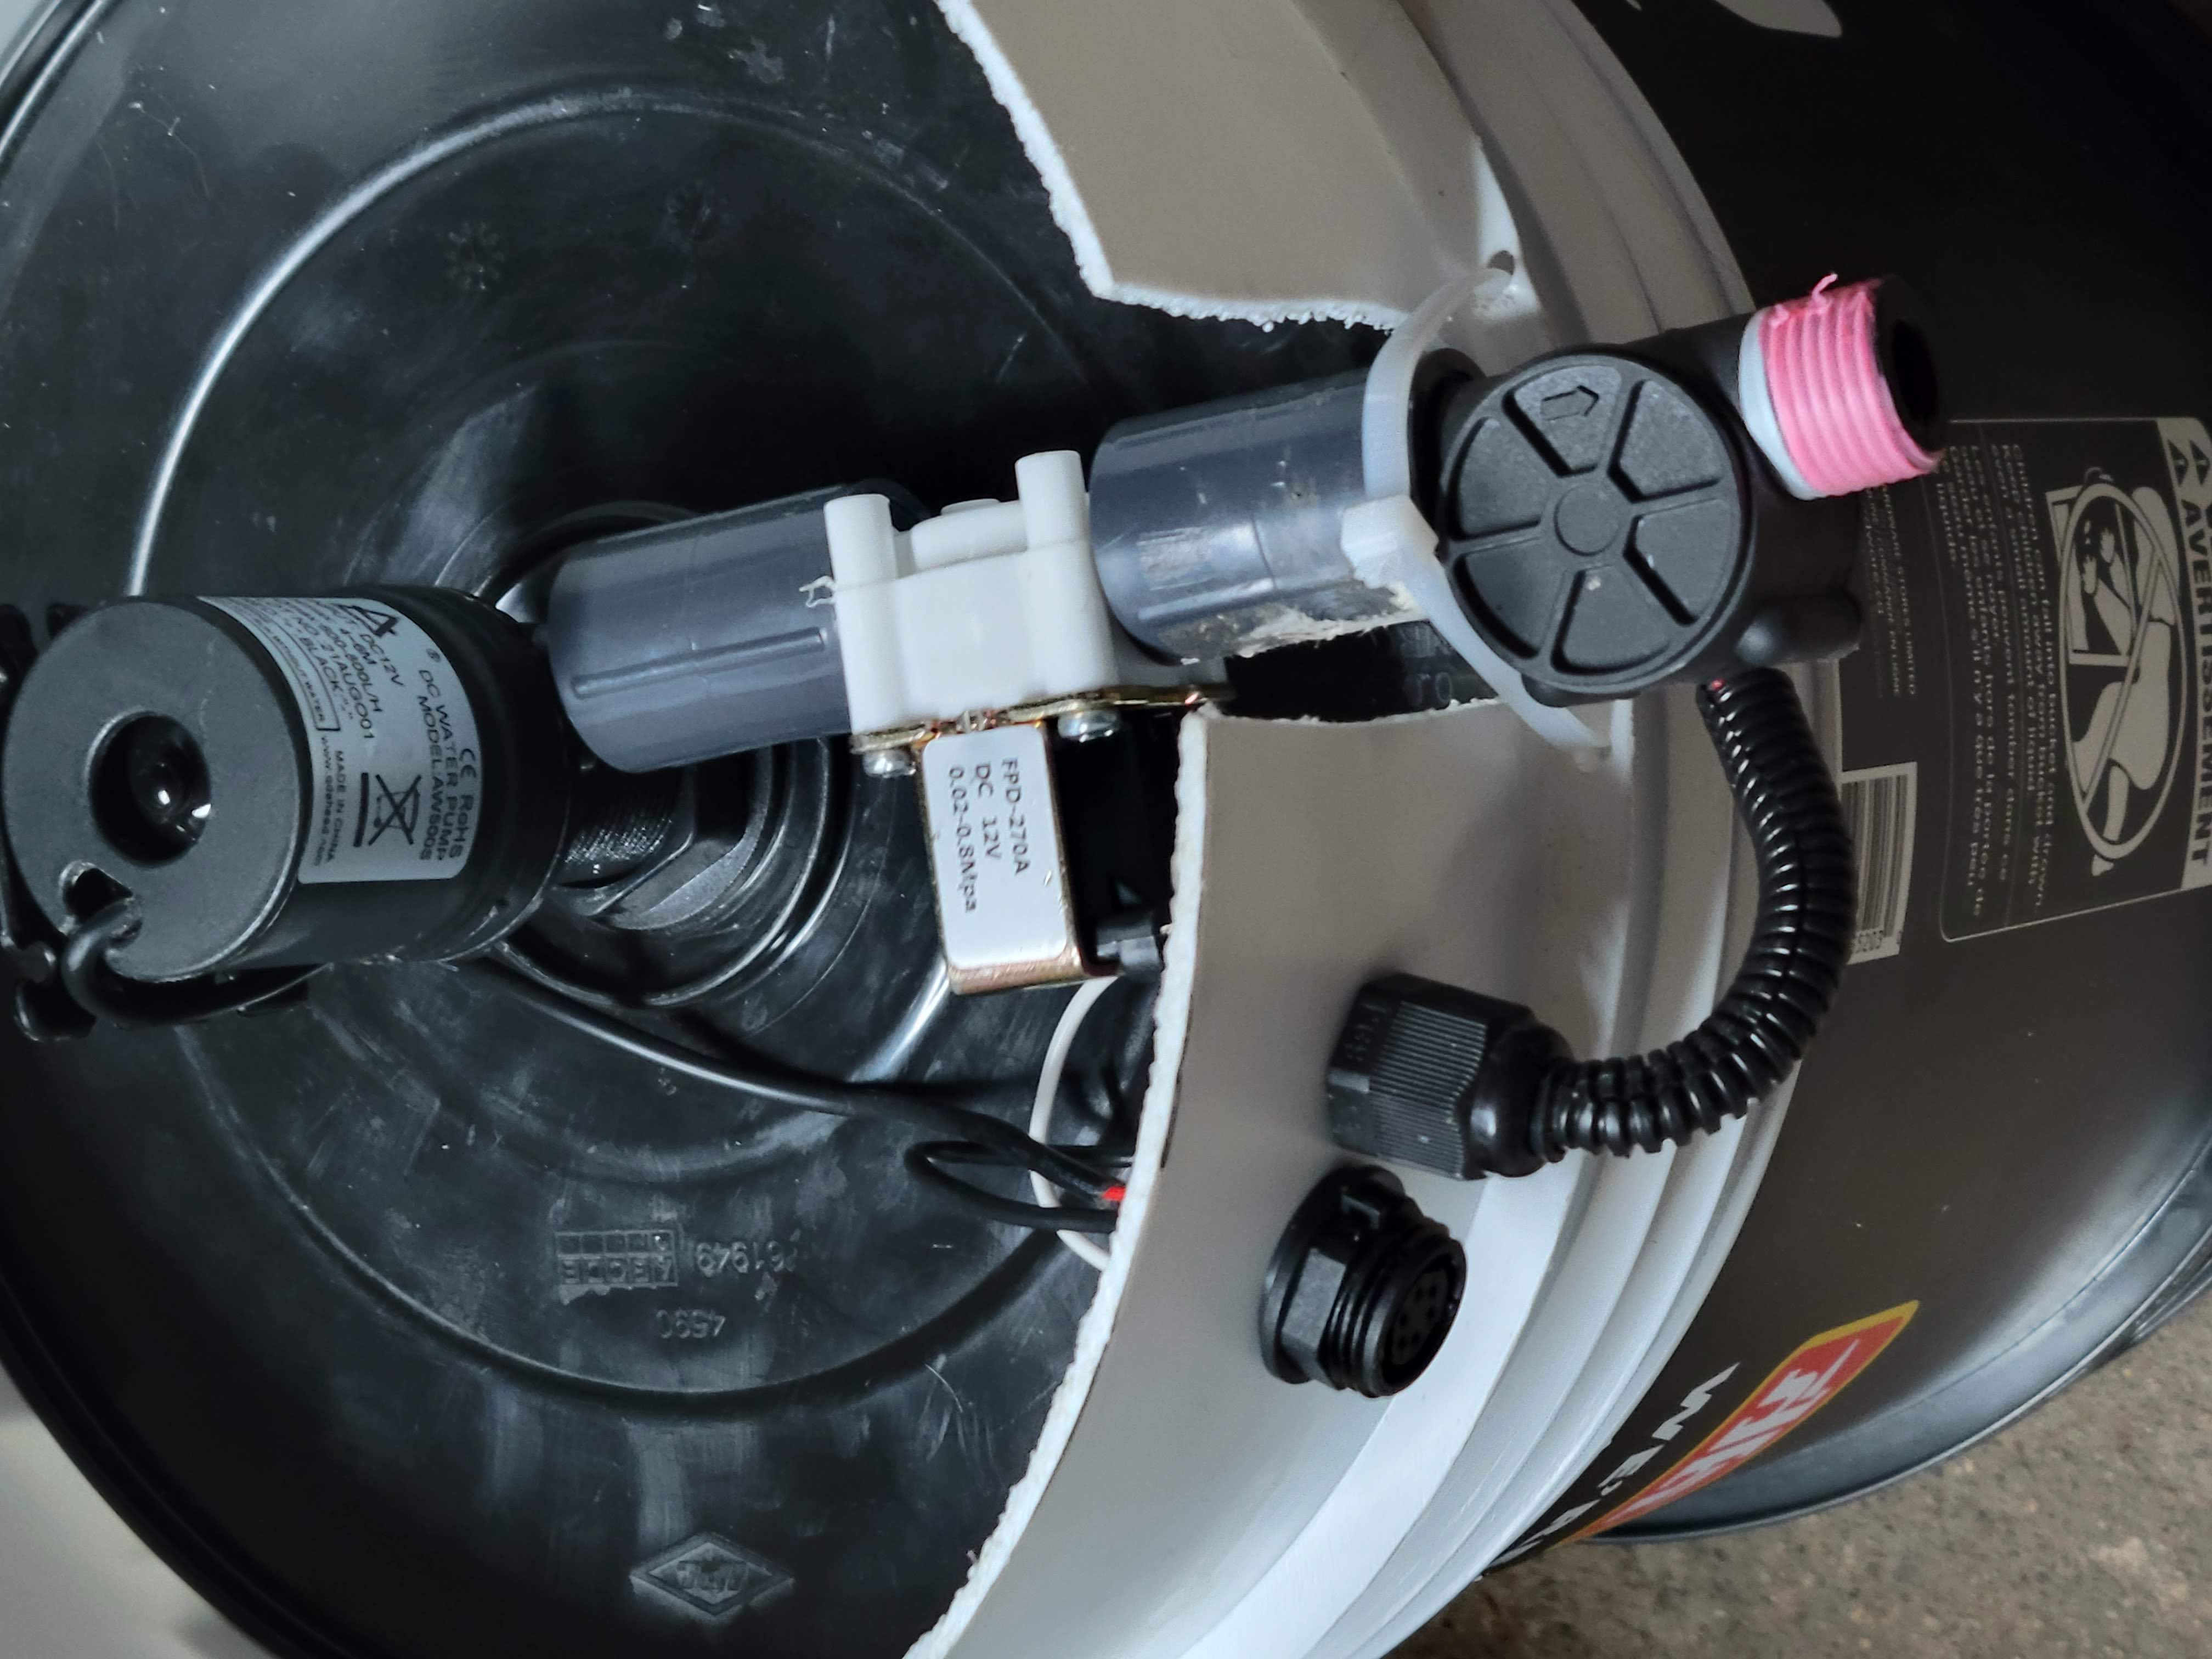
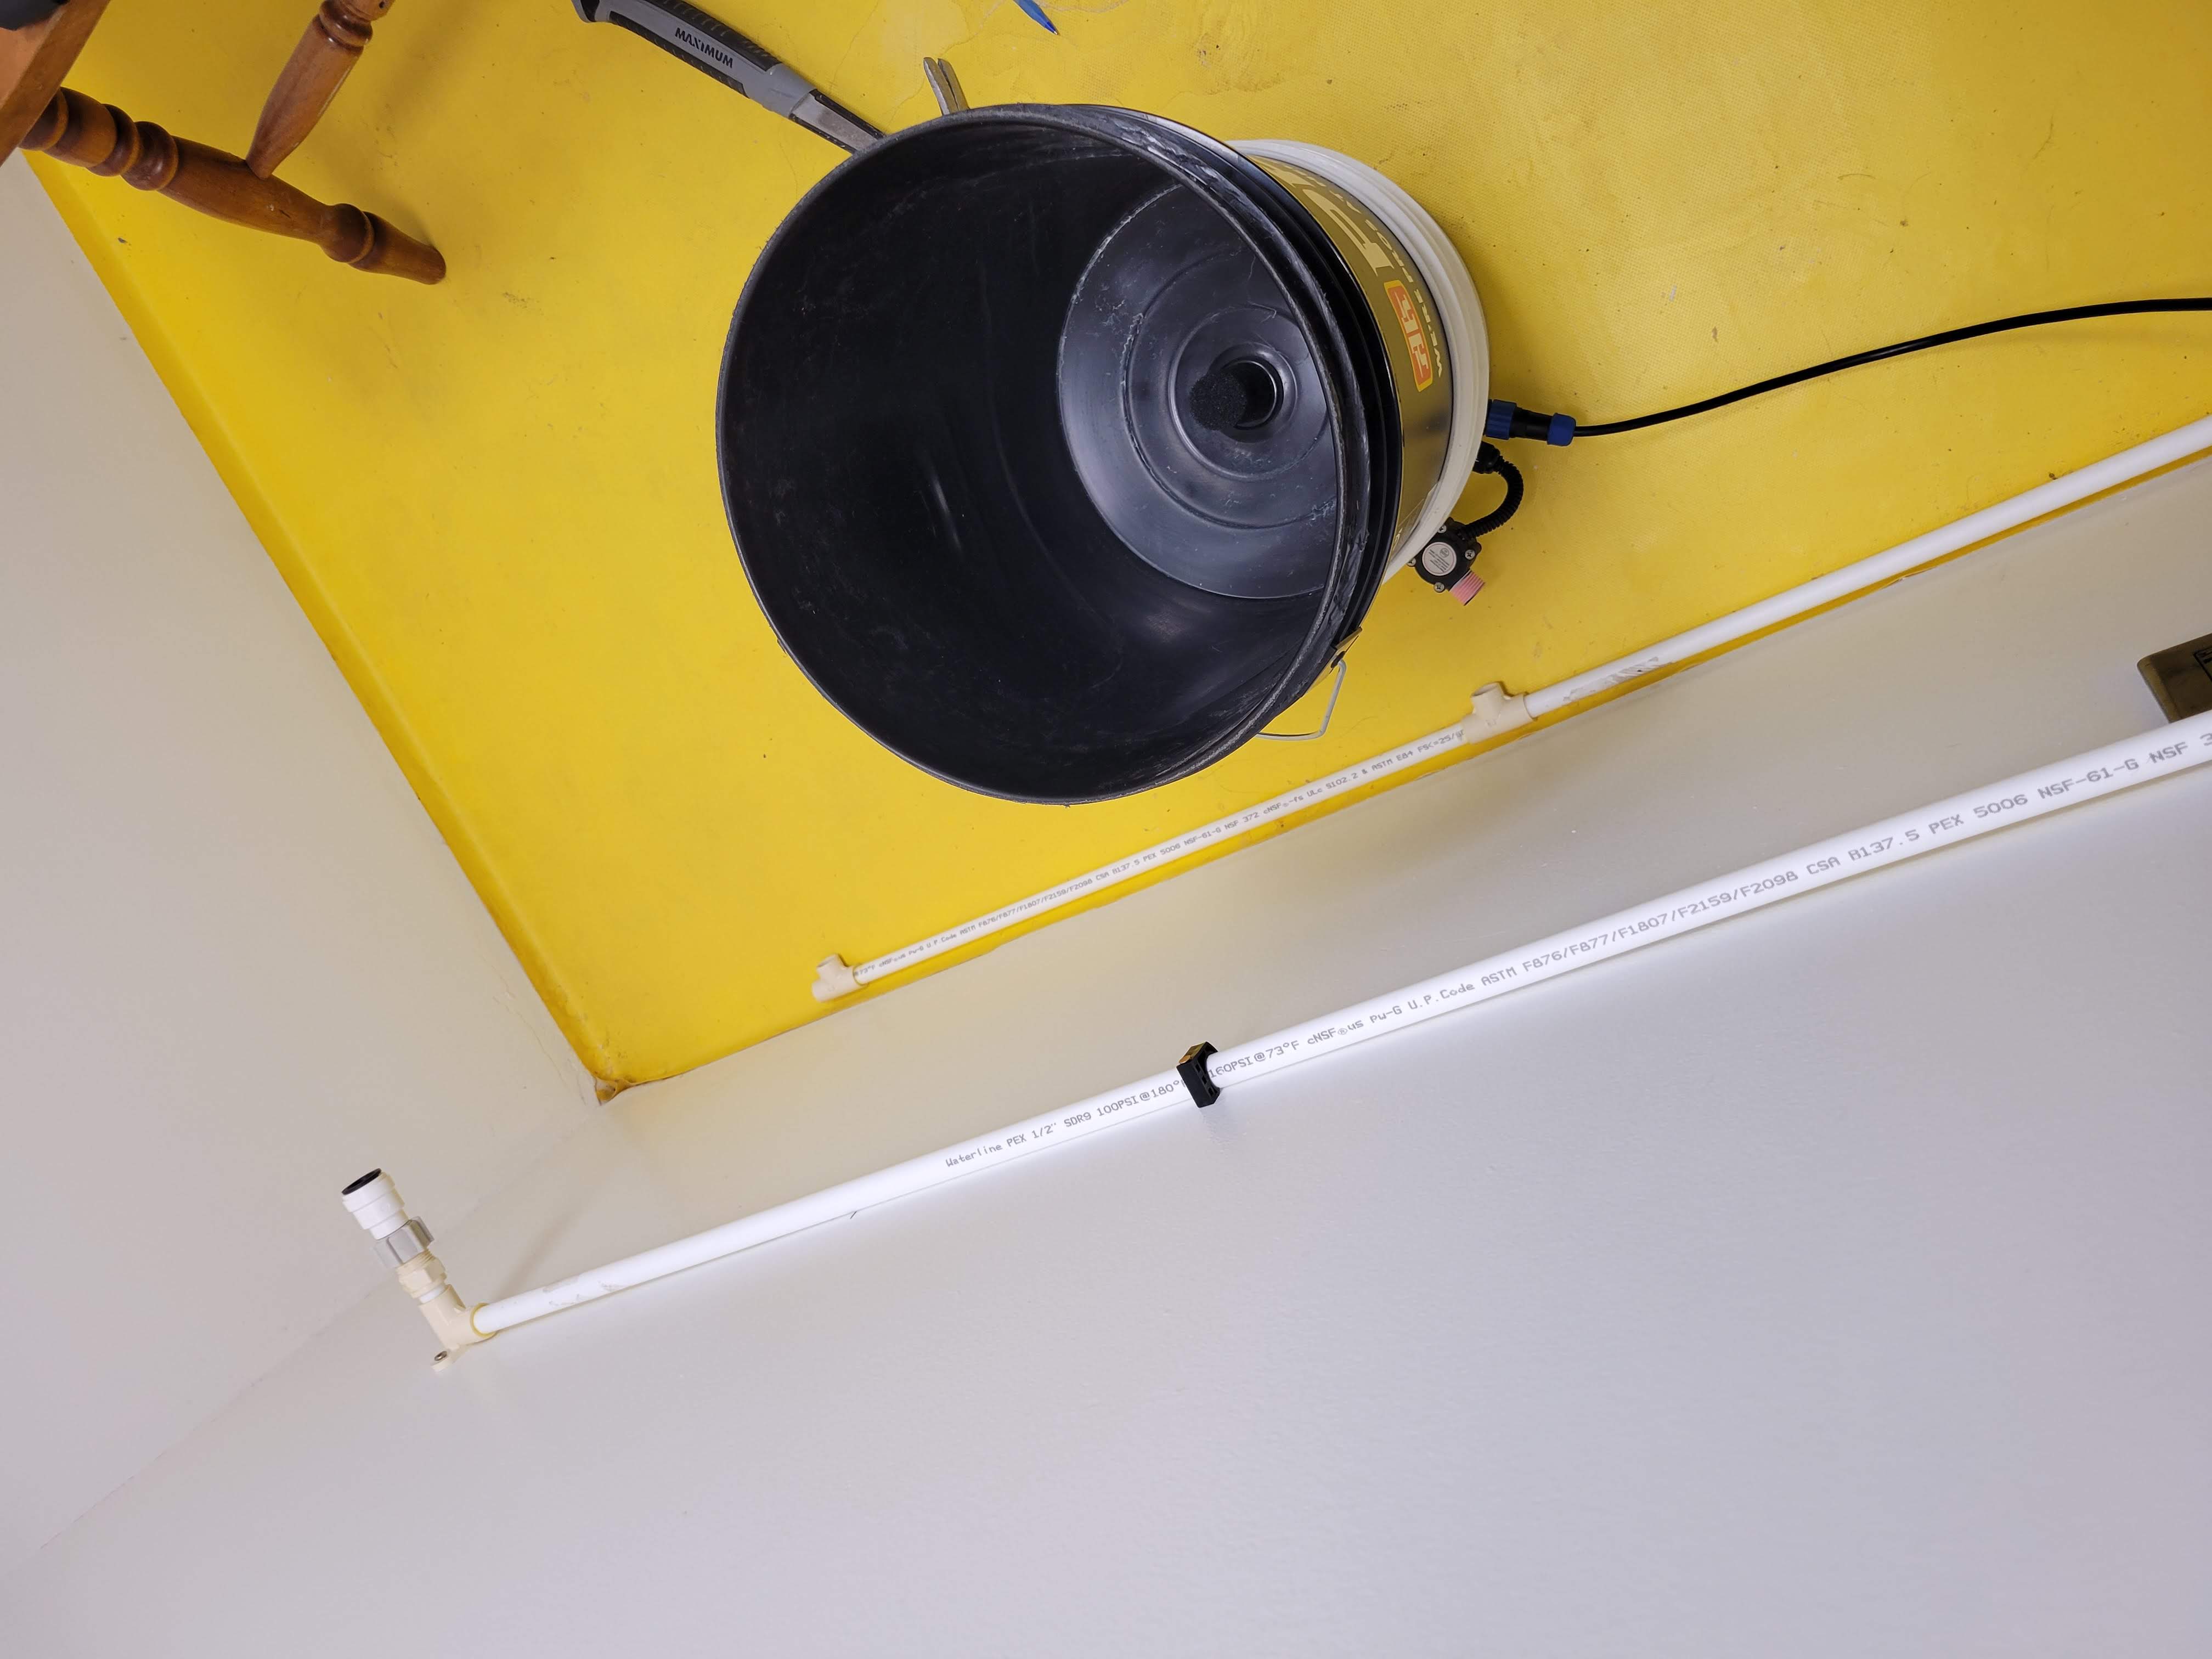
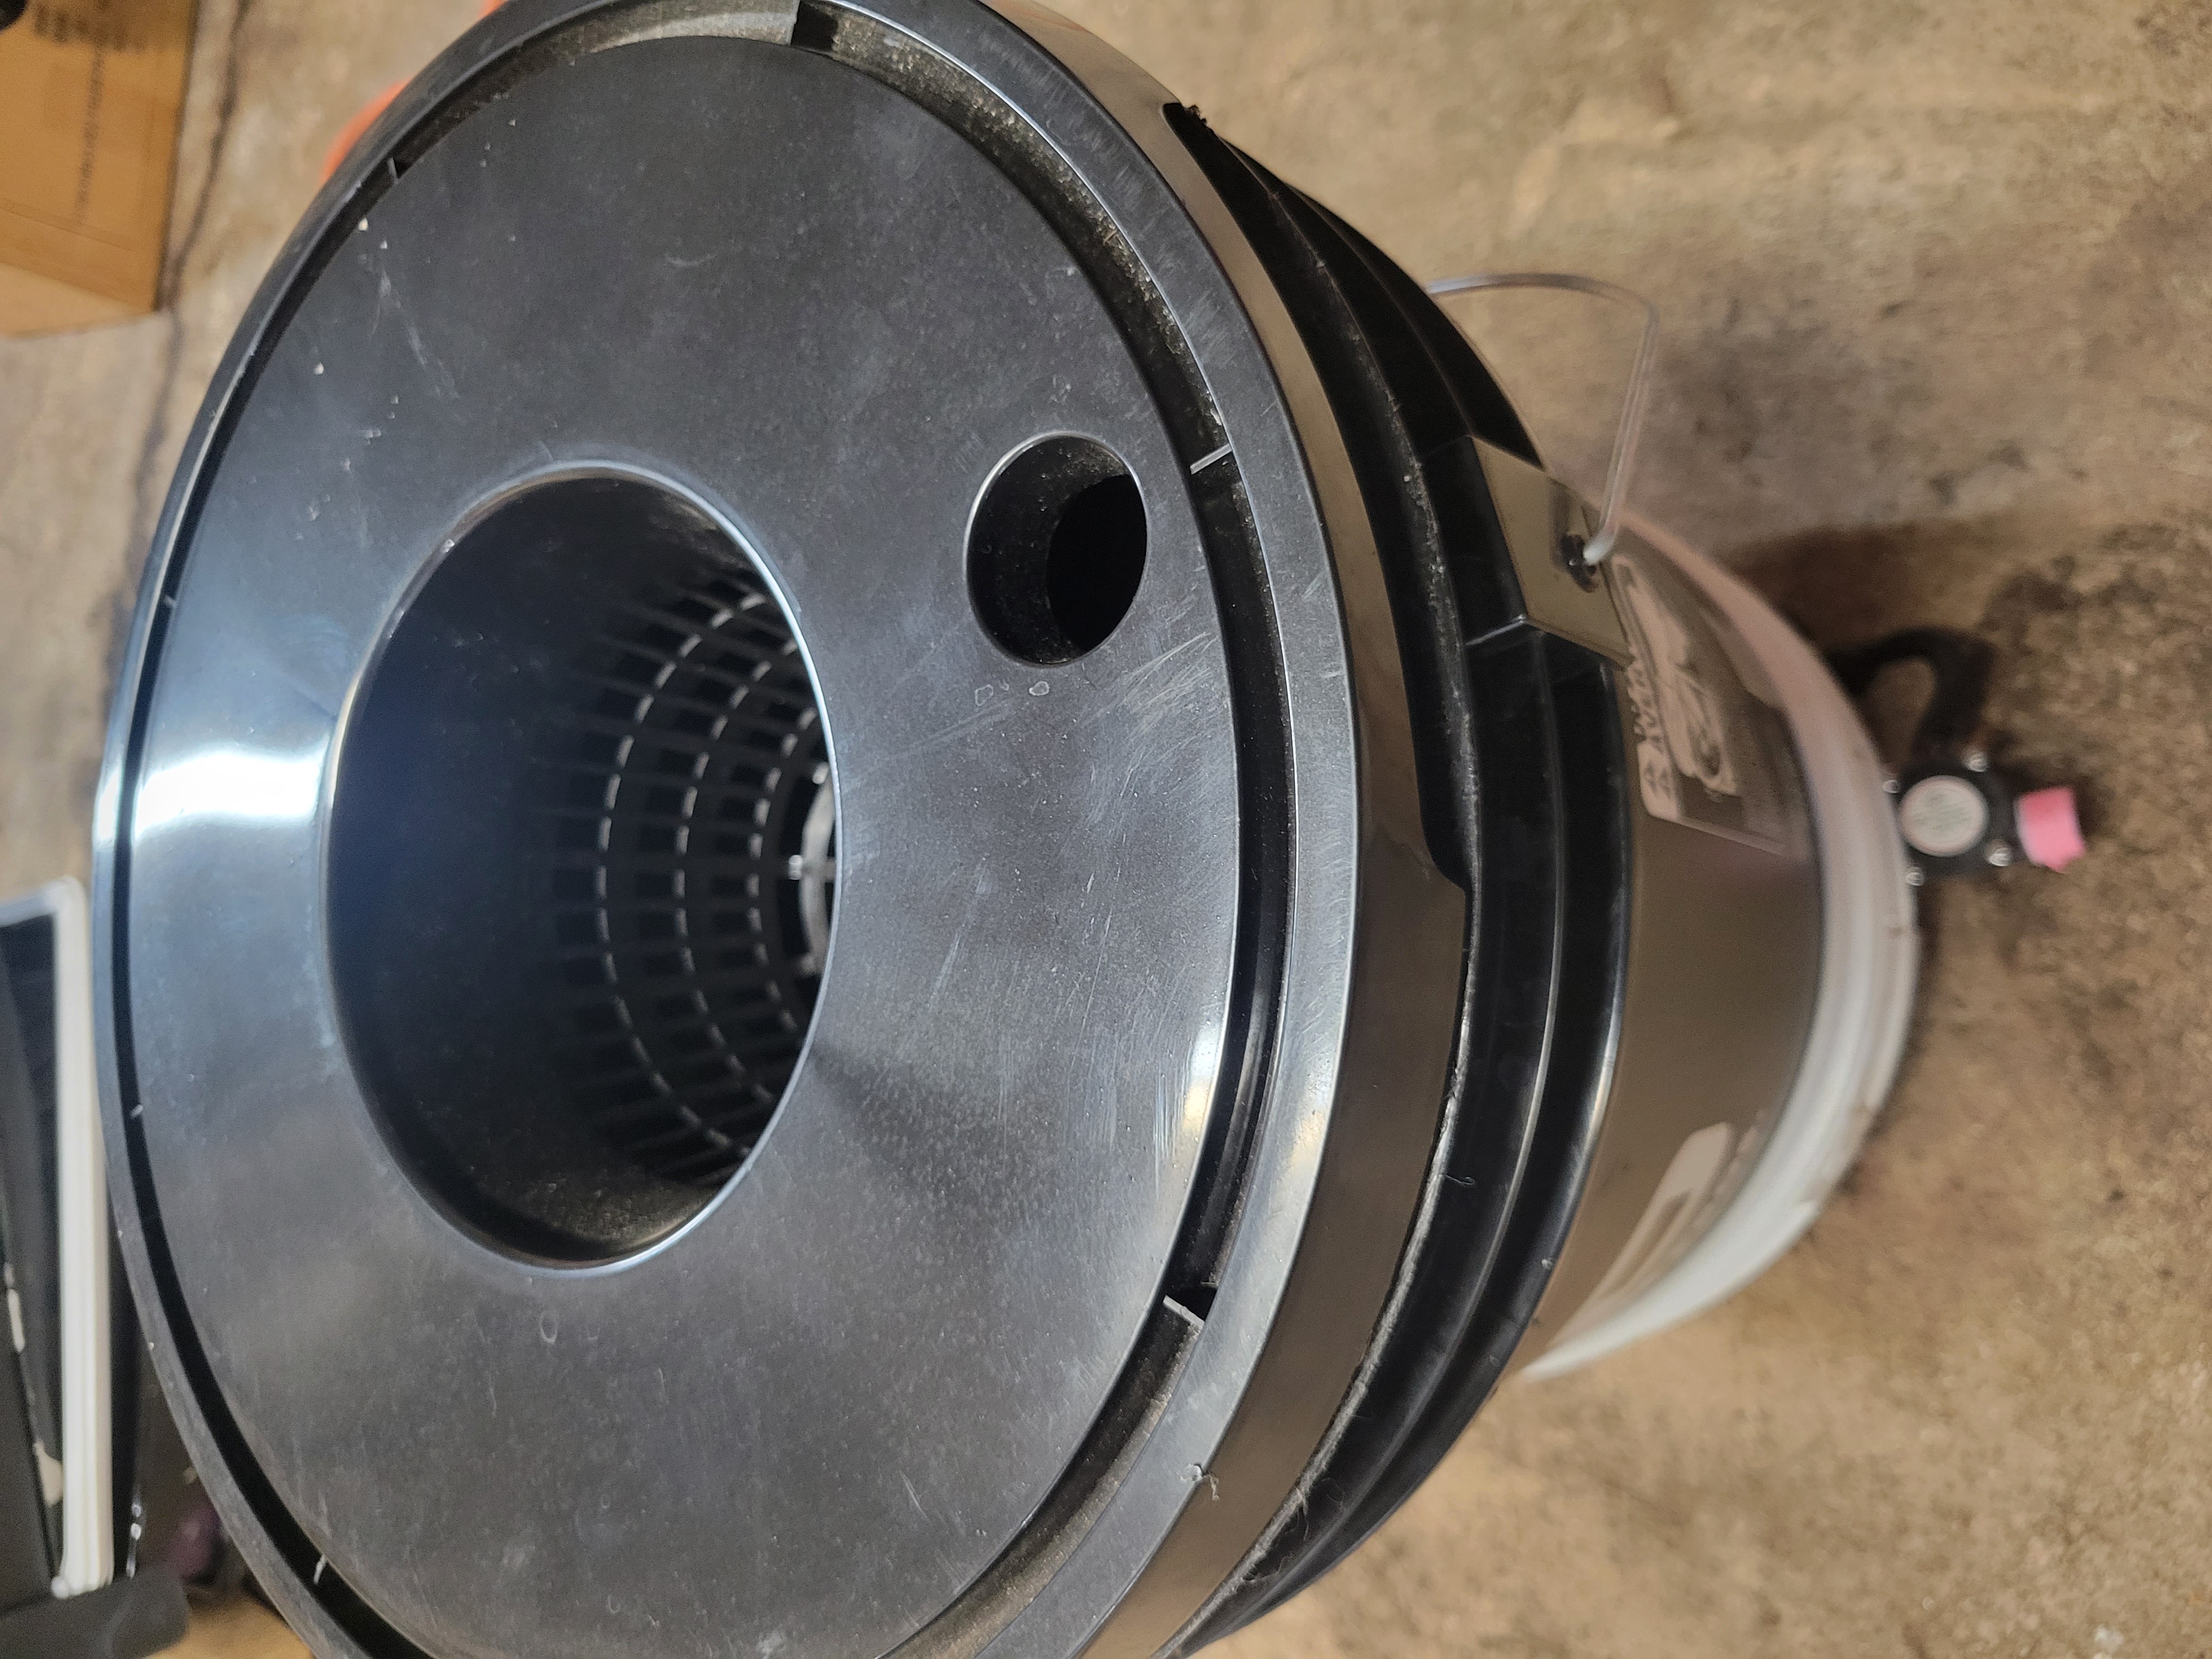
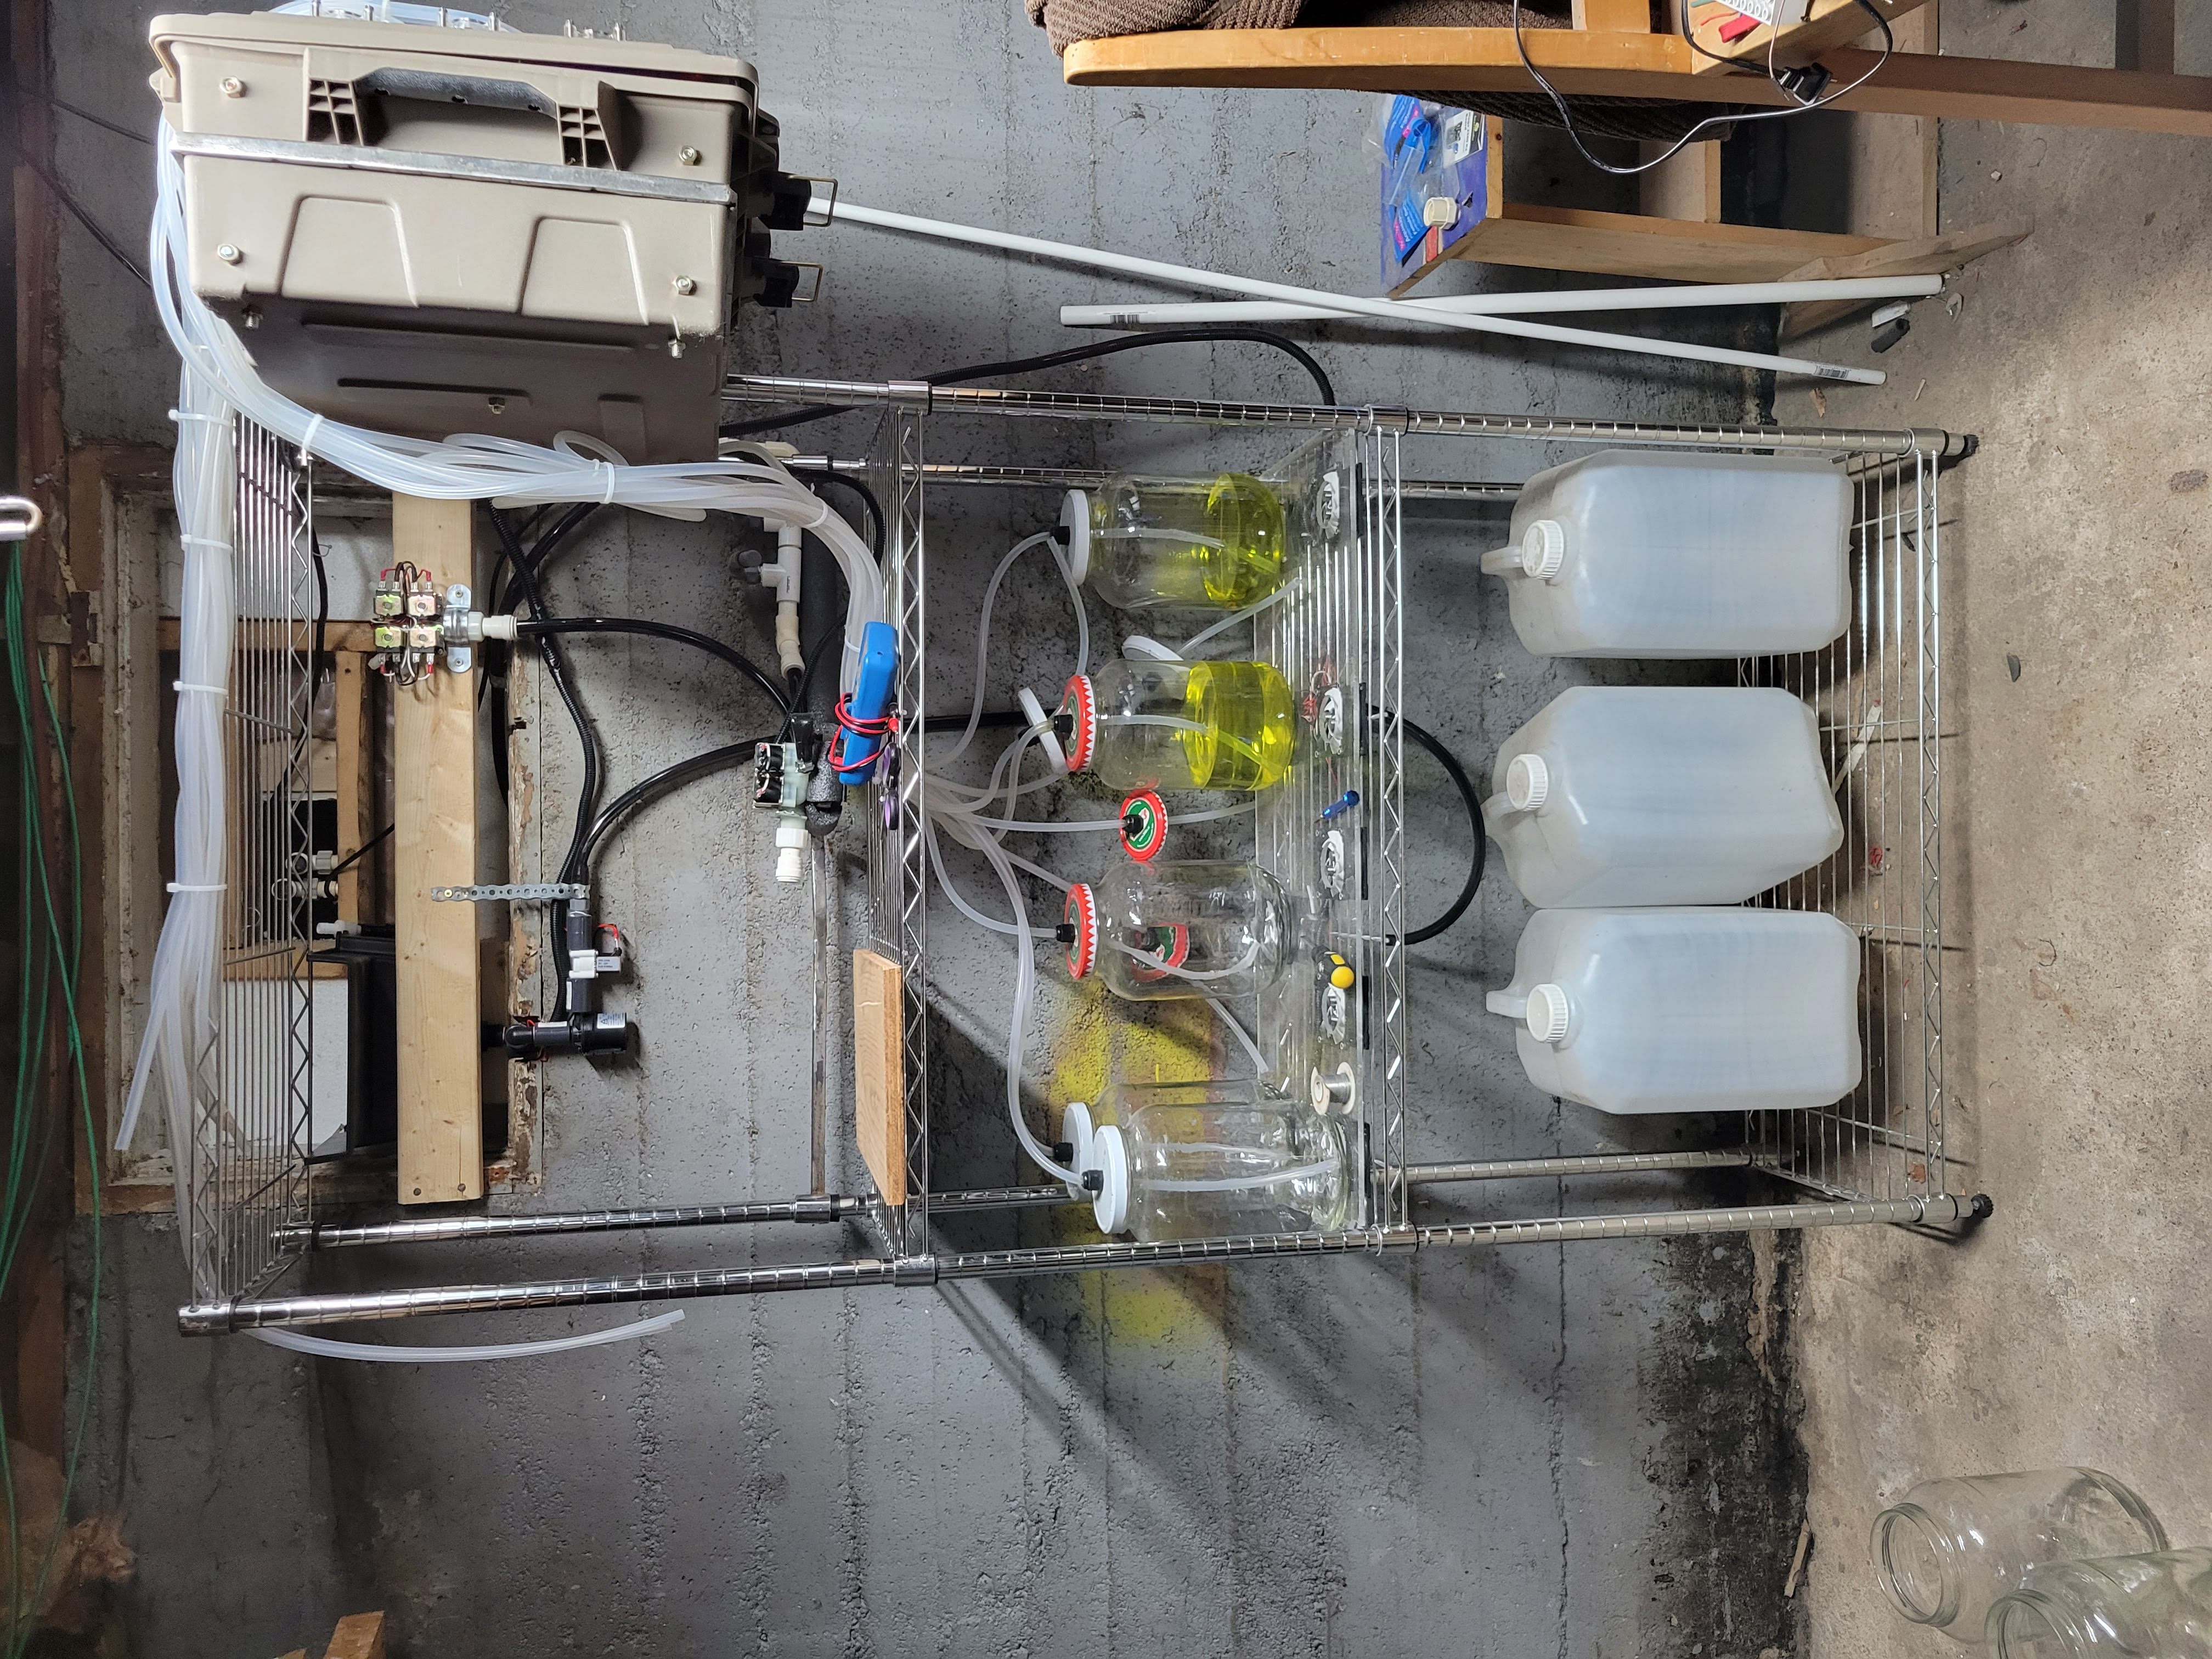
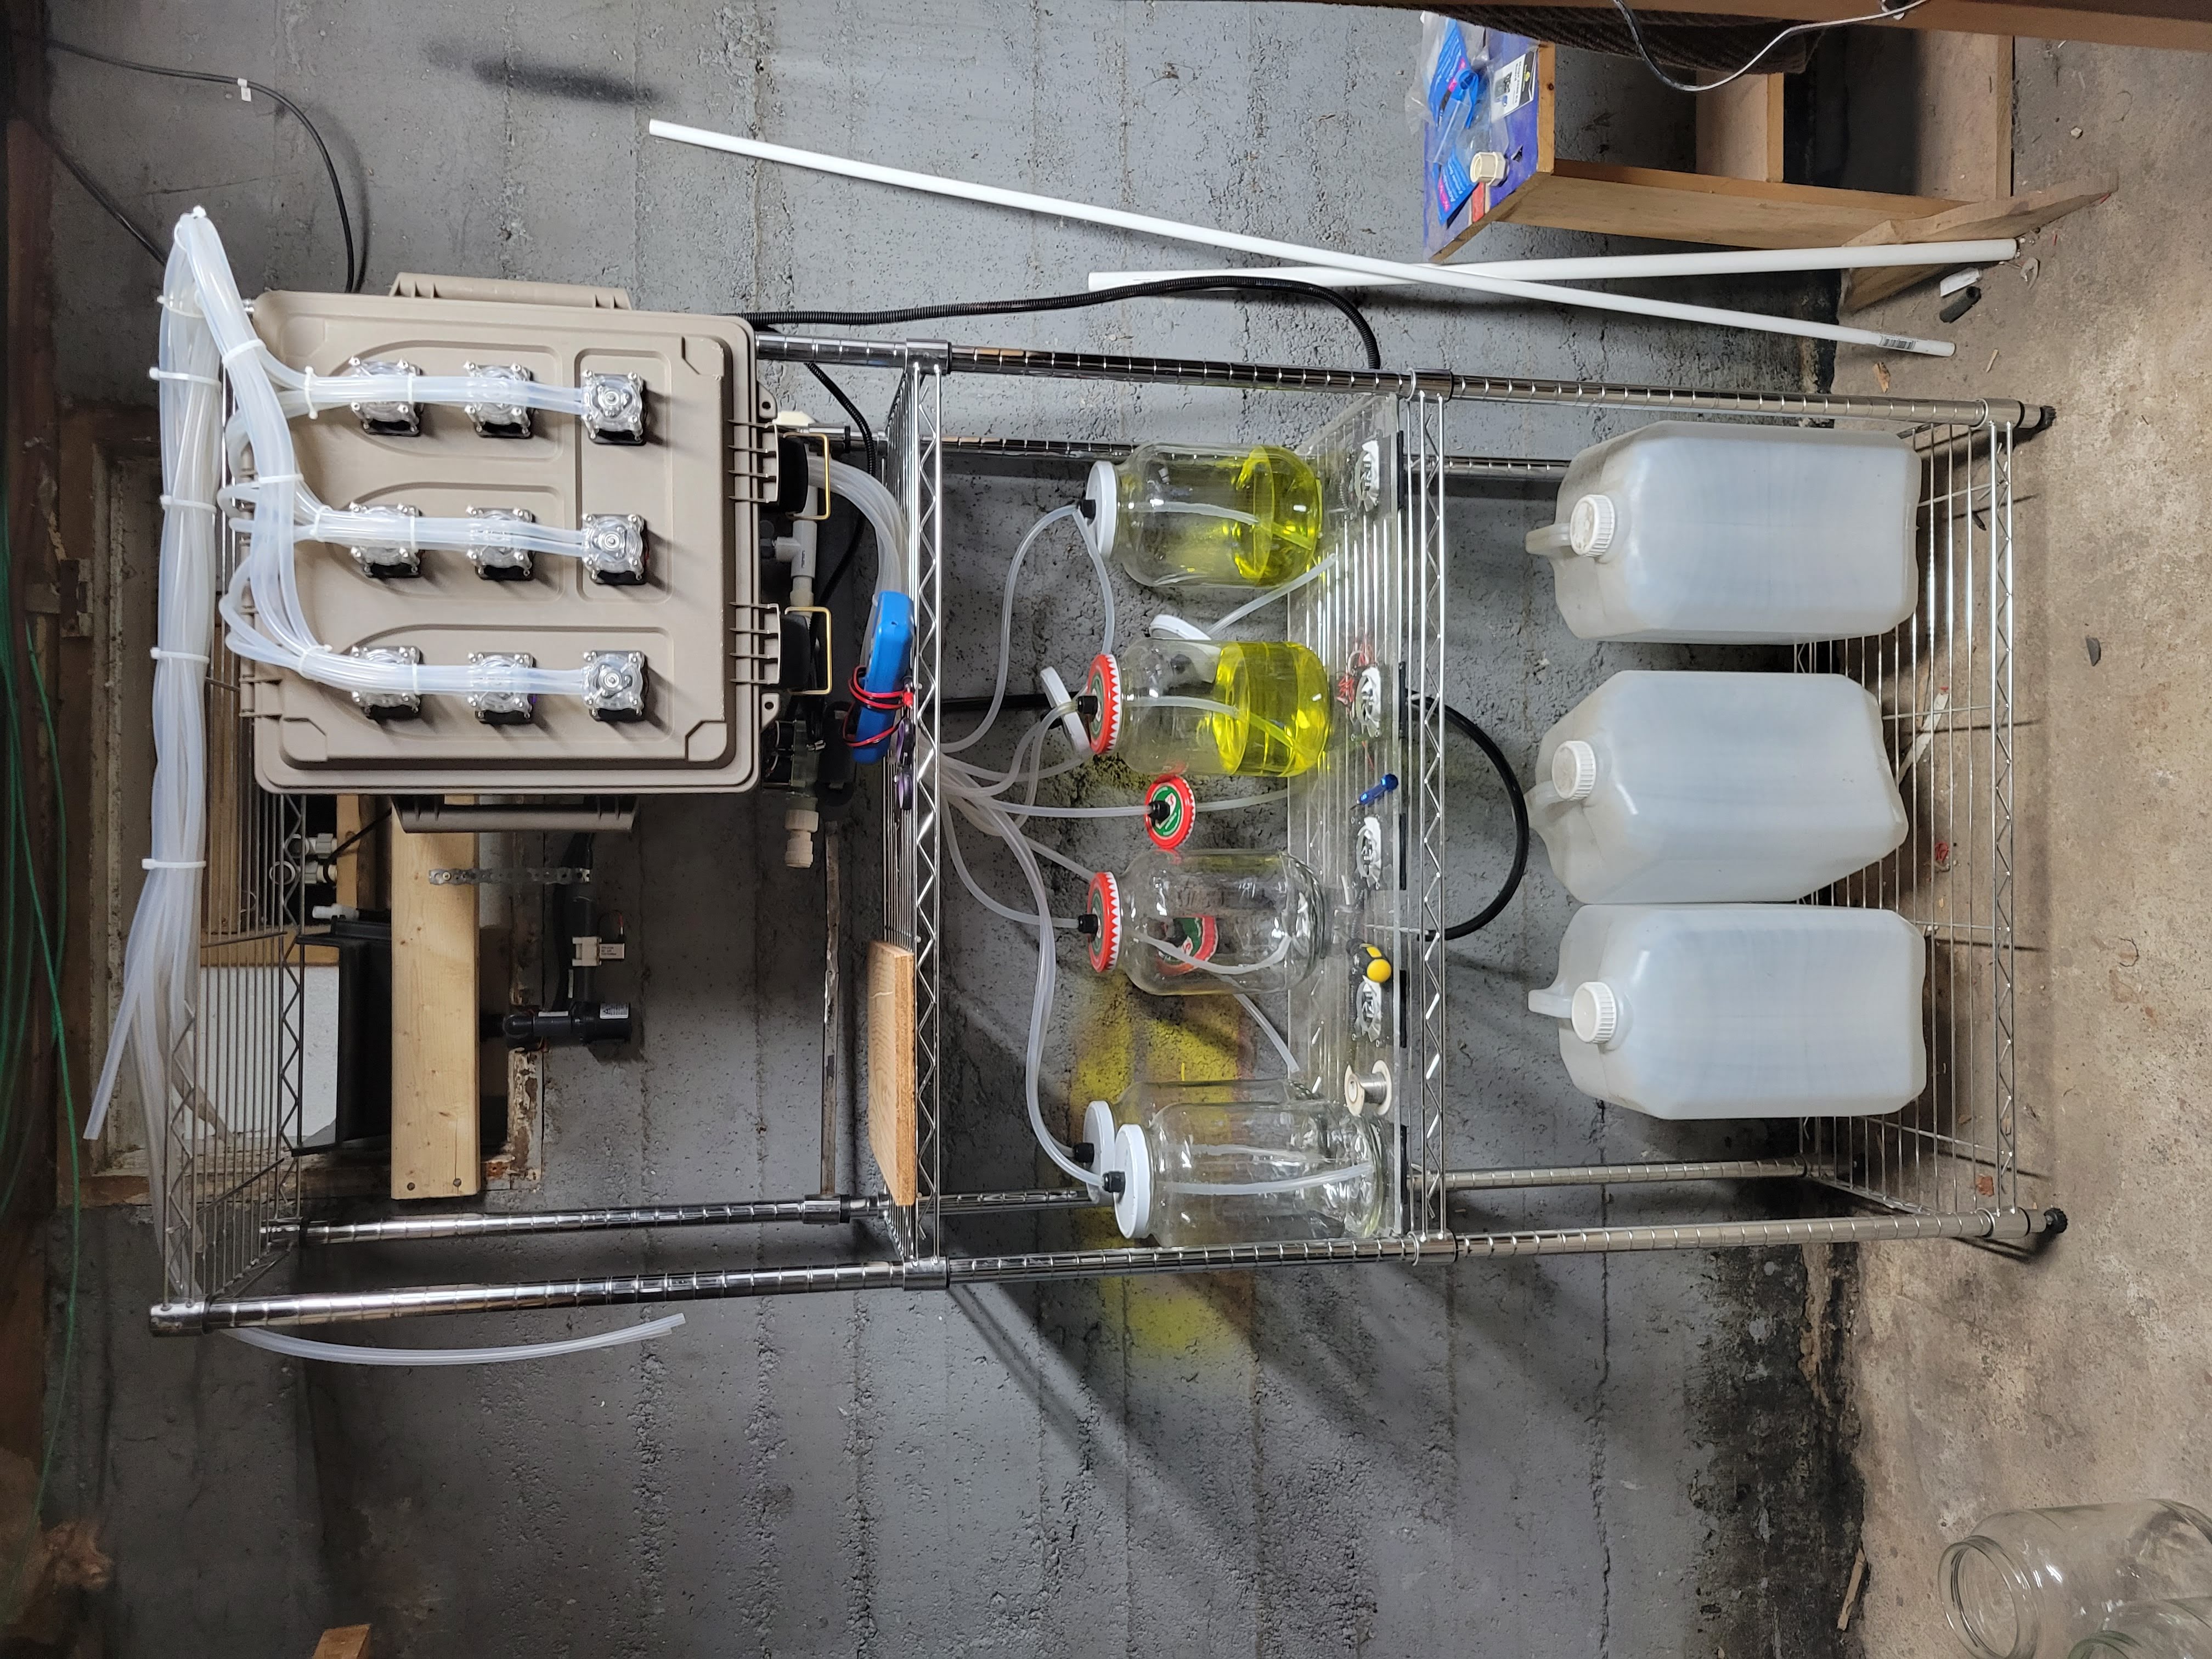
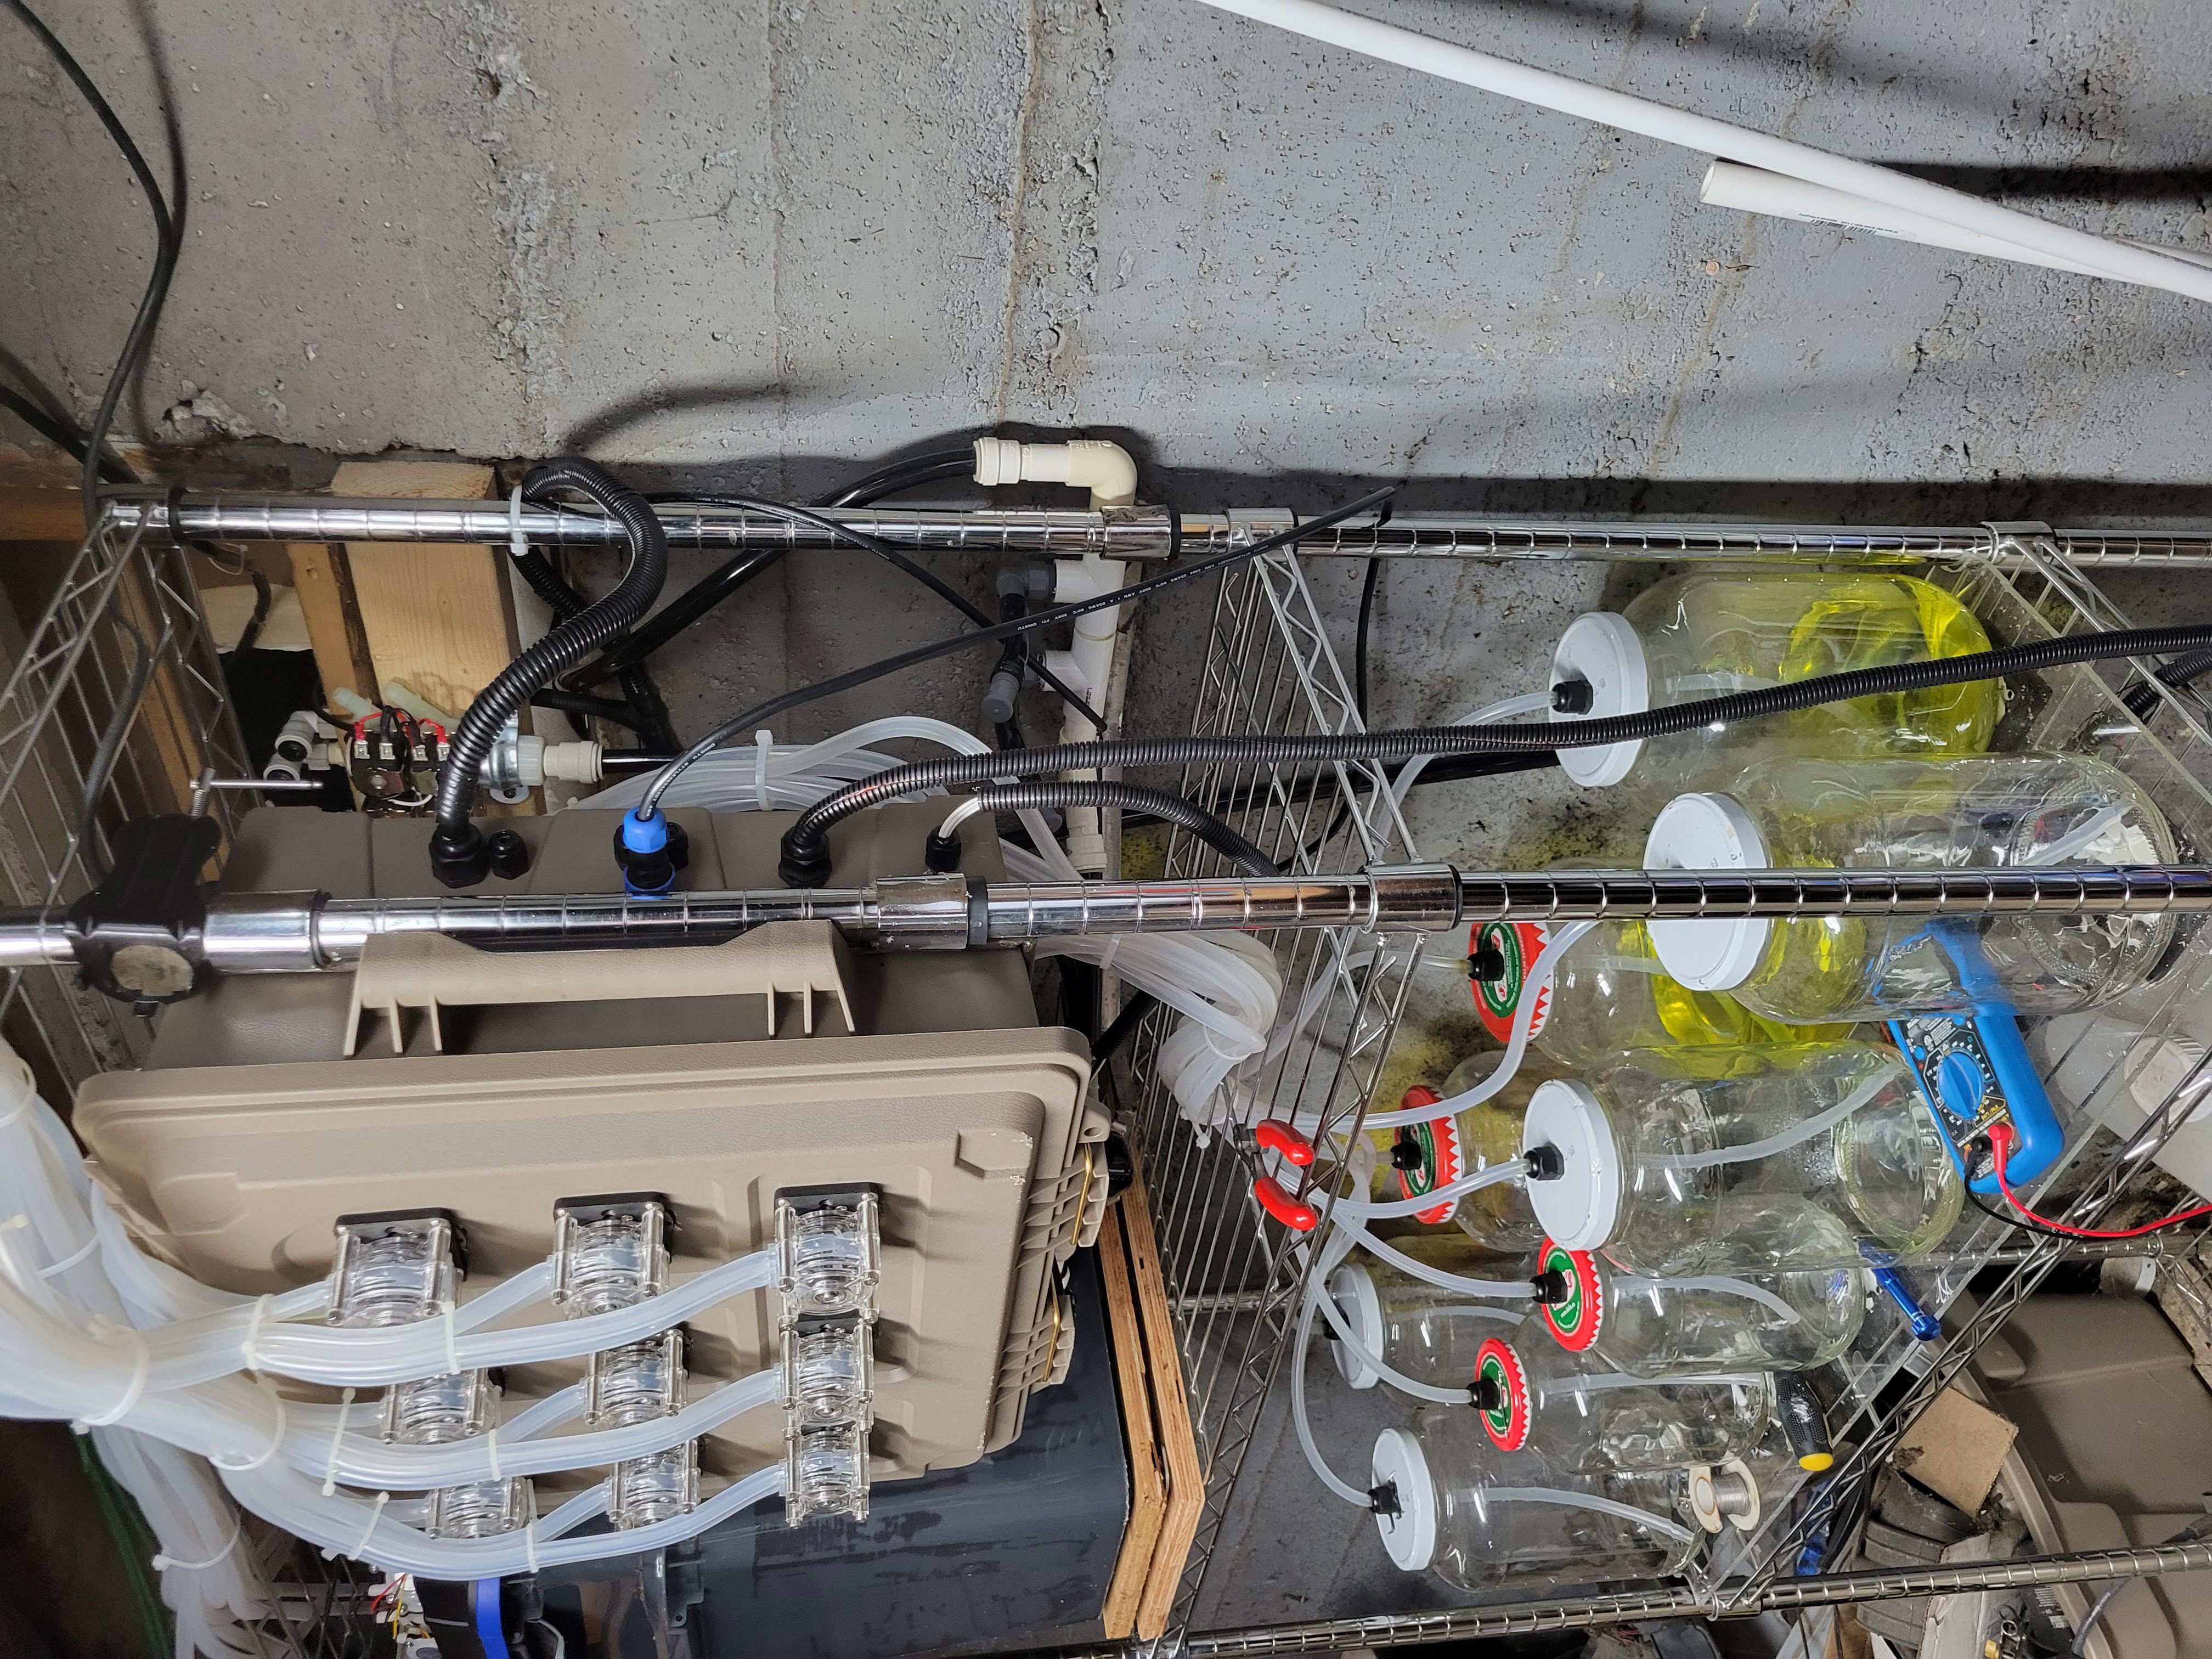
  • The system is designed to accommodate four plants initially (for this test proof of concept at least), fully expandable and modular, each housed in a separate 3" net cup within a 20L plastic pail, providing an environment for optimal growth.
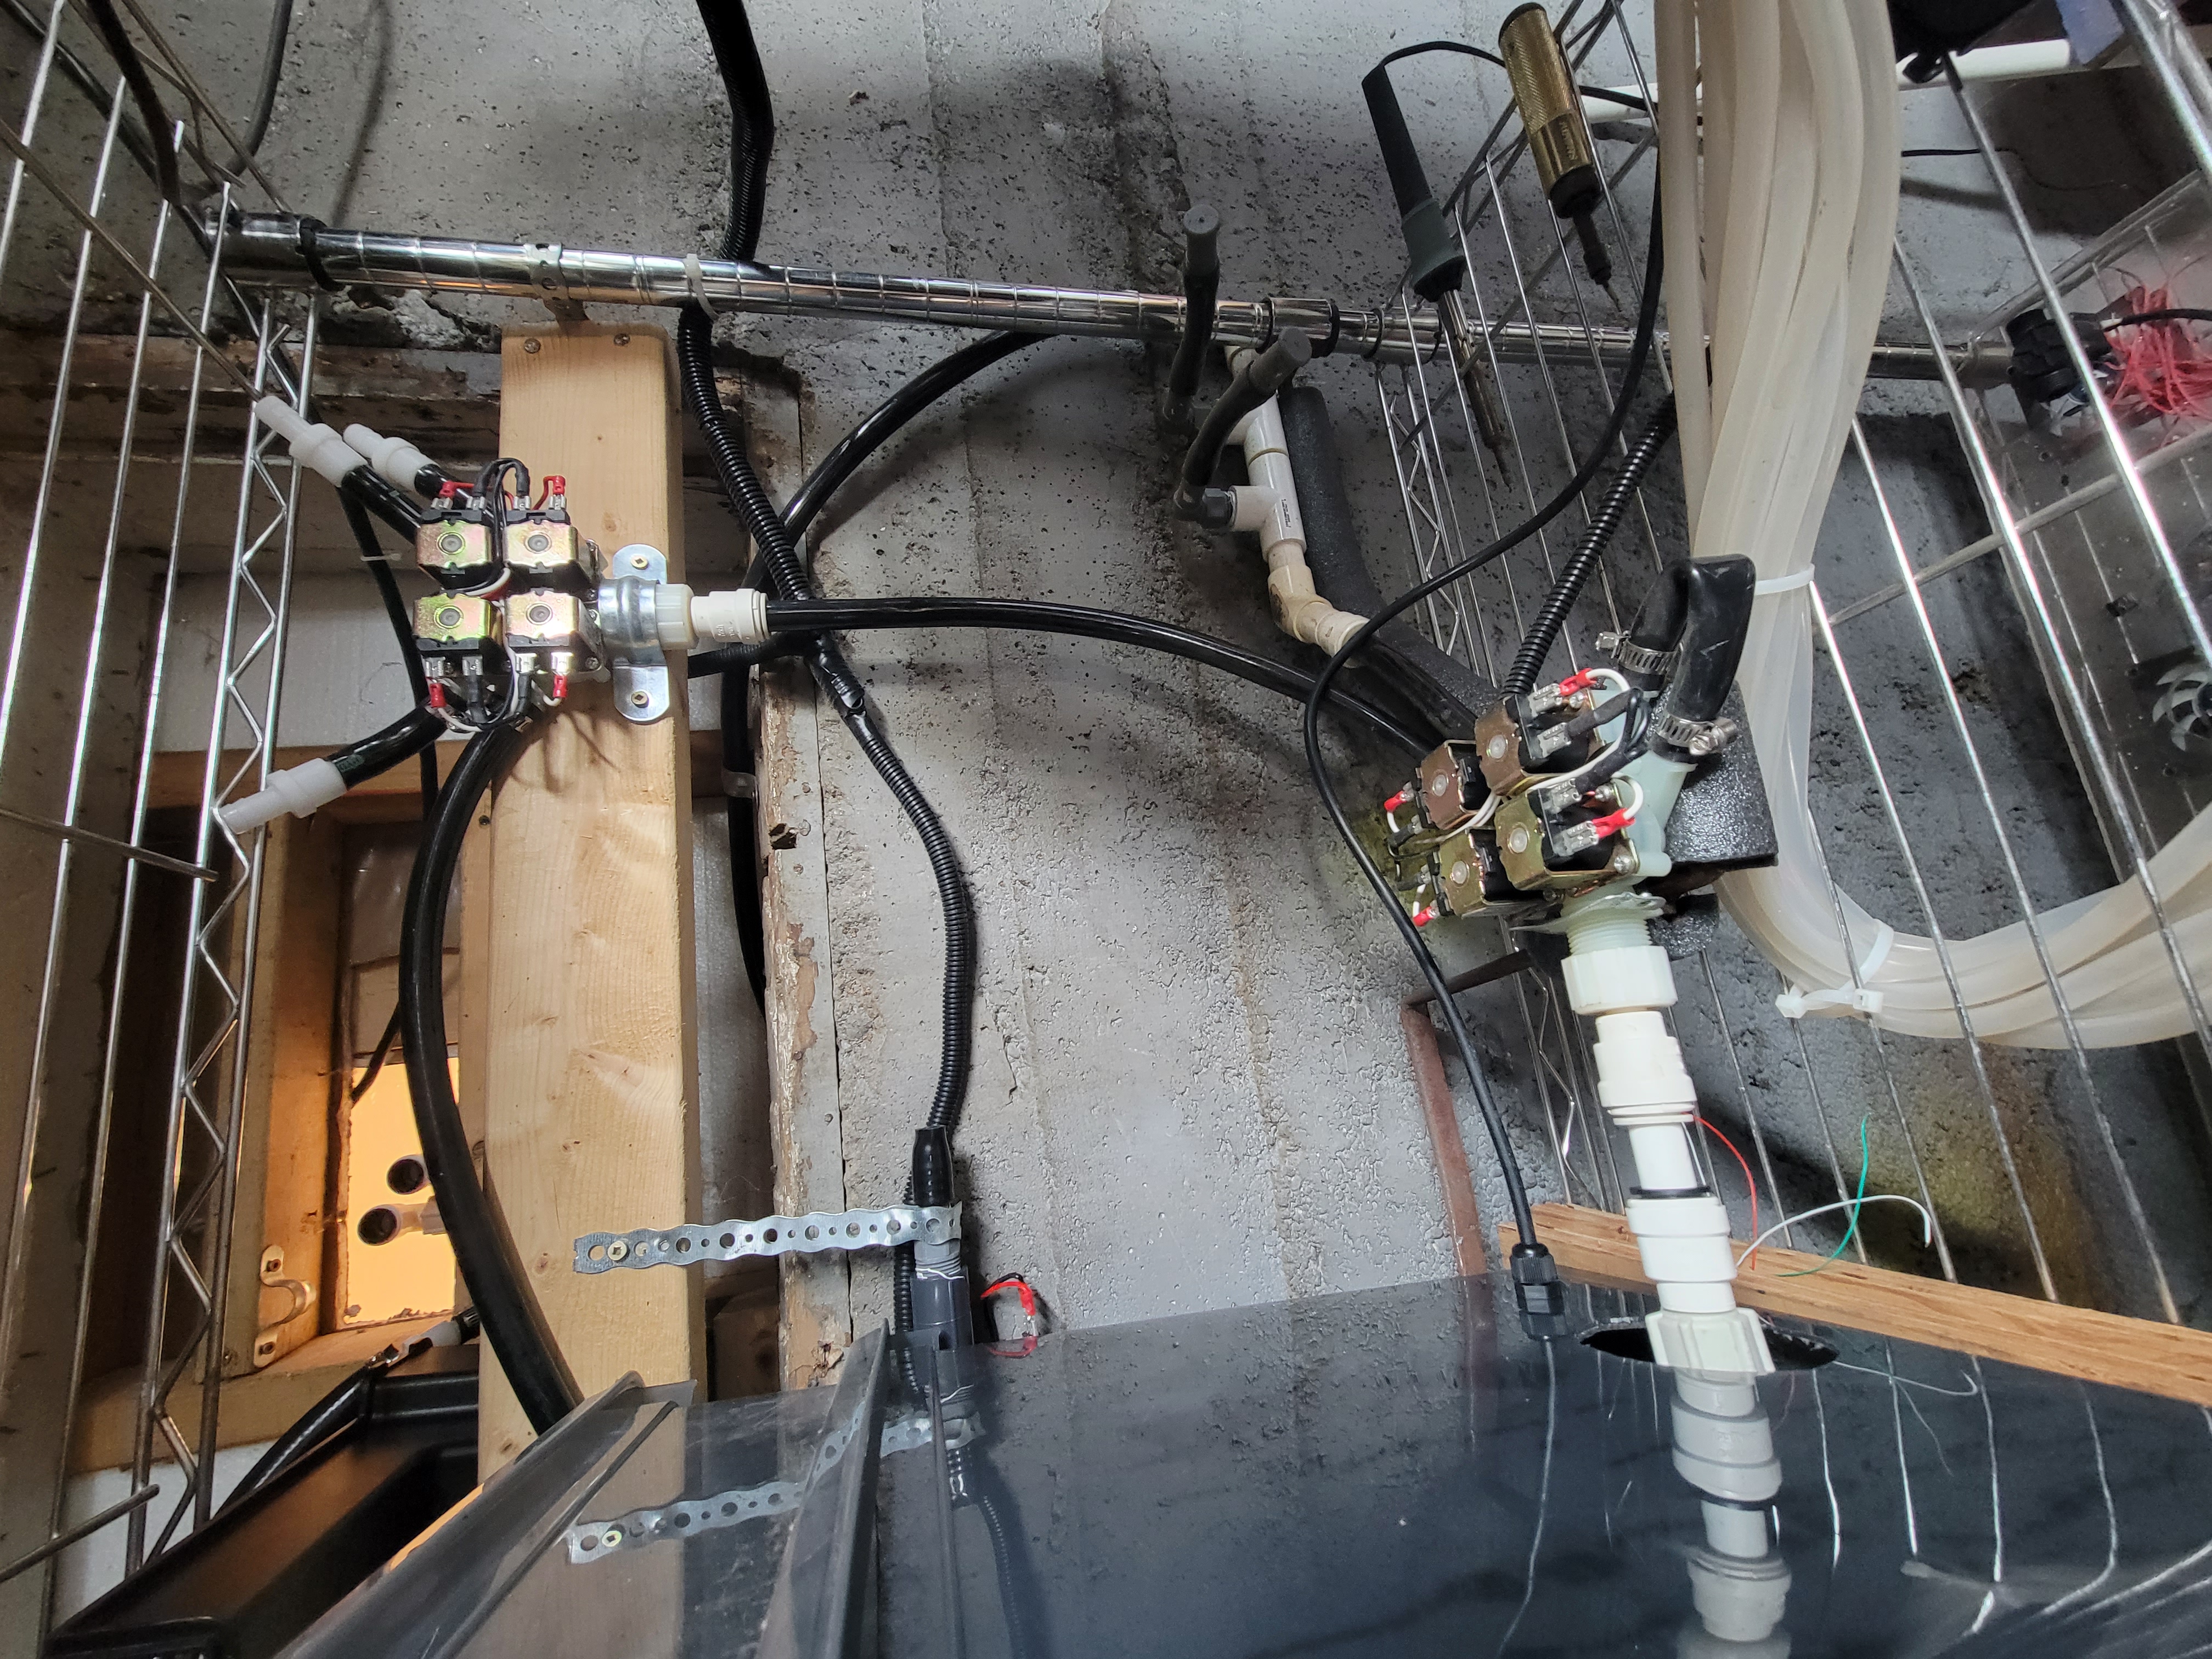
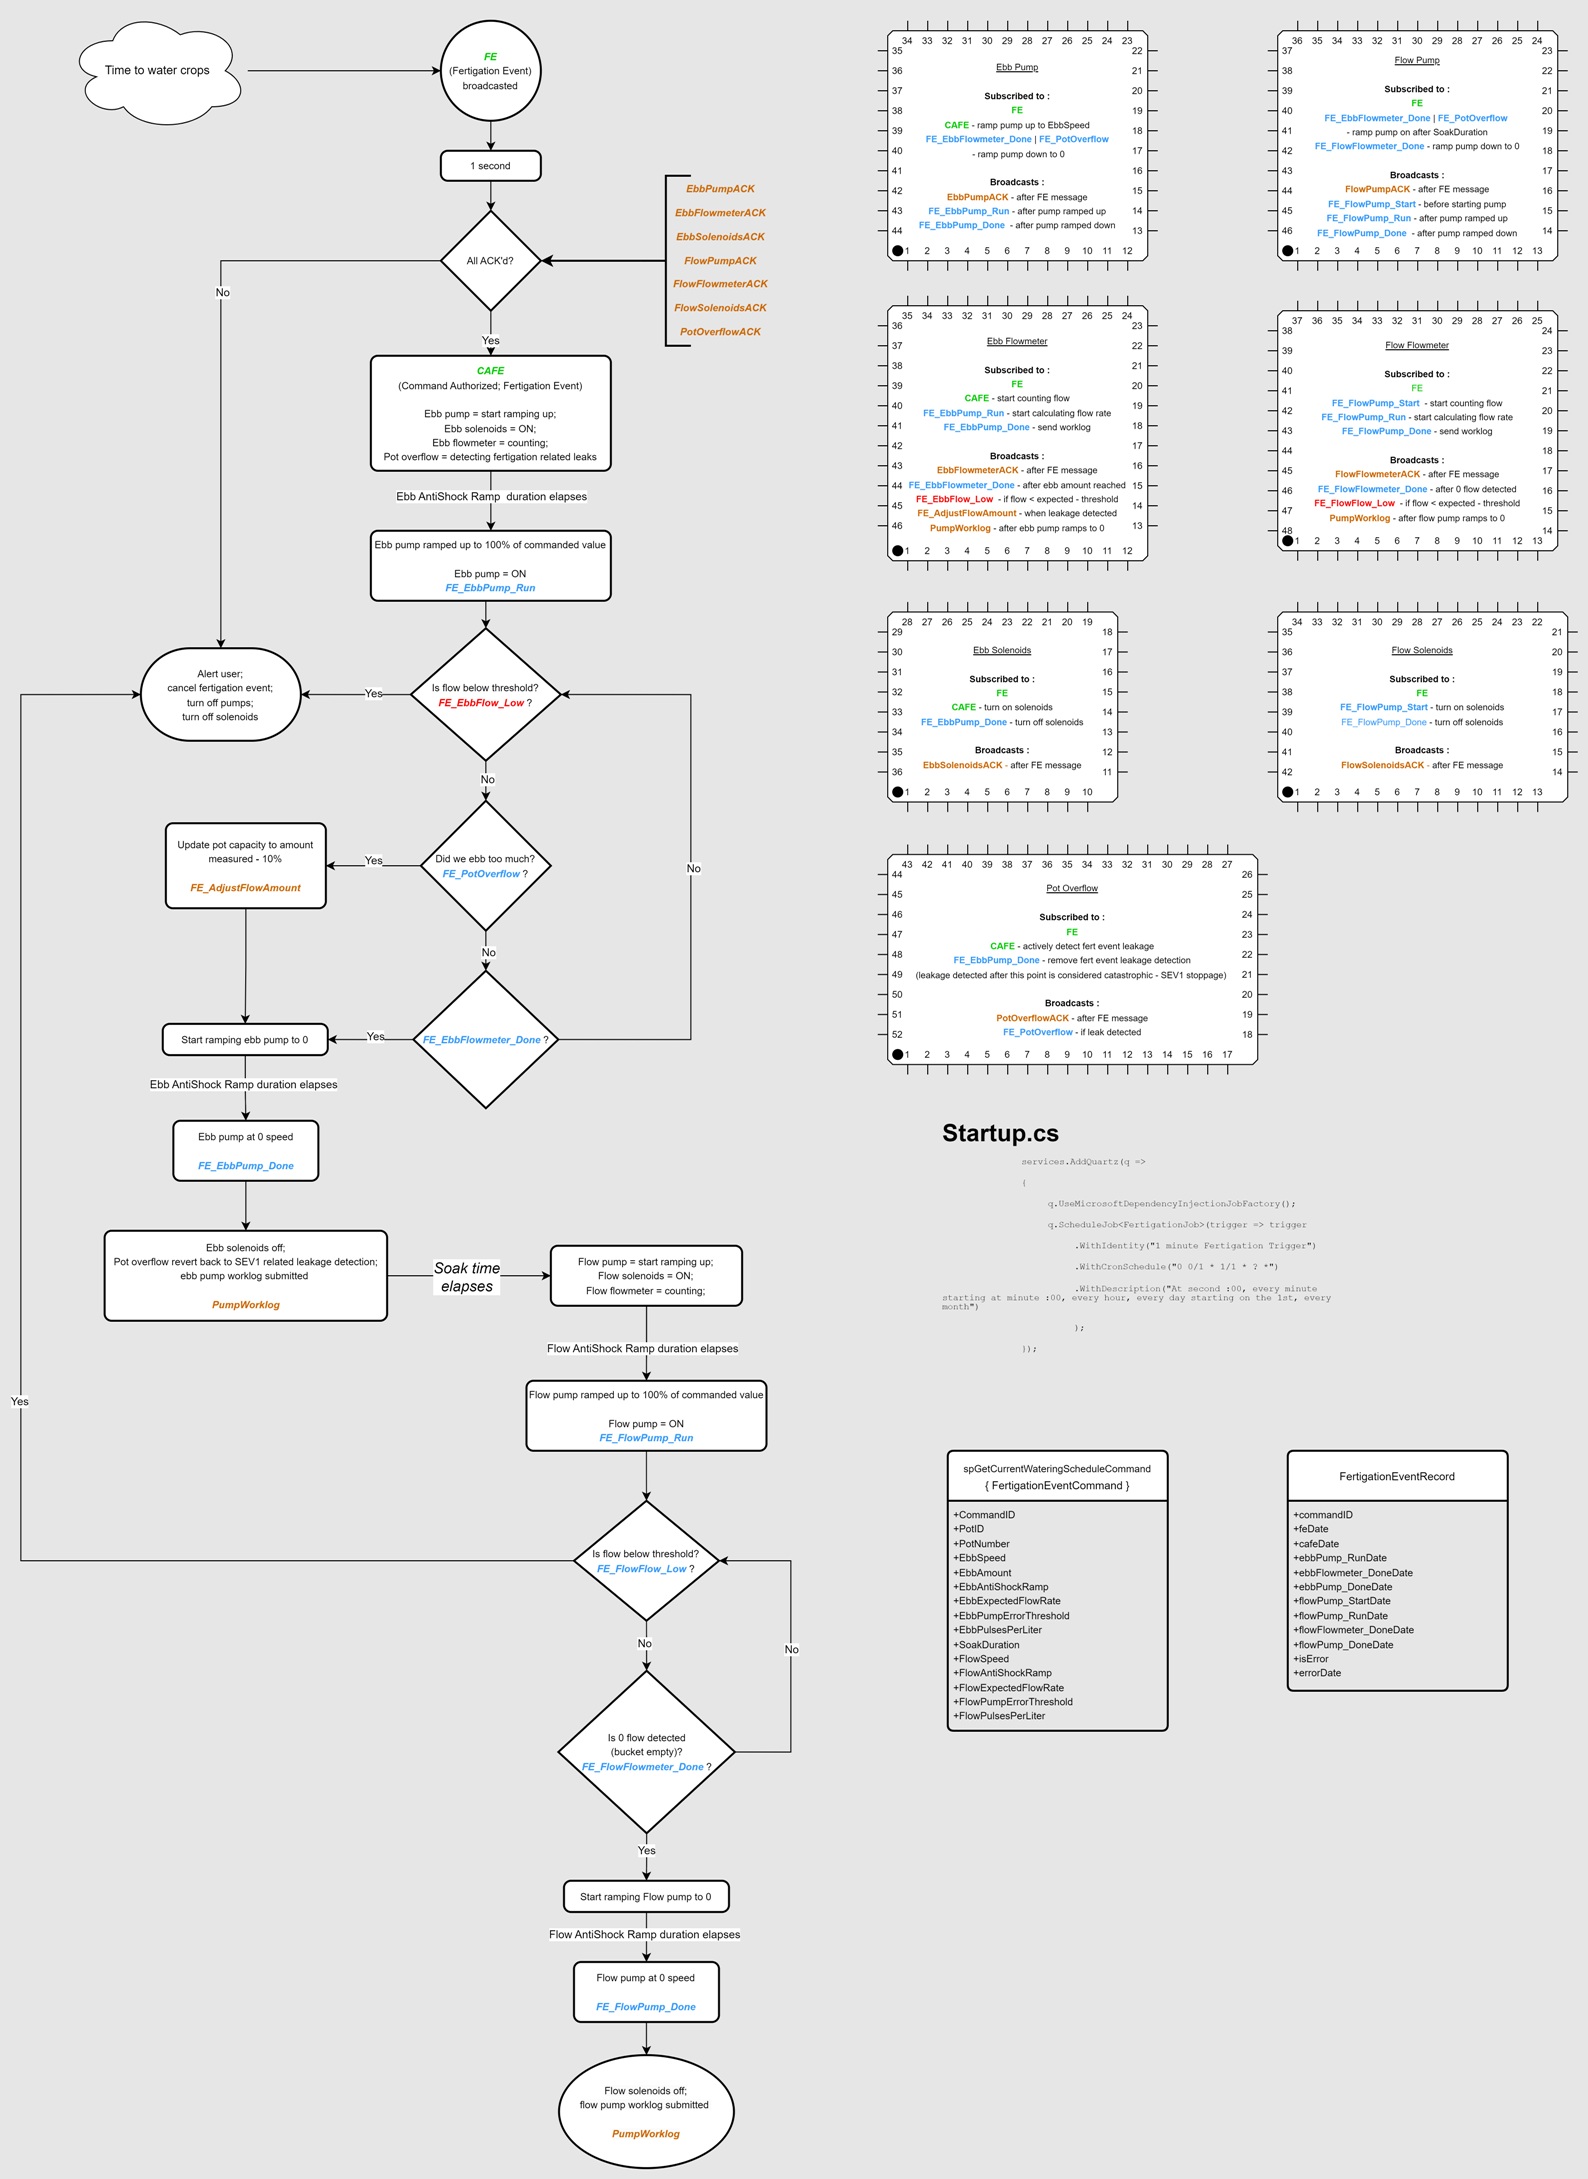
  • Flood detection mechanisms have been implemented to prevent potential overflow, leveraging moisture sensors that promptly signal adjustments to the ebb and flow cycle.
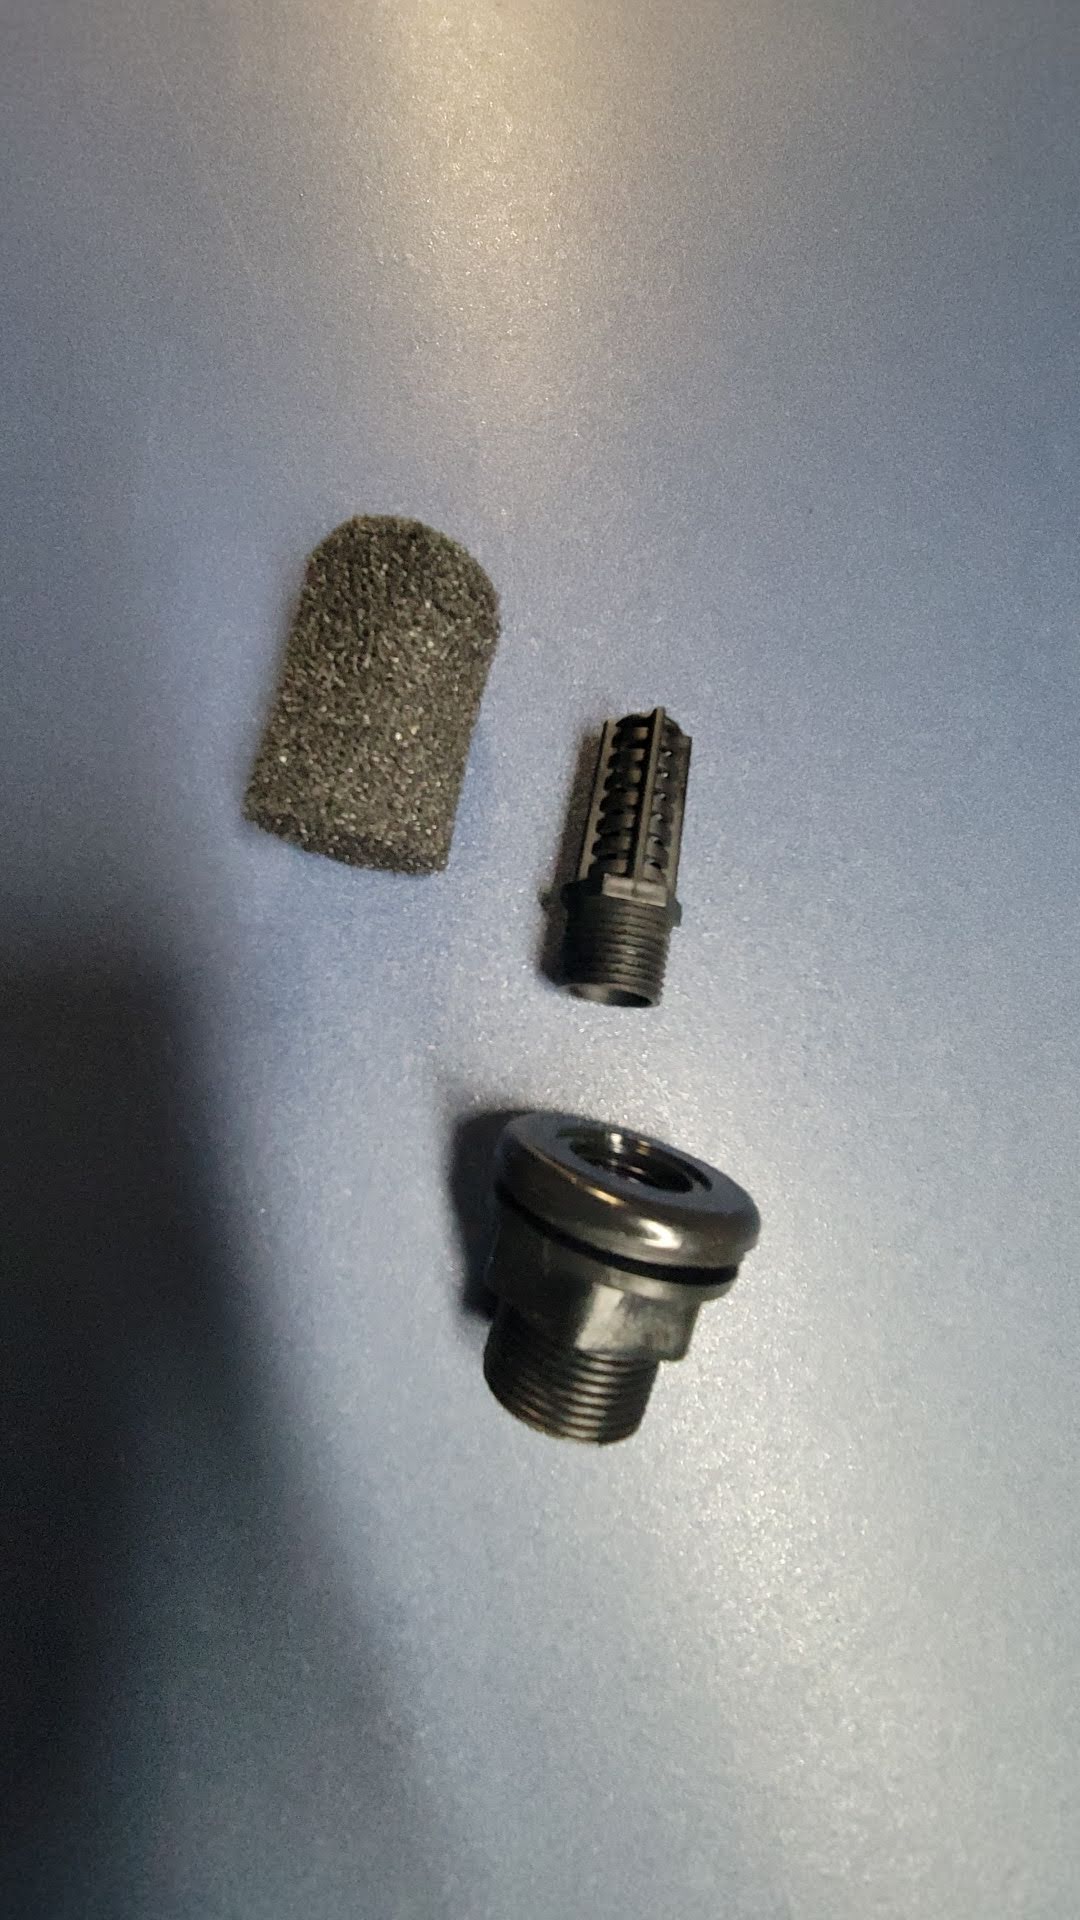
  • The system incorporates maintenance tracking for critical components, including pumps, solenoids, and flow meters, ensuring smooth operation.
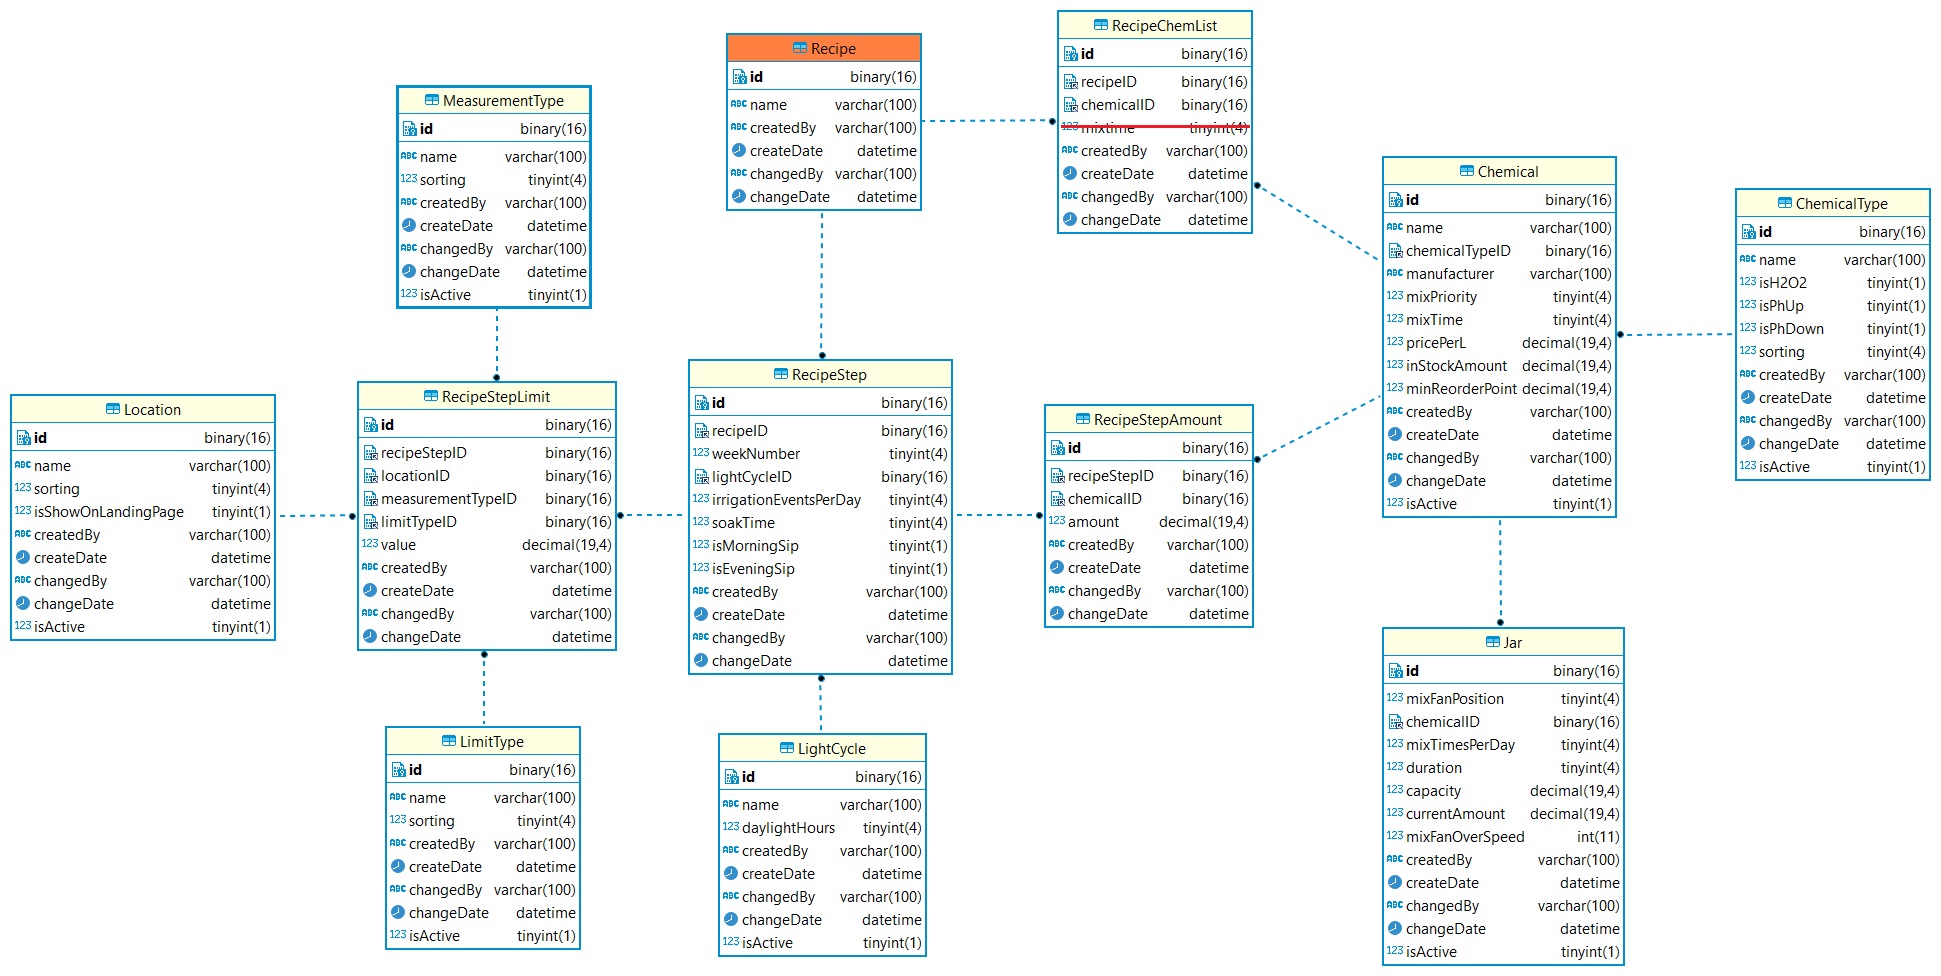
  • Inventory tracking is integrated to monitor the levels of essential chemicals, with potential features for automated procurement when stock reaches predefined thresholds.
  • To maintain ideal conditions, the YARG project includes provisions for regulating water temperature through water chillers or heaters as required.

Software and Control:

The software architecture of the YARG project is comprehensive:

  • The software follows the MVC (Model-View-Controller) design pattern and is developed as a C# web application using .NET 5. It incorporates Bootstrap, JQuery, and Plotly JavaScript libraries for enhanced functionality and user experience.
  • The application is compiled for ARM64 Linux and is hosted on a Raspberry Pi 3, leveraging NGINX for web server functionality. Database management is handled by MariaDB on an SSD drive for data reliability.
  • Secure MQTT communication is established for seamless device interaction through a Mosquitto broker on the same Raspberry Pi, ensuring data integrity and privacy.
  • Authentication mechanisms are in place, allowing local user accounts and exploring the possibility of third-party sign-ons such as Google authentication via Microsoft Identity.
  • The project follows a strict "No Entity Framework" policy, allowing for fine-grained control over the database layer. This includes crafting custom stored procedures, optimizing queries, and hand-coding the Data Access Layer (DAL) for optimal performance and control.
  • The YARG project embraces a multi-language approach, offering support for English (as the default language) and plans for future expansions to include French, Spanish, Ukrainian, and more, to accommodate a diverse user base.
  • At its core, the project aims to provide a platform for skill enhancement and continual learning. The open-source, do-it-yourself (DIY) philosophy aligns with budget-conscious principles, fostering collaboration, and encouraging community participation in the spirit of shared knowledge.

Language Support and Educational Goals:

Language diversity and educational growth are essential aspects of the YARG project:

  • The project aims to offer multi-language support, starting with English (default), and plans to expand to include French, Spanish, and Ukrainian, with potential for additional languages in the future.
  • At its core, the YARG project serves as a platform for skill enhancement and continual learning for myself. It provides an opportunity to stay relevant in an ever-evolving technological landscape.
  • The project upholds an open-source and DIY ethos, emphasizing a budget-friendly approach that encourages collaboration and community participation.

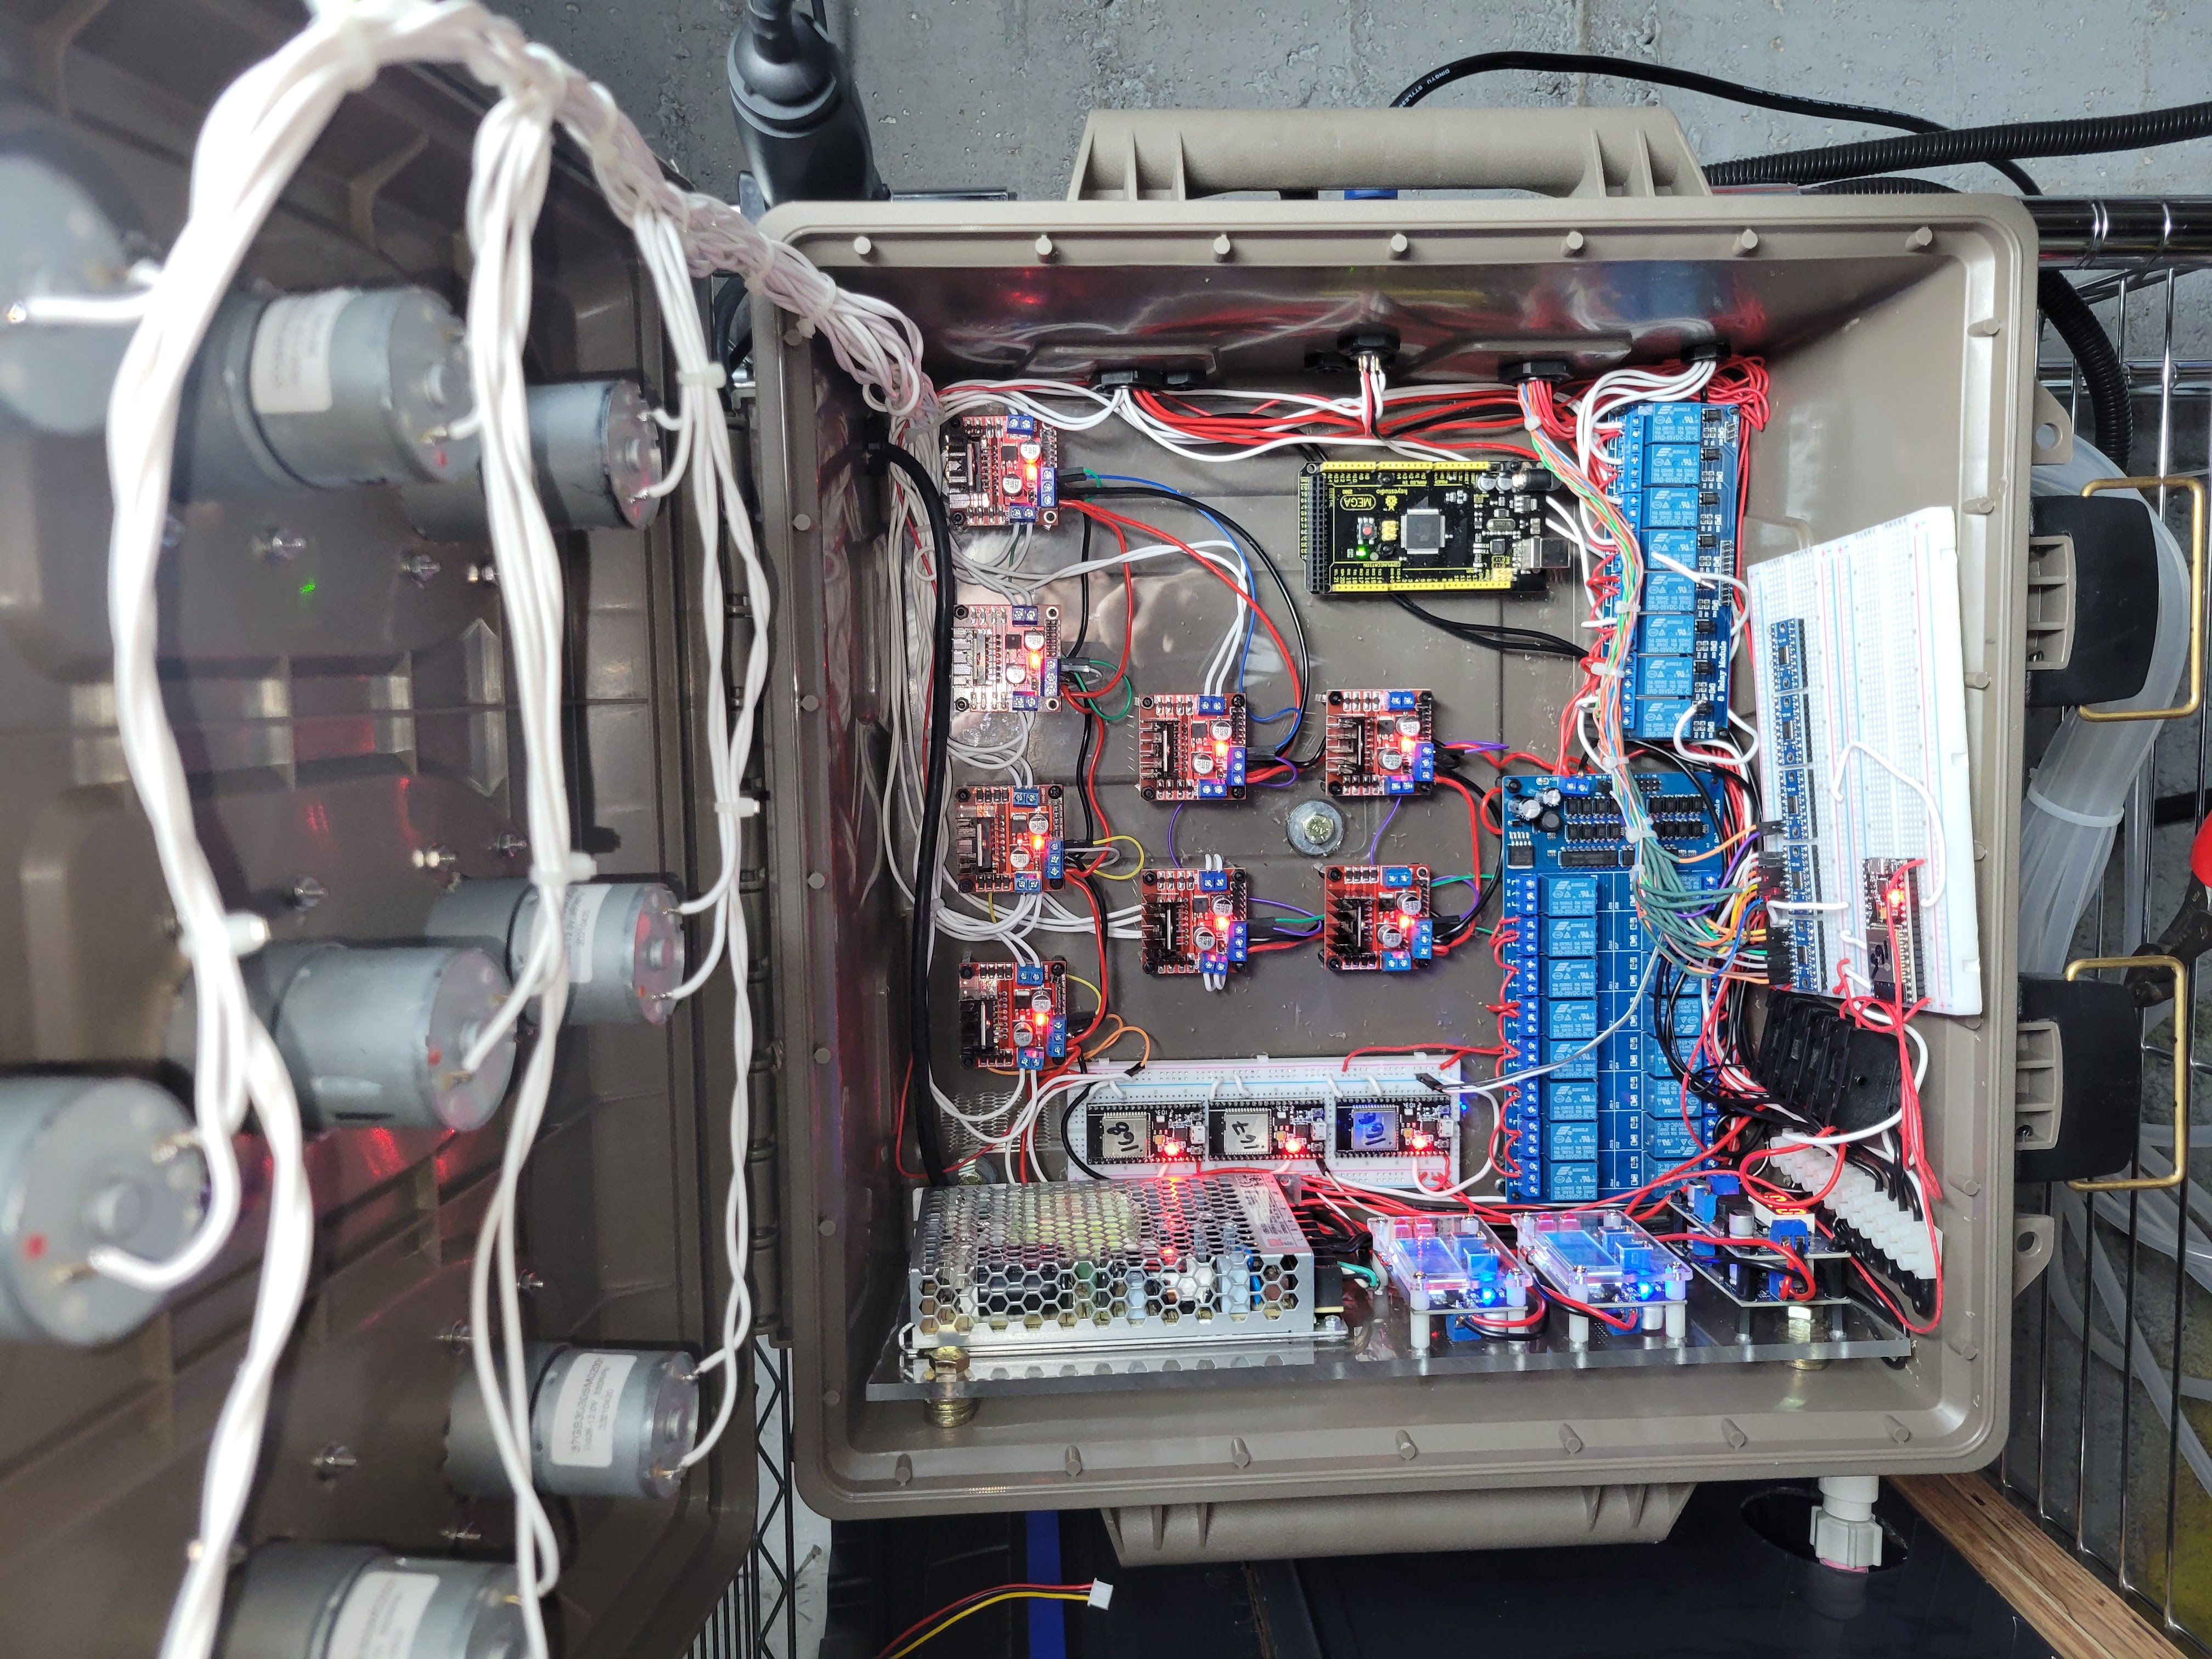
Microcontroller and Control Logic:

The hardware and control components of the YARG project are meticulously designed:

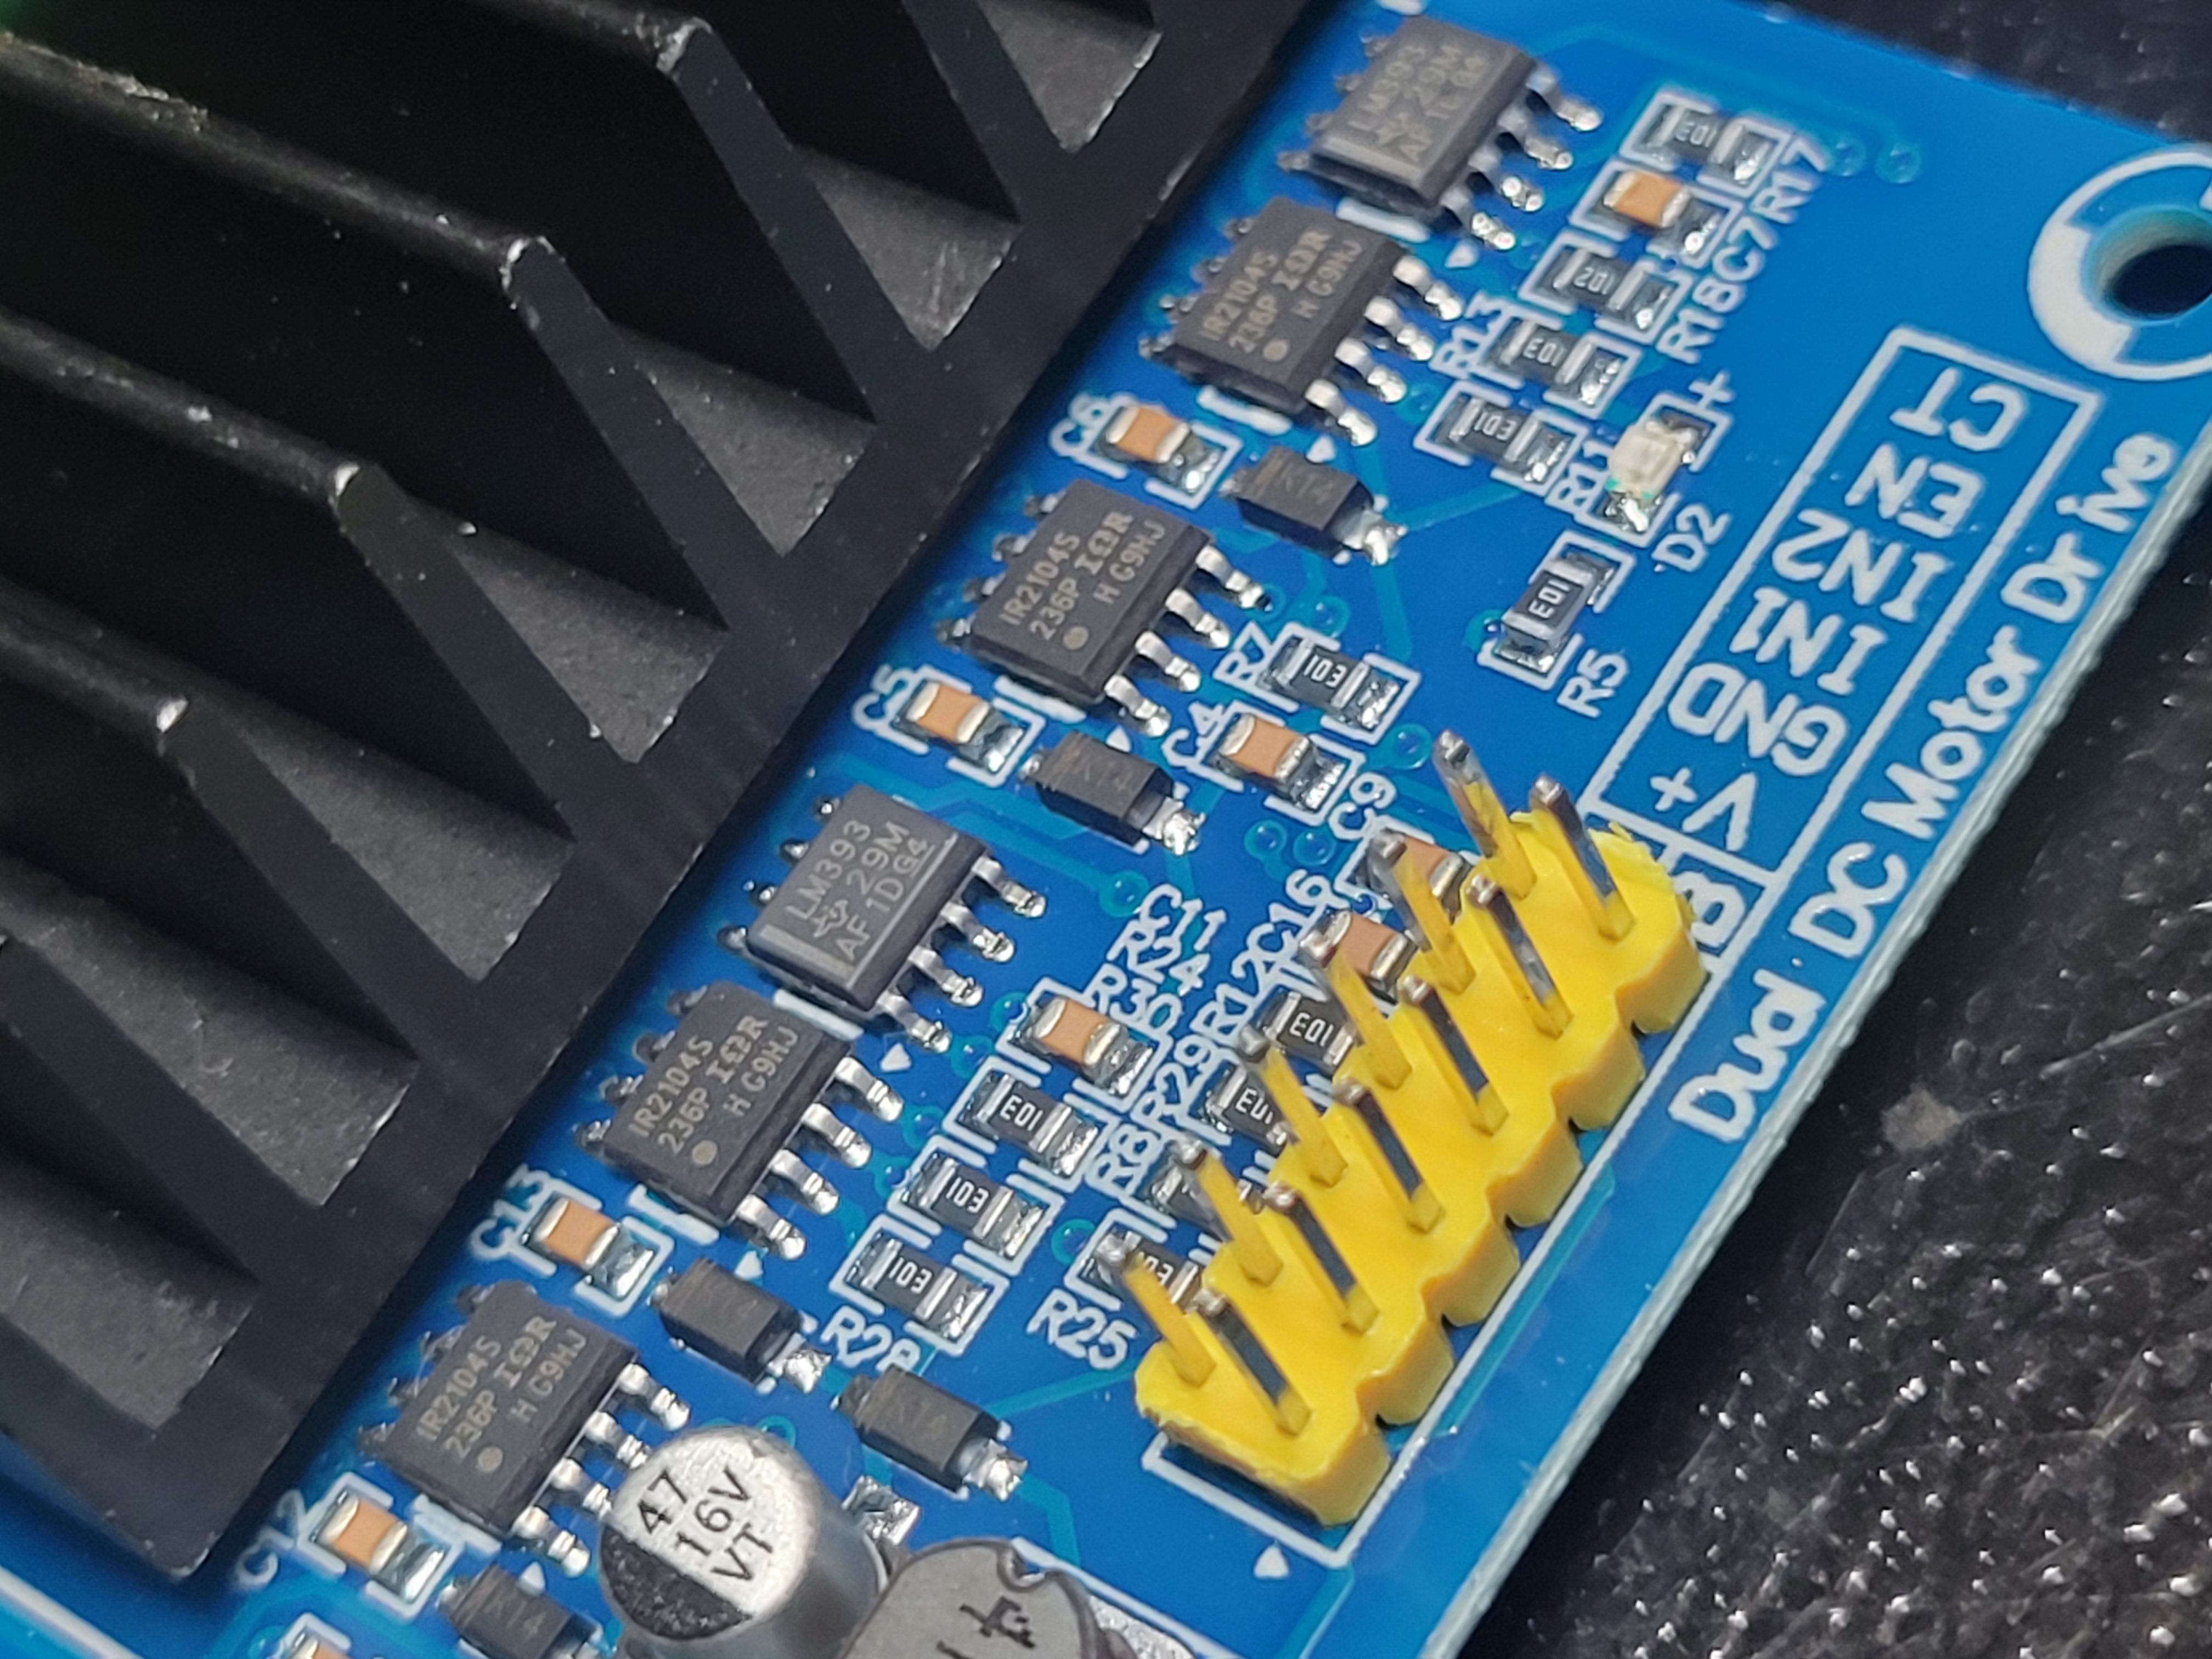
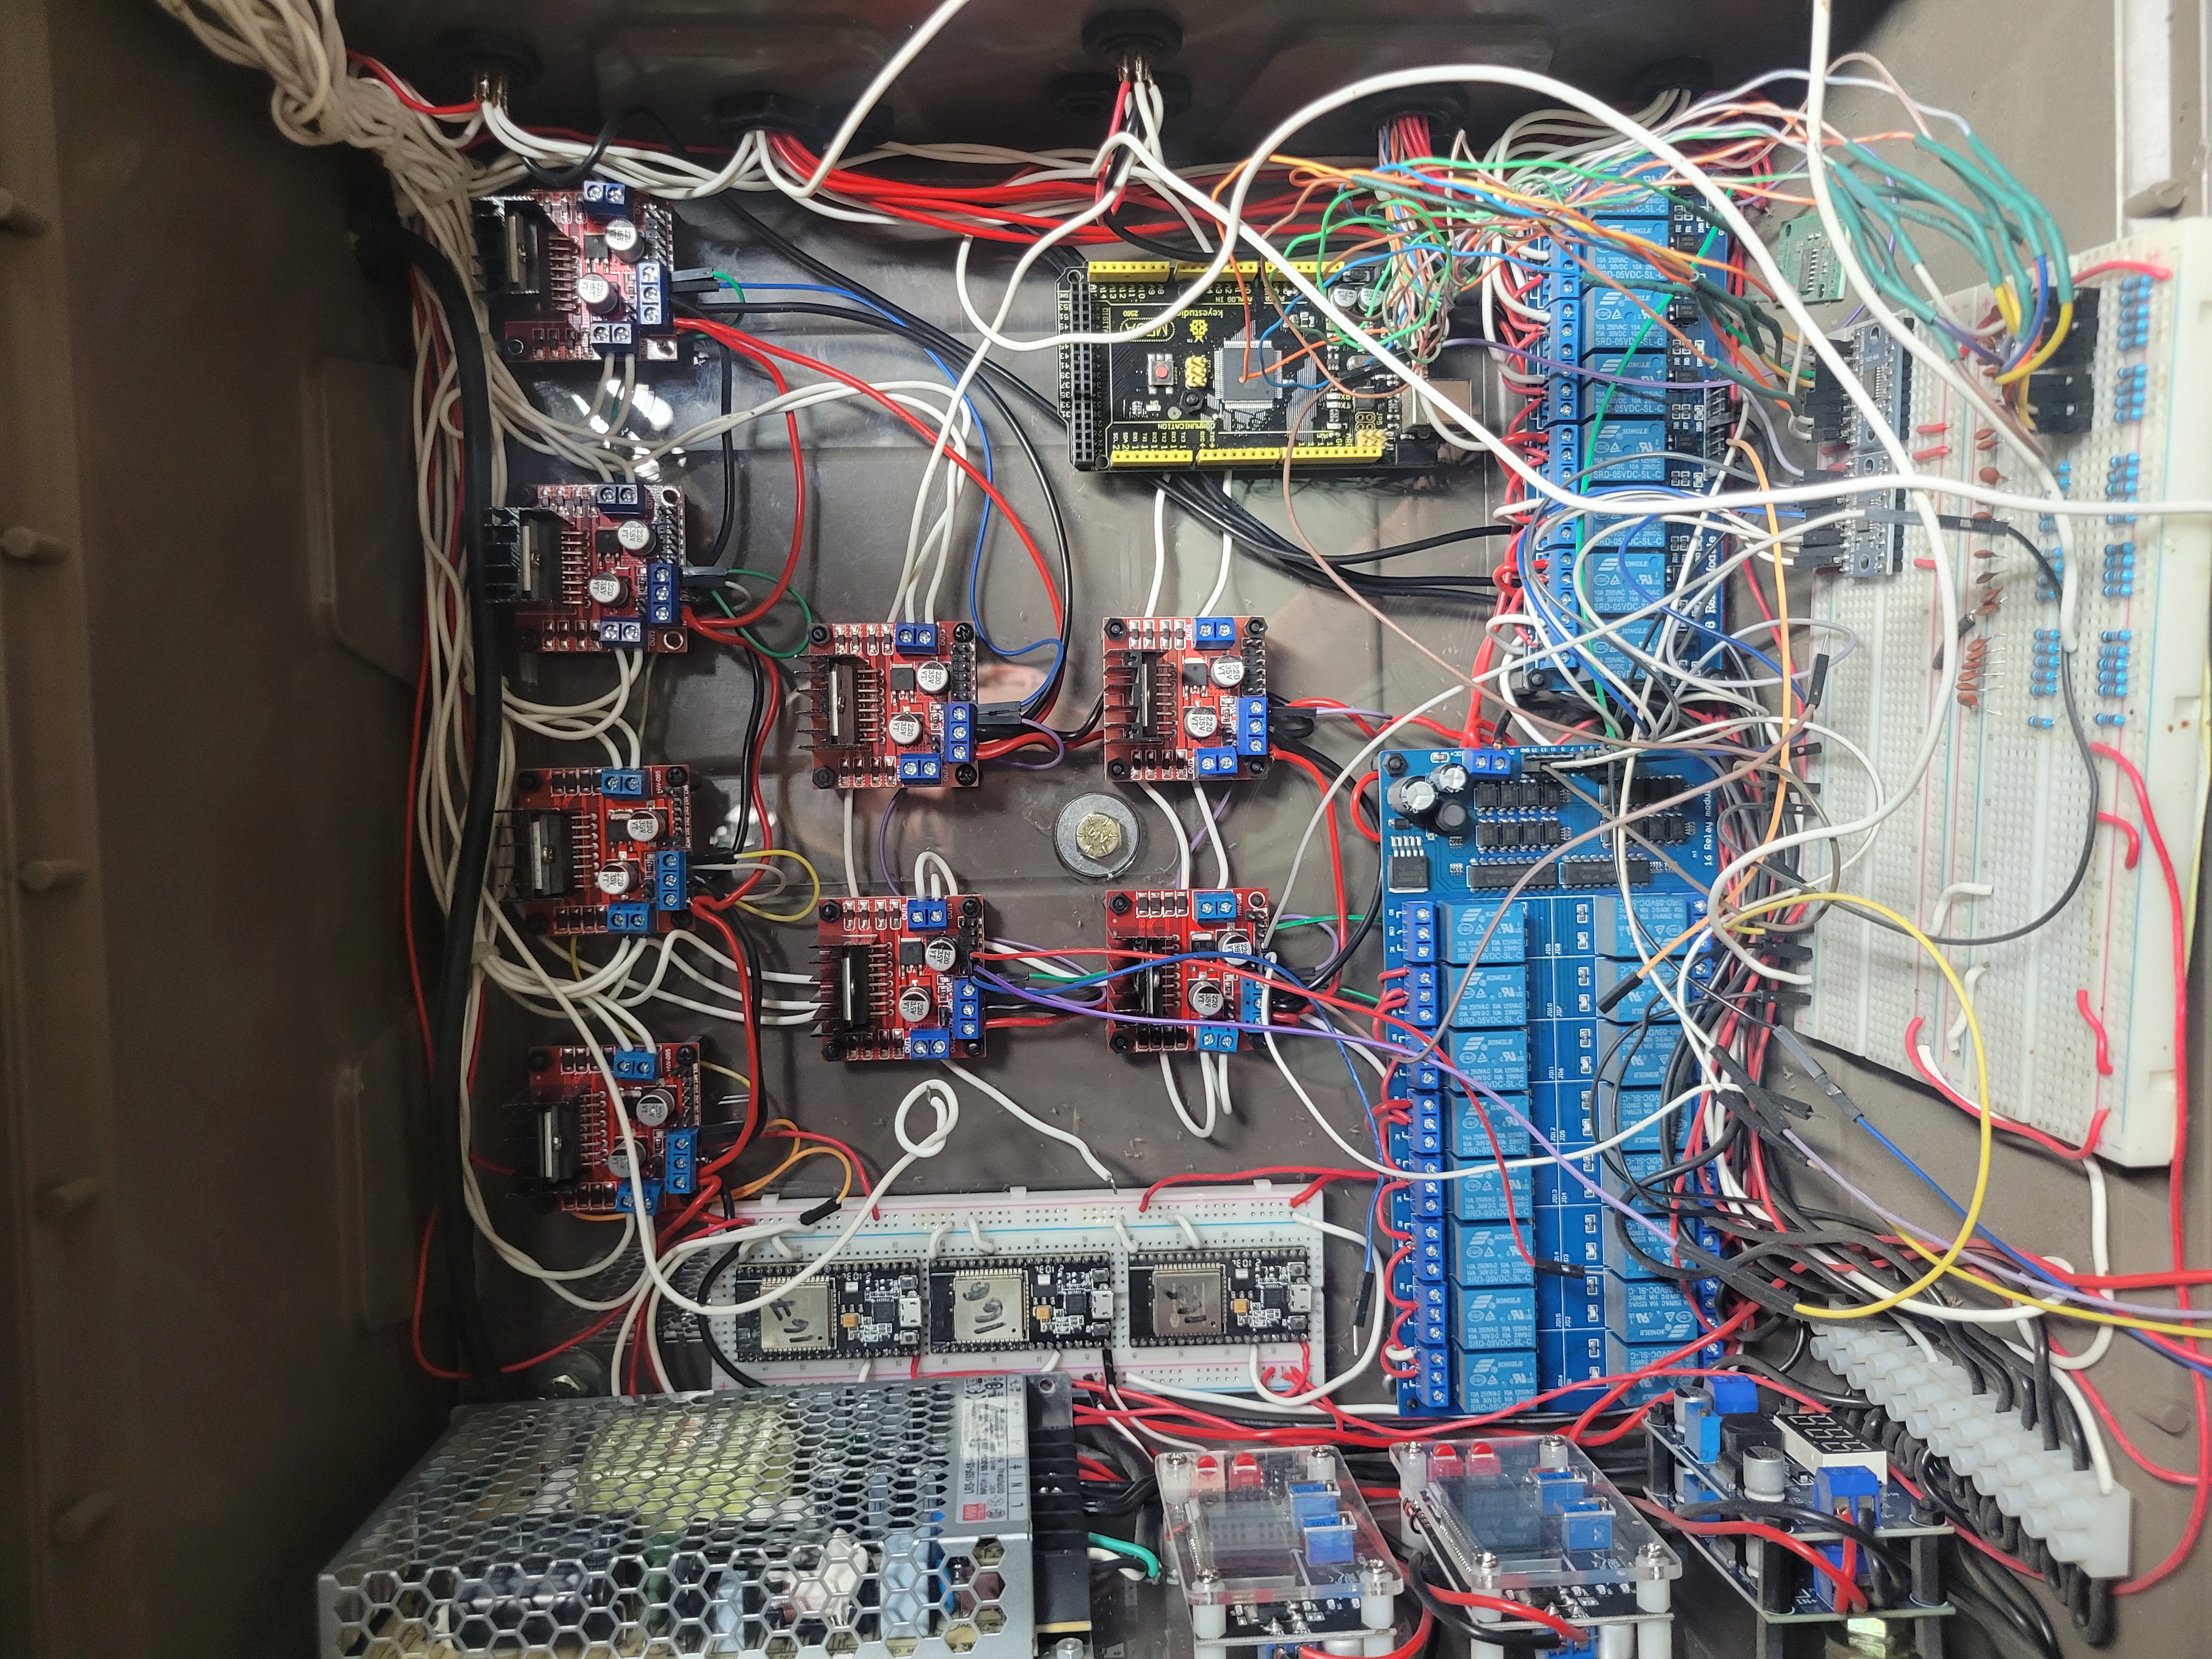
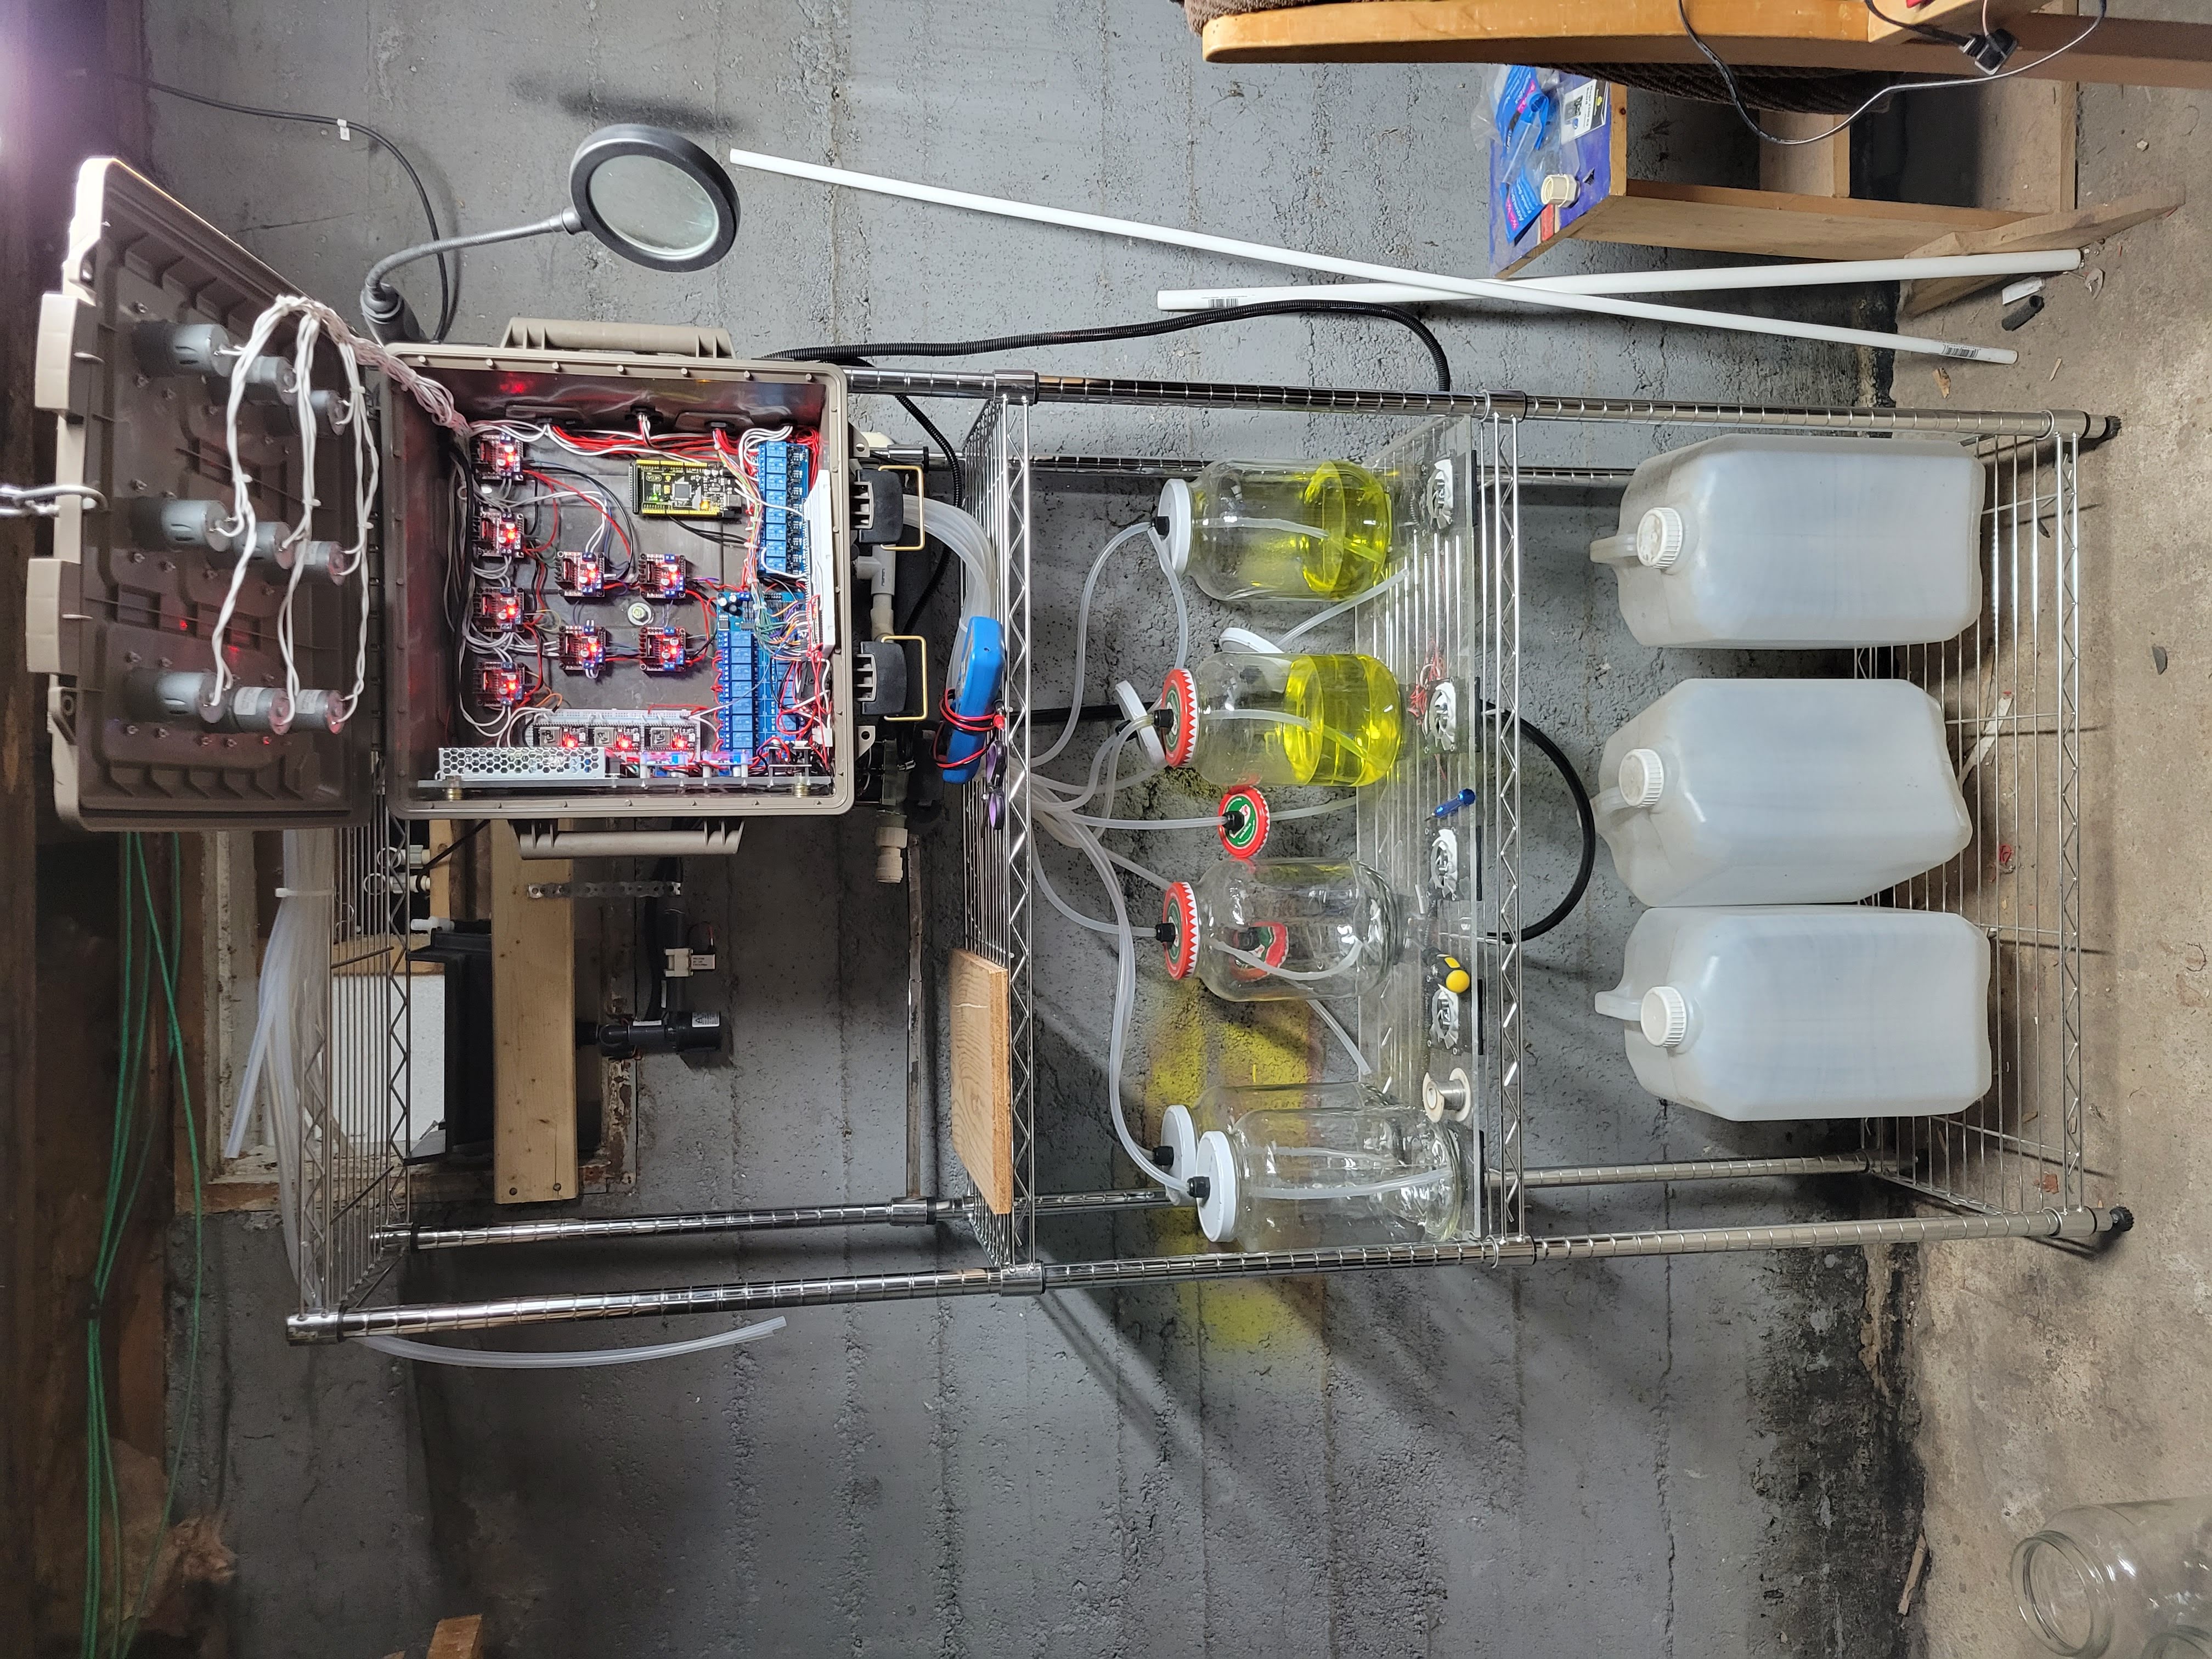
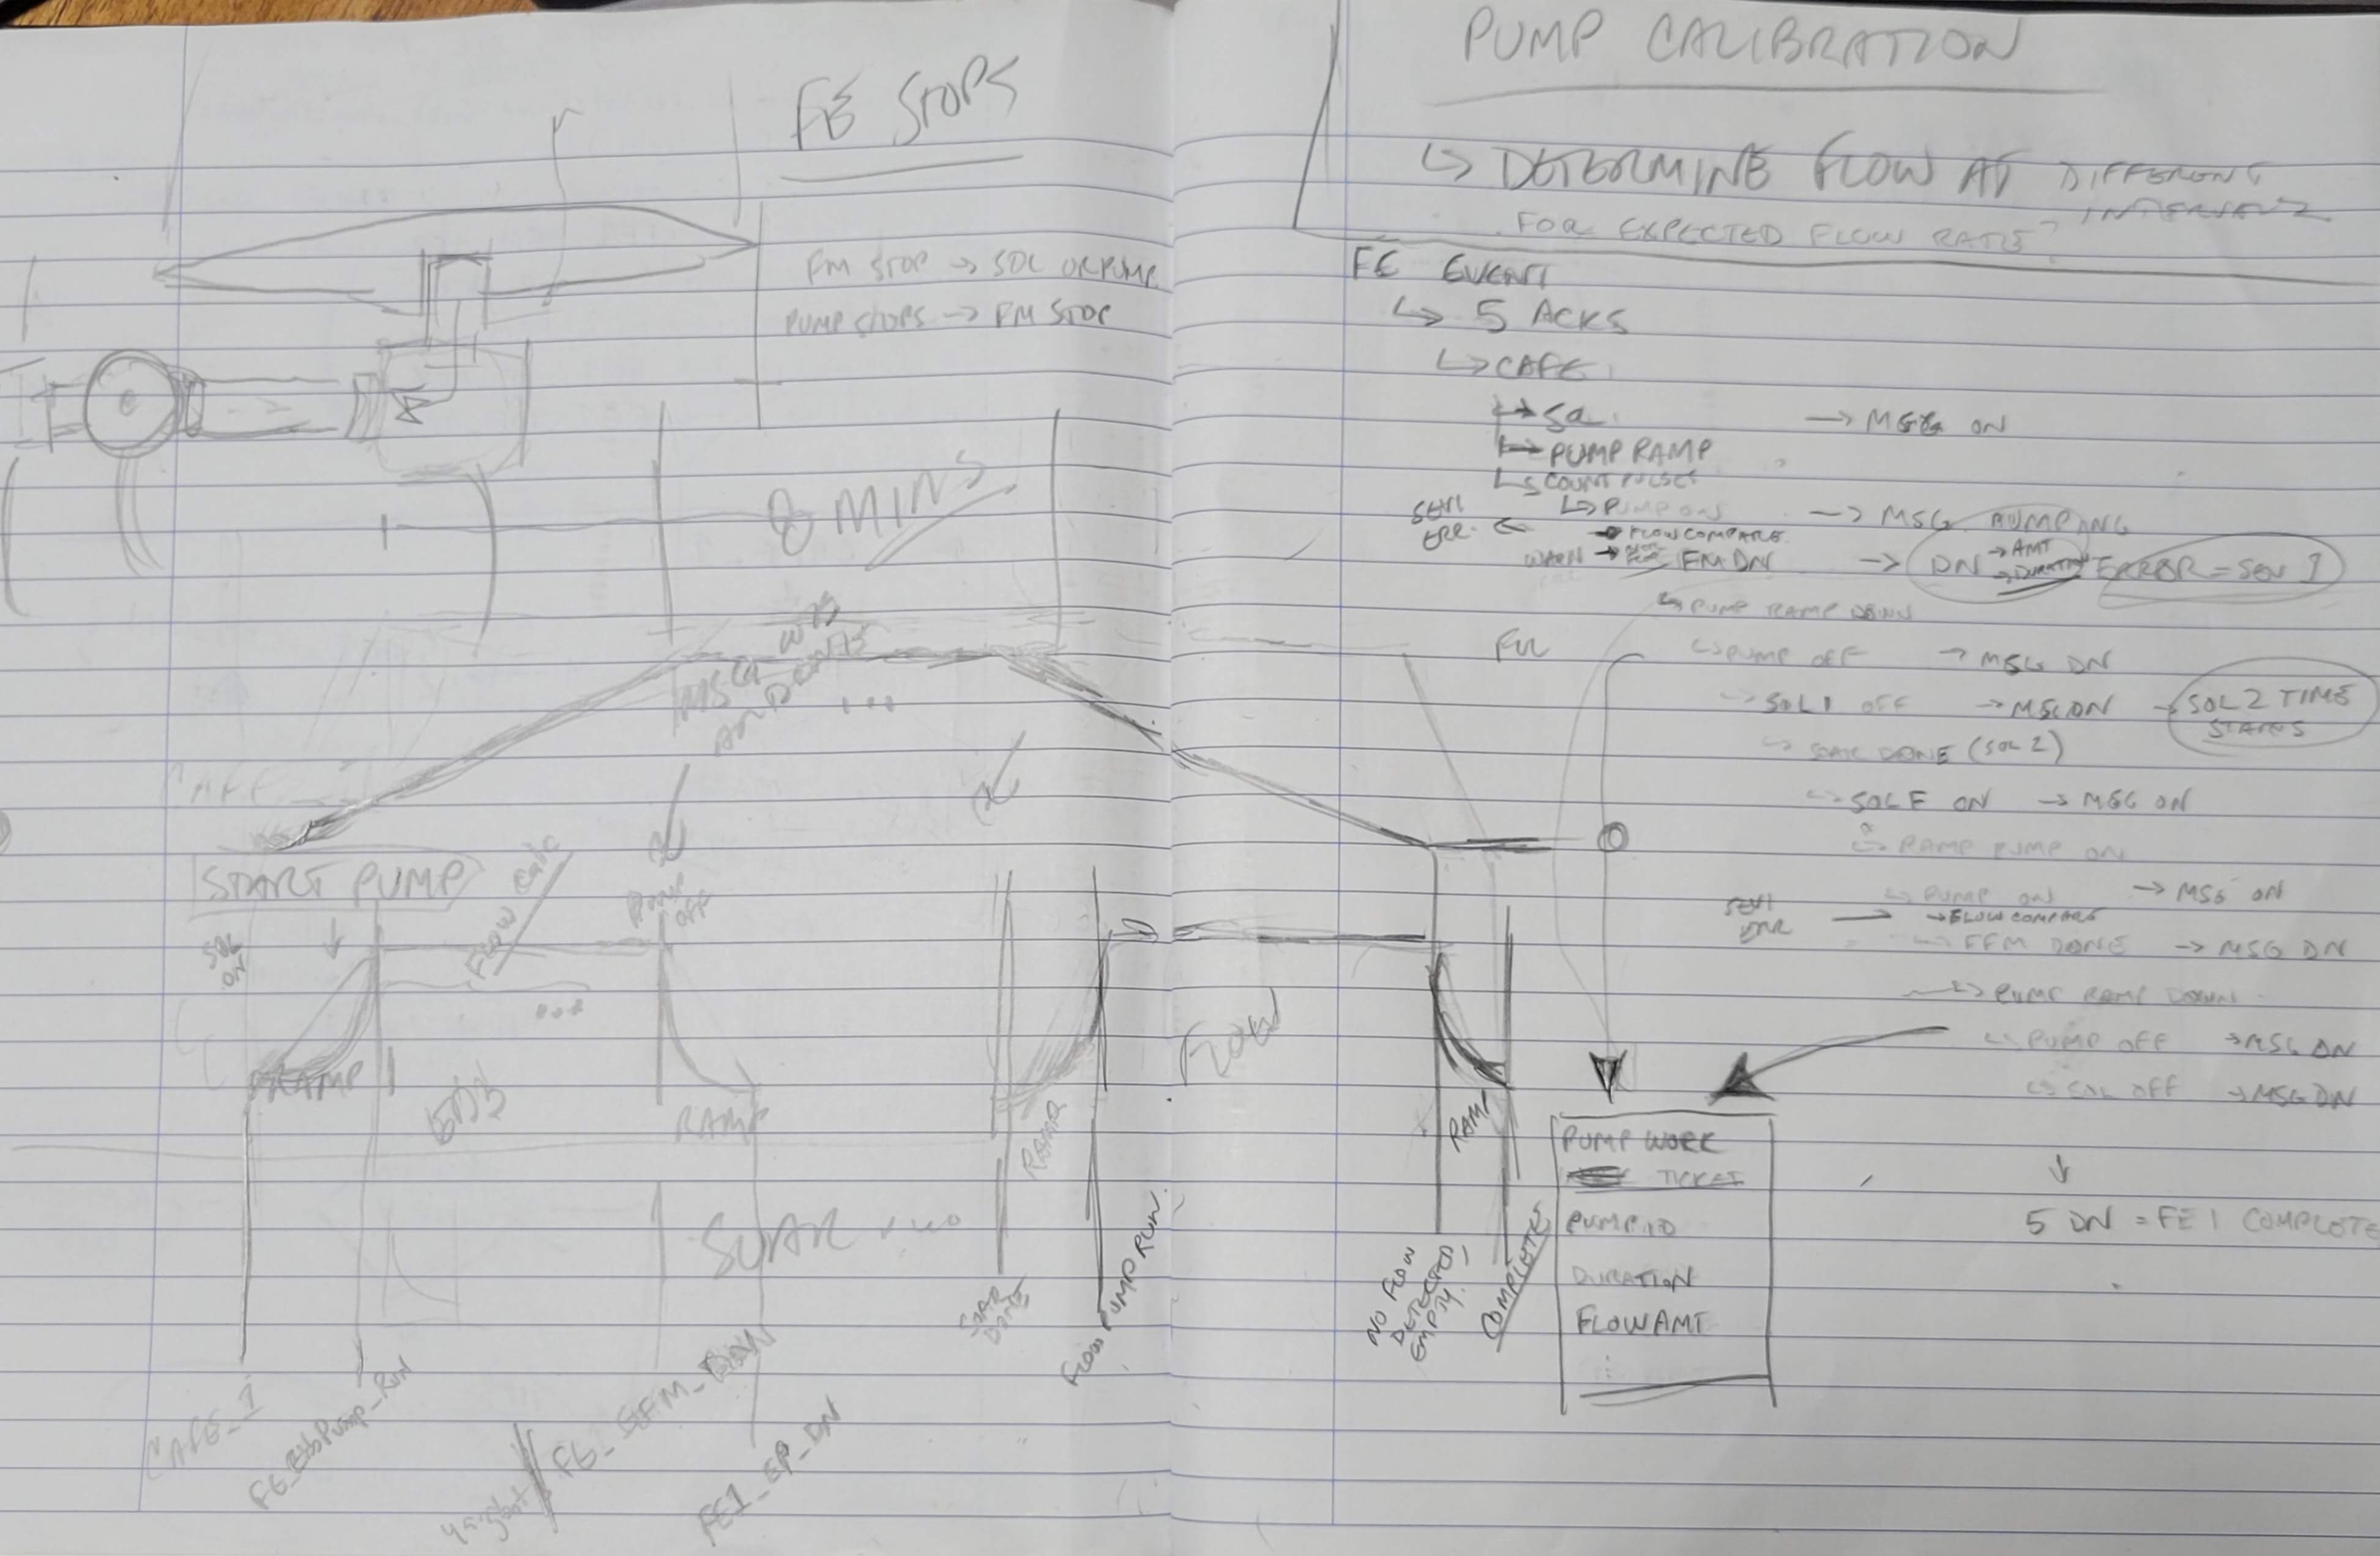
  • ESP32 microcontrollers play a central role in interfacing with external components, controlling solenoid relays, and managing L298N motor controllers for peristaltic and circulatory pumps.
  • An ATMega microcontroller is responsible for precise pH and EC measurements using Atlas Scientific sensors, with serial communication to ESP32 devices, facilitating data transfer to the central server.
  • Communication within the YARG ecosystem is achieved through secure MQTT channels with SSL encryption, ensuring robust and reliable data exchange.
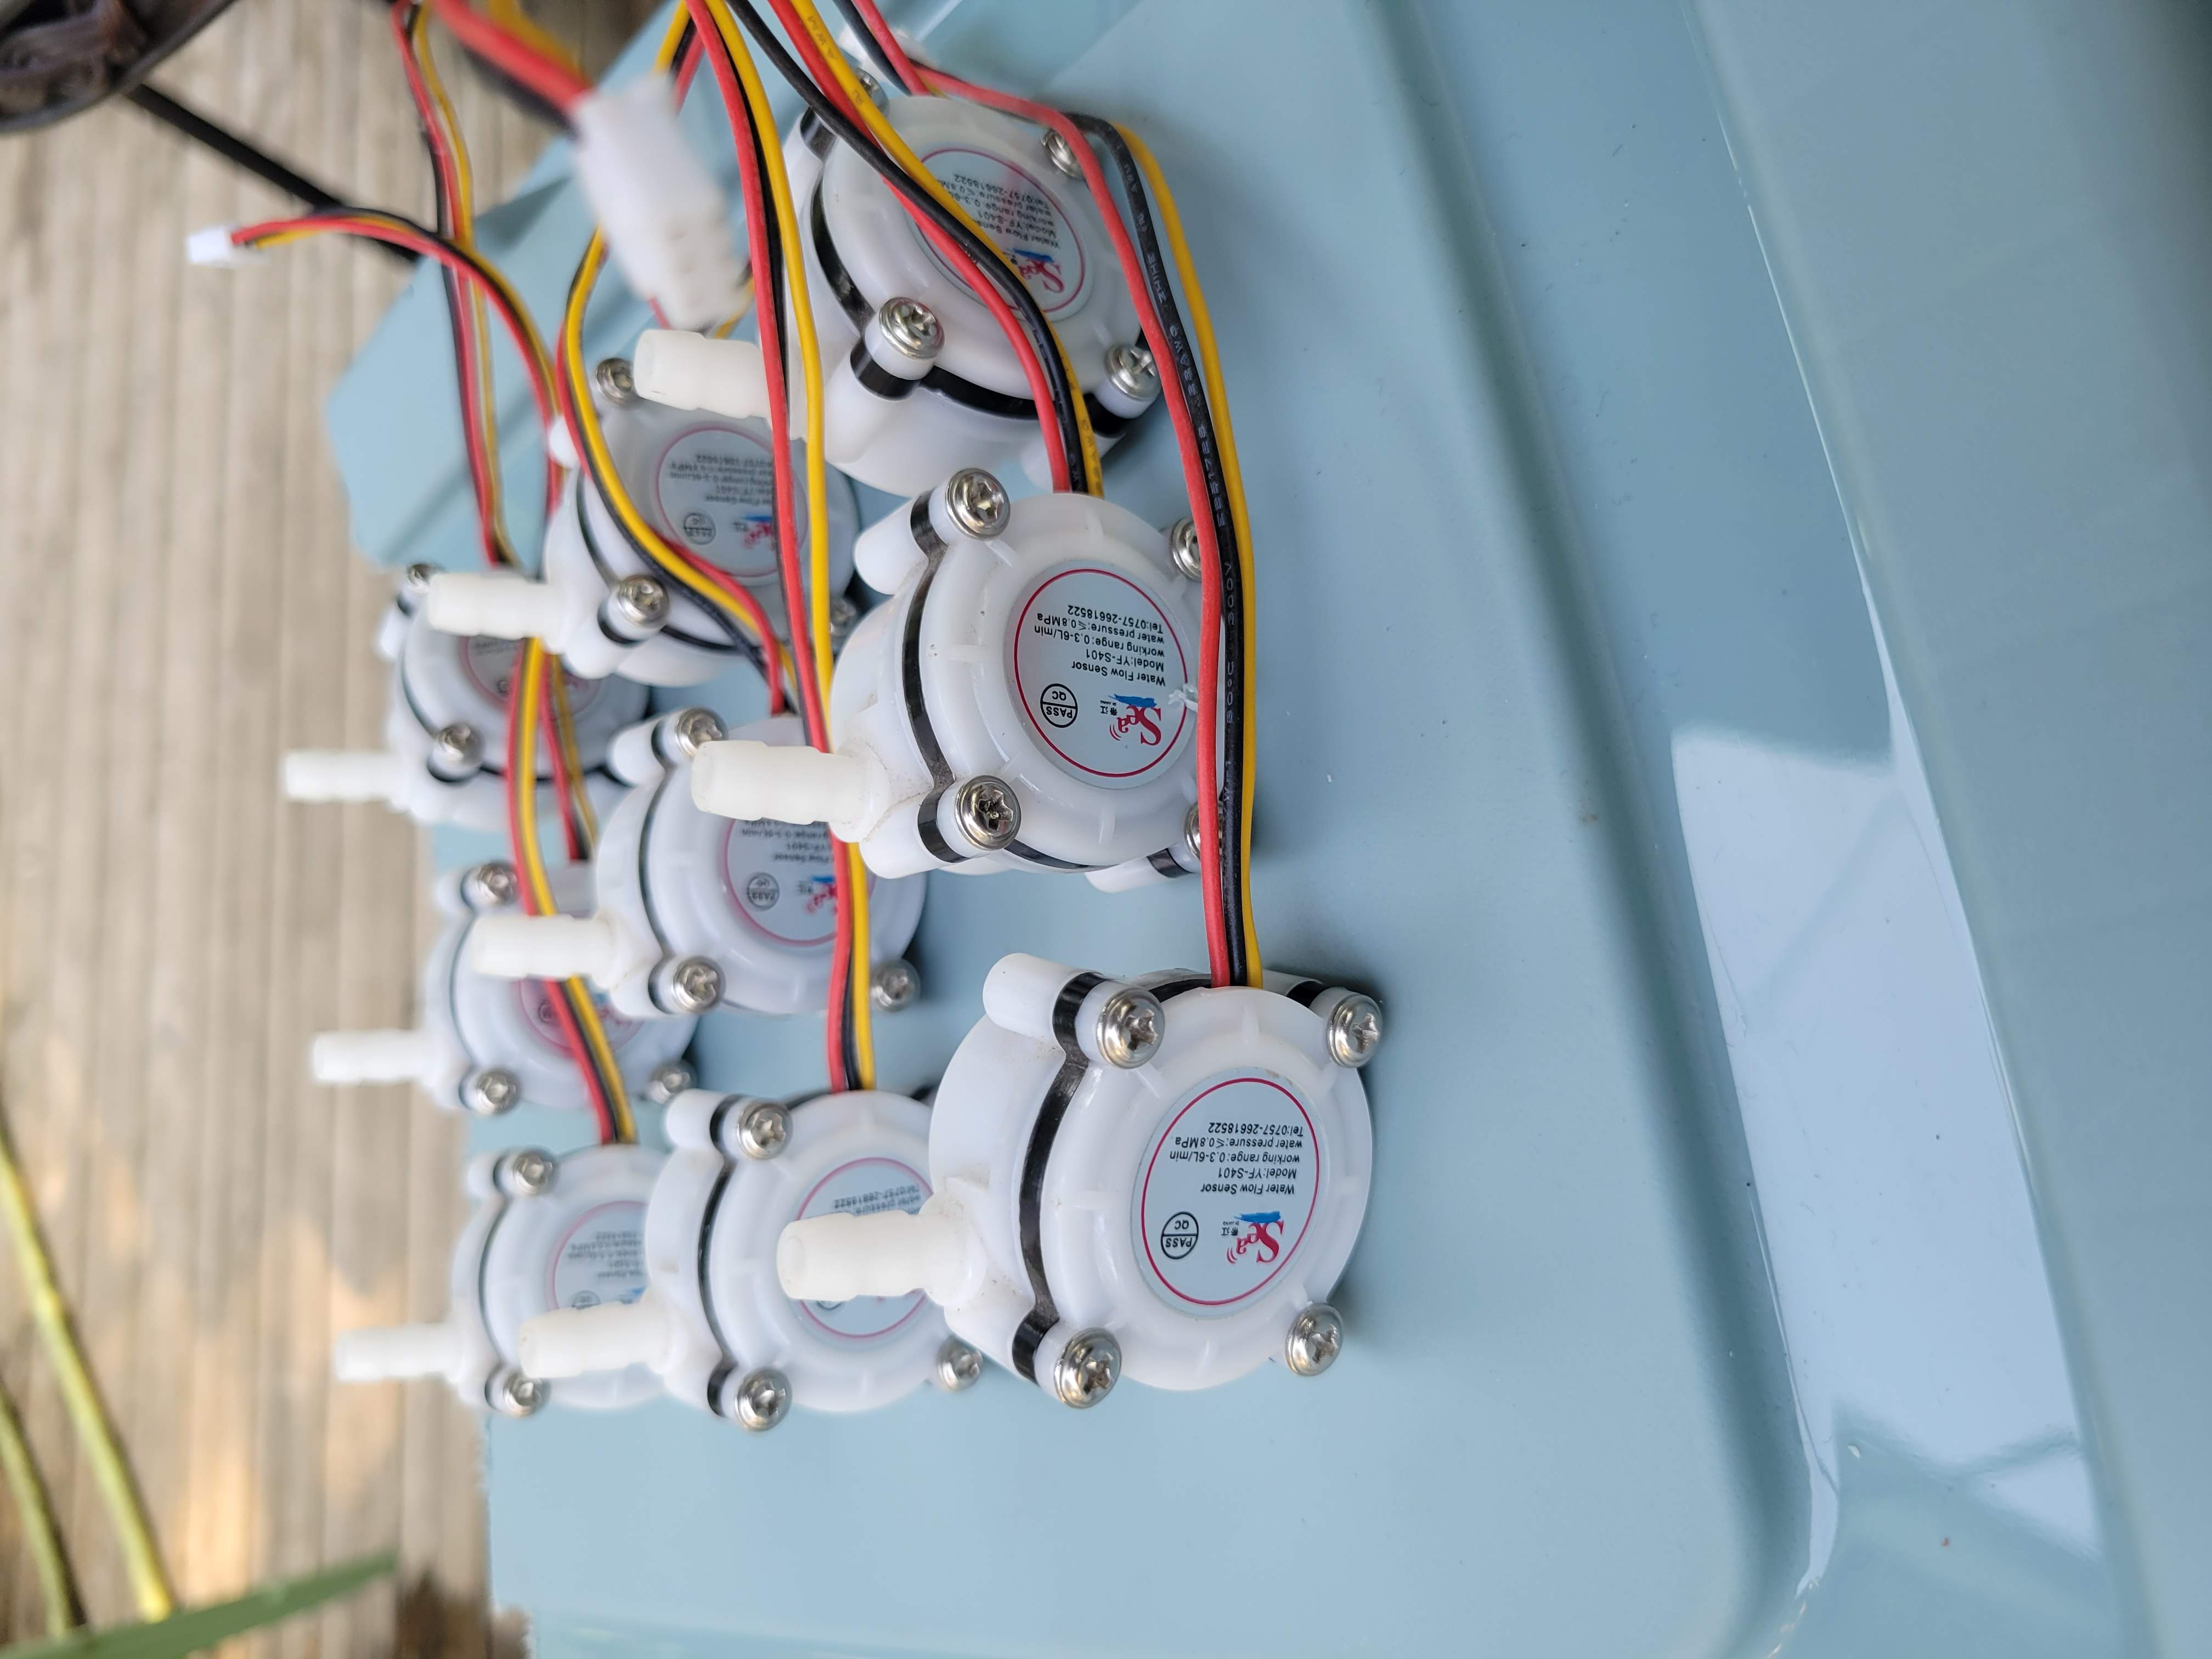
  • Flow meters are integrated into the system, providing accurate measurements for all pumps. The YARG project embraces flexibility, allowing user-configurable pulses per liter for freedom from vendor lock-in.

Physical Setup and Aesthetic:

The physical configuration of the YARG grow room as follows:

  • The grow room occupies a 4' x 5' space, with each plant allocated a 2' x 2' area. Spider Farmer SF1000 LED grow lights are strategically positioned directly above each plant, offering an optimal lighting environment.
  • The hydroponic setup features 20L plastic buckets, each equipped with a 3" net pot and a false bottom. These components integrate essential elements such as pumps, water flow sensors, solenoid switches, and moisture sensors to ensure precise and efficient operation.

Current Status and Future Prospects:

The YARG project experienced a brief period of inactivity, but it was recently reinvigorated in July 2023:

The documentation and sharing of progress are planned through a WordPress this personal blog, serving as a platform to provide regular updates, insights, and milestones achieved in this ongoing journey of technological horticulture.

Sharing on Github is scheduled for end of September 2023. Honestly guys, there's a lot of dead code, irresponsible code, and some of it is embarassingly bad; give me a little bit to get over my code anxiety to spit and polish a little

Ta for now.

Kiki overlooking operations

Random pics

Recent Posts

Chris Ross's avatar

Things are going great

Working out some of the mounting details with a bigger reservoir, new ebb pump and water quality measurement circuit while I procrastinate a little bit longer on ordering a replacement pi.

Chris Ross's avatar

Redesign

Been busy with real life things; new family members arriving (grandson #2!), infrastructure issues (water softener needed a complete rebuild), some exciting professional work related items on the go, and a couple holidays in between... I'm stretched quite thin and haven't much opportunity to do much with this project. I'm lucky to keep up with the lawns at this point.

Santa came through like a boss with an Everflow EF3000 (3.0GPM 12V diaphragm pump), a Seaflo 34 series (1.6GPM 12V diaphragm pump) and a DBH-12V motor driver (30A). This will greatly simplify efforts by using one pump dedicated to ebbing and one pump dedicated to flowing (eliminating the need for each bucket having its own pump). Also, more plumb work for 2 additional measuring plugs, and installation of a water chiller are on the docket.

The l298n motor drivers I originally intended to drive each flow pump are not required, freeing up real estate in the control box and mitagating heat issues. I have a bigger power supply (12V 30A); getting it mounted in the case will be something else (am presently going through re-design hijinx).

In other news, both Raspberry Pis are offline; RPI4 requires a new cpu fan, RPI3 was conscripted into an unrelated DDNS updater role for the IPTV cams at our locsl small business. That reminds me, time to get another Pi.

Slowly tredging forward.

Chris Ross's avatar

Plumb It Real Good

So, it goes a little something like this -

Hope I got most of the symbols right. Referring to the above plumbing diagram, it's easy to see that the Reservoir Outfeed Pump is central to the operation. Finding a suitable 12V pump that was rated for continuous duty, 2 - 3 gpm, < 10A, 1/2" fittings and available in Canada was challenging. SeaFlo Series 34 pumps, SHURflo 2088-514-145 sure does look nice and shiny (and pricey), and the Everflo EV3000. We will see which pump Santa will bring.

Since I've been good (overall, in general, I mean), other things on my Christmas list include a DBH-12V motor controller for the pump above. Maybe throw in an Atlas Scientific DO and ORP EZO kit in my stocking.

Sidebar - Capturing the DO (dissolved oxygen) levels will indicate whether the spillway/waterfall design is enough to offset the need for airstones, and tracking the ORP (Oxidation-Reduction Potential) is a mayswell. Like, may as well get that too since we're at it. (ORP is a measure of the system cleanliness and will indicate when the system needs cleaning).

While we wait for the fat man to arrive, I'm whittling away at the documentation, features, and bug list. I've come to realize that the AW500S pumps I have are actually brushless; hence the trouble I've been having trying to control them with L298N controllers. Call off Scooby Doo and the gang, turns out that the bug I was chasing was me all along!

Since hooking up real-world I/O and putting theory into practice, some sort of interference is glitching all the ESP32s and it's tripping up their wifi; only momentarily and intermittently, whether pumps or relays are turned on or not. I need to reorganize the power layout in the panel anyway to accommodate the new motor controllers when they arrive; I'll deal with it then. This also means that my plans to develop an OTA (over-the-air) solution to remotely update the ESP32s are UITA (up-in-the-air).

I'll see myself out.

Chris Ross's avatar

Moving water

Mocking up fertigation events indeed highlighted certain areas for improvement, to put it mildly. To facilitate ebbing and flowing overlap to different buckets, the logic surrounding the _fertigationEvent variable in the ESP32 required a bit more work. I opted for an array of 4 _fertigationEvent structs to represent each of the buckets, with potNumber-1 indicating which array member the code is dealing with.

When the ESP32s publish fertigation event-related MQTT messages—such as the yargbot/FE_ebbFlowmeter_DONE topic (sent when the commanded ebb amount has been reached)—the payload consists of the commandID GUID, which is used as a cross-reference to the current _fertigationEvent that's in play.

...
if ((strcmp(topic, "yargbot/FE_ebbFlowmeter_DONE") == 0) || (strcmp(topic, "yargbot/FE_potOverflow") == 0)) {
char* guidToken = strrchr(topic, '/');
if (guidToken != NULL) {
String guid = String(guidToken + 1); // Extract the GUID from the topic
    
int i = getArrayElementFromCommandID(guid.c_str(), _fertigationEvent, 4);

if (i != -1) {
_fertigationEvent[i].isEbbPumpStopRequested = true;
_fertigationEvent[i].flowStartMillis = millis() + _fertigationEvent[i].soakDuration;
}
}
}

...

int getArrayElementFromCommandID(const char* guid, struct FertigationEvent* eventArray, int arraySize) {
for (int i = 0; i < arraySize; i++) {
if (strcmp(guid, eventArray[i].commandID.c_str()) == 0) {
    return (eventArray[i].potNumber - 1);
}
}
    
// Return a default value (e.g., -1) if no matching commandID is found
return -1;
}

Pretty slick.

Several challenges needed addressing to transition from virtually filling the bucket to actually filling the bucket, including an incorrectly soldered wiring loom, a fine mesh screen clogged in one of the 4 to 1 distribution blocks, and surprisingly, only a few leaky connections. However, now I find myself actually moving and chasing this bucket of water around. Hot damn. The pumps are pumping, the flow meters are flowing, and the solenoids are solenoiding. Well... sort of. Turns out, there are still a number of bugs to work out.

The pumps responsible for transferring water back and forth are quite small (AW500S), rated between 600 to 800 LPH with a head height of 5m and 1/2" male threaded connections. Turns out the flow rate is a little optimistic. After calculating a theoretical time to fill a bucket at 1.4 minutes, in reality, it takes a little over 4 minutes. This little discrepancy disrupts the morning and evening sip routines, so I need to go back and sort that out further. I'm going to have to also revisit the logic for creating the watering schedule and perhaps lengthen the duration between events to offset the low flowing pump. It is what it is.

Considering that the water needed to fill the bucket will decrease over time as the roots grow and displace more water, I believe I can live with this low flow rate. On the flip side, the pump under the reservoir is doing the lion's share of all water transfer tasks: ebb motions, recirculatory function to pump water back into the spillway, blending function during nutrient chemical mixology, and flushing the system with an H2O2 cleaning solution. I'm unsure if this small pump can handle such abuse over a weeks-long grow season and am currently exploring alternative pumps.

This leads to another concern—the motor drivers. Currently, I use L298N motor driver modules, and after 5 minutes of ebbing or flowing, the heat sinks become very hot. While they may be suitable for peristaltic pumps responsible for dosing chemicals, I doubt the L298N can handle the rigors of what the reservoir pump has to go through. Therefore, I am looking into a different motor driver for the new reservoir pump. If I keep with the L298N for the pumps on the buckets and continue to use them for 4 or 5 minutes straight time, I'll have to mount an exahust fan and monitor the control box temperatures.

I also need to revisit the flow meters as it appears that the math is not mathing all that well (or perhaps the pulse is not triggering) in the ESP32. The system is pumping the entirety of the reservoir into the bucket, soaking, and flowing it all back again without measuring, or at least measuring incorrectly.

The pumps don't exactly ramp up or down; there's a bug that needs addressing. It's either a full-speed "yee-haw giver" or a complete stop, with no in-between.

The best news so far is that after reviewing some of the real fertigation event timestamps, the timing concerns in my last post are a non-issue. Here's a 'real' fertigation event that took place with a soak time of 10 minutes and an antishock ramp of 5 seconds:

FertigationEventRecord
feDatecafeDateebbPump_RunDateebbFlowmeter_DoneDateebbPump_DoneDateflowPump_StartDateflowPump_RunDateflowFlowmeter_DoneDateflowPump_DoneDate
2023-11-10 19:07:00.0942023-11-10 19:07:00.2232023-11-10 19:07:05.2422023-11-10 19:11:19.6062023-11-10 19:11:24.6172023-11-10 19:21:19.6022023-11-10 19:21:24.6032023-11-10 19:25:47.6002023-11-10 19:25:52.607

I'm quite pleased with the results. :)

Pictures below showcase the setup so far, with the spillway tucked behind flowing into the reservoir and the swing-away control box for easy access to the plumbing. Pay no attention to the dusty chem jars nor the wiring in the control box, they identify as clean and tidy.

Chris Ross's avatar

To Mock a Fertigation

Spillover from the post from last week - I finally have enough pieces of the puzzle together on the ESP32 side that the fertigation event is being entirely mocked up and the records are being driven entirely via this external device.

On the surface, this is not at all very glamourous; but it still marks an important milestone for several reasons. Consider a scenario where we want to start a new fertigation event, but the previous one is still in progress. By creating this mockup, I get the opportunity to delve into the nitty-gritty of communication protocols, allowing me to spot and iron out potential hiccups and bottlenecks in the system.

Furthermore, this is the ideal time to validate the logical flow of data within the system. This means making sure that my devices communicate in the right sequence, following the intended logic, and it pinpoints the exact areas where we need to address turning pin outputs on or off, count pulses from flowmeters, etc.

This is an example of an abridged fertigation event that was broadcasted via MQTT:

Oct 29 11:26:00
ebbSpeed: 99
ebbAmount: 19.10
ebbAntiShockRamp: 950
soakDuration: 720000
flowSpeed: 95
flowAntiShockRamp: 750
Which resulted in the following fertigation event record in the database:
feDate cafeDate ebbPump_RunDate ebbFlowmeter_DoneDate ebbPump_DoneDate flowPump_StartDate flowPump_RunDate flowFlowmeter_DoneDate flowFlowpump_DoneDate
2023-10-29 11:26:00.104 2023-10-29 11:26:00.211 2023-10-29 11:26:01.416 2023-10-29 11:27:48.517 2023-10-29 11:27:49.493 2023-10-29 11:39:48.504 2023-10-29 11:39:49.274 2023-10-29 11:41:27.775 2023-10-29 11:41:28.524

At first glance, I'm a little surprised that the ebb anti-shock ramp lasted 1205 milliseconds, exceeding the commanded 950 milliseconds by 255 (over a quarter of a second). In computer terms, that is a significant delay. Interestingly, other entries in the database do not exhibit this much longer than expected delay on any anti-shock ramp. It's possible that this can be attributed to a random network lag spike. On the other hand, since there is a relatively small sample of real 'mock' data, this might indicate other issues. Granted, we are not splitting the atom; I can tell myself not to overthink it... But there it is in front of me, larger than life. I'll be spending more time in the data analytics department in the months to come, scrutinizing these delay patterns. That will actually be kind of fun (and completely overkill) to graph out the event using Plotly. Mmmmm.... eye candy.

My goal this week is to connect the ESP32 to real-world I/O components, including the reservoir pump, solenoid matrix, flowmeter, and the first pot I assembled for this proof of concept.

Constructing the pot is relatively straightforward. I begin with a 5-gallon (19-liter) black bucket with the center drilled out. Next, I install a 1/2" double-threaded bulkhead, and retrofit an aquarium filter around a strainer that is threaded into the inner bucket portion (to prevent clogging by plant root matter).

Attached to the under-bucket part of the bulkhead is an AW500S 12Vdc water pump. This small pump provides the lift and flow rate I'm looking for, although its long-term durability remains to be seen. This is why it's critical to plan ahead and track all pump usage in order to create benchmarks for maintenance activities. We also have a software solution already in place should we need to use a bigger pump and need to adjust the speed lower to offset.

Following the pump, there is a 1/2" female coupling, a normally closed solenoid, another coupler, and, finally, a YF-S201 flowmeter.

The bucket is placed on top of a base made from a spare plastic bucket I had lying around, extending about 6 inches. This arrangement protects the piping, pump, solenoid, and flowmeter, while also providing a stable base for the wiring harness.

Finally, it will all be topped off with a mesh net cover. Water ebbing into the pot will do so via the opening at the top of the mesh cover.

Chris Ross's avatar

Fertigation part 2 - An Ode To Code

After letting the fertigation theory ferment on the back burner for the past few weeks, I’ve finally circled back and am ready to get into the 1s and 0s of ‘See? Nothing to it.’ here.

The flowchart above outline the steps we need to take, along with the 7 areas of interest we need to keep in mind that control real world things.

In the ConfigureServices method of our StartUp class, we'll add a little Quartz goodness that fires up the FertigationJob as per the cron schedule.

    services.AddQuartz(q =>
    {
        q.UseMicrosoftDependencyInjectionJobFactory();
        q.ScheduleJob<FertigationJob>(trigger => trigger
            .WithIdentity("1 minute Fertigation Trigger")
            .WithCronSchedule("0 0/1 * 1/1 * ? *")
            .WithDescription("At second :00, every minute starting at minute :00, every hour, every day starting on the 1st, every month")
            );
    });

The FertigationJob class queries the database, and if it is time to water the plants, it creates a FertigationEventCommand (info to include with a FE message) as well as a FertigationEventRecord (proof that we watered the plants).

A la peanut butter sandwiches -

FertigationEventCommand fertigationEventCommand = await _wateringScheduleDAL.AreWeThereYetAsync();

if (fertigationEventCommand != null)
{
string MQTT_Topic_Suffix = "FE" + fertigationEventCommand.PotNumber;

string mqttMessage = $"{fertigationEventCommand.CommandID}:{fertigationEventCommand.PotID}:" +
$"{fertigationEventCommand.EbbSpeed}:{fertigationEventCommand.EbbAmount}:" +
$"{fertigationEventCommand.EbbAntiShockRamp}:{fertigationEventCommand.EbbExpectedFlowRate}:" +
$"{fertigationEventCommand.EbbPumpErrorThreshold}:{fertigationEventCommand.EbbPulsesPerLiter}:" +
$"{fertigationEventCommand.SoakDuration}:{fertigationEventCommand.FlowSpeed}:" +
$"{fertigationEventCommand.FlowAntiShockRamp}:{fertigationEventCommand.FlowExpectedFlowRate}:" +
$"{fertigationEventCommand.FlowPumpErrorThreshold}:{fertigationEventCommand.FlowPulsesPerLiter}";

try
{
await _wateringScheduleDAL.CreateFertigationEventRecord(fertigationEventCommand.CommandID);
await _mqttPublisherService.PublishMessageAsync("fertigationEvent/" + MQTT_Topic_Suffix, mqttMessage);
await Task.Delay(1000); // Introduce a 1-second delay

// check to see if we are good to go. (is CAFEDate set for this event from other threads)
if(!await _wateringScheduleDAL.VerifyFertigationEventACK(fertigationEventCommand.CommandID))
{
    FertigationEventRecord fertigationEventRecord = new();
    fertigationEventRecord.CommandID = fertigationEventCommand.CommandID;
    fertigationEventRecord.IsError = true;
    fertigationEventRecord.ErrorDate = DateTime.Now;
                                
    await _wateringScheduleDAL.UpdateFertigationEventRecord(fertigationEventRecord);

    // do other importanter things here
... and so on and so forth.
public class FertigationEventCommand
{
public Guid CommandID { get; set; }
public Guid PotID { get; set; }
public byte PotNumber { get; set; }
public short EbbSpeed { get; set; }
public decimal EbbAmount { get; set; }
public short EbbAntiShockRamp { get; set; }
public decimal EbbExpectedFlowRate { get; set; }
public byte EbbPumpErrorThreshold { get; set; } // 5% to 95%
public short EbbPulsesPerLiter { get; set; }
public int SoakDuration { get; set; }
public short FlowSpeed { get; set; }
public short FlowAntiShockRamp { get; set; }
public decimal FlowExpectedFlowRate { get; set; }
public short FlowPumpErrorThreshold { get; set; }
public short FlowPulsesPerLiter { get; set; }
}

public class FertigationEventRecord
{
public Guid CommandID { get; set; }
public DateTime FEDate { get; set; }
public DateTime? CAFEDate { get; set; }
public DateTime? EbbPump_RunDate { get; set; }
public DateTime? EbbFlowmeter_DoneDate { get; set; }
public DateTime? EbbPump_DoneDate { get; set; }
public DateTime? FlowPump_StartDate { get; set; }
public DateTime? FlowPump_RunDate { get; set; }
public DateTime? FlowFlowmeter_DoneDate { get; set; }
public DateTime? FlowPump_DoneDate { get; set; }
public bool? IsError { get; set; }
public DateTime? ErrorDate { get; set; }
}

Whatever device(s) that are responsible for the 7 areas of interest (above) extract information out of the FE payload, send an acknowledgement and wait for the starting gun. If the FE message is not acknowledged within a second, the FertigationJob cancels the event (comms lost, alert user, something sketchy this way comes).

The FertigationEventRecord records the timestamps of the key events during the fertigation process (see graphic above). Mental note - The MySQL connector for rpi3 (web server) to rpi4 (db server) communication is causing the loss of millisecond precision in DateTime values, despite our numerous attempts to address this issue and ensure the accuracy of timestamps in the application server. As a result, all timestamps sent to the 'spUpdateFertigationEventRecord' stored procedure are being disregarded, and we resort to internally using 'now(3)' to obtain millisecond precision. Consequently, this means that any subsequent analysis of the fertigation event timestamps will be affected by network latency.

Here is an example FE message (fertigationEvent/FE4) -

3a0e663f-a48c-2172-065c-096ae5518e0e:3a02f1e2-f652-780f-d49b-9cbdb0db5abe:99:19.40:950:3.50:15:465:600000:92:900:3.40:15:456

The arduino code in the ESP32 (parses this information to populate a struct, defined as something like this -

enum PumpState {
RampingUp,
MaintainingSpeed,
RampingDown
};

struct FertigationEvent {    
String commandID;      
String potID;      
int16_t ebbSpeed;
double ebbAmount;
int16_t ebbAntiShockRamp;
double ebbExpectedFlowRate;
uint8_t ebbPumpErrorThreshold;
int16_t ebbPulsesPerLiter;
int32_t soakDuration;
int16_t flowSpeed;
int16_t flowAntiShockRamp;
double flowExpectedFlowRate;
uint8_t flowPumpErrorThreshold;
int16_t flowPulsesPerLiter;
// above are populated by parsing the fertigationEvent payload
// below are used by the ebb pump area of concern
uint32_t cafeStartMillis;
uint32_t currentTime;
uint32_t elapsedTime;
bool isEbbPumpON;
bool isEbbPumpRunRequested;
bool isEbbPumpStopRequested;    
PumpState ebbPumpState;  
};

struct FertigationEvent _fertigationEvent;
The enum and last 7 properties are used only for this ebb pump example.

In the callback procedure where the MQTT payloads are handled, we'll load up the _fertigationEvent variable like so:

if (strstr(topic, “fertigationEvent/FE”) != NULL) {
parseFertigationEvent(payloadStr, &_fertigationEvent);
client.publish(MQTT_TOPIC_FE_EP_ACK, _fertigationEvent.commandID.c_str());
}
if (strcmp(topic, “fertigationEvent/CAFE”) == 0) {
_fertigationEvent.isEbbPumpRunRequested = true;
_fertigationEvent.cafeStartMillis = millis();
_fertigationEvent.ebbPumpState = RampingUp;
}
if ((strcmp(topic, “yargbot/FE_ebbFlowmeter_DONE”) == 0) || (strcmp(topic, “yargbot/FE_potOverflow”) == 0)) {
_fertigationEvent.isEbbPumpStopRequested = true;
}

void parseFertigationEvent(const char* message, struct FertigationEvent* event) {
size_t messageLength = strlen(message);
char copy[messageLength + 1]; 
strcpy(copy, message);

char* strtokIndx;  
strtokIndx = strtok(copy, “:”);
event->commandID = String(strtokIndx);
event->potID = String(strtok(NULL, “:”));
event->ebbSpeed = atoi(strtok(NULL, “:”));
event->ebbAmount = atof(strtok(NULL, “:”));  
event->ebbAntiShockRamp = atoi(strtok(NULL, “:”));
event->ebbExpectedFlowRate = atof(strtok(NULL, “:”));
event->ebbPumpErrorThreshold = atoi(strtok(NULL, “:”));
event->ebbPulsesPerLiter = atoi(strtok(NULL, “:”));  
event->soakDuration = atoi(strtok(NULL, “:”));
event->flowSpeed = atoi(strtok(NULL, “:”));
event->flowAntiShockRamp = atoi(strtok(NULL, “:”));
event->flowExpectedFlowRate = atof(strtok(NULL, “:”));
event->flowPumpErrorThreshold = atoi(strtok(NULL, “:”));
event->flowPulsesPerLiter = atoi(strtok(NULL, “:”));  
}
Fertigation events are being broadcasted with topics such as 'fertigationEvent/FE2' to indicate that this is for pot # 2. In the ebb pump case, (the pump that is attached to the reservoir) it will be used in all fertigation events.

Hence, the strstr command; looking for any topic that starts with 'fertigationEvent/FE' on the first line there.

That leaves the main loop, which we'll throw this into the mix :

if (_fertigationEvent.isEbbPumpRunRequested) {
_fertigationEvent.currentTime = millis();
_fertigationEvent.elapsedTime = _fertigationEvent.currentTime - _fertigationEvent.cafeStartMillis;
    
switch (_fertigationEvent.ebbPumpState) {
case RampingUp:
    if (_fertigationEvent.elapsedTime < _fertigationEvent.ebbAntiShockRamp / 2) {
        int dutyCycle = map(_fertigationEvent.elapsedTime, 0, _fertigationEvent.ebbAntiShockRamp / 2, minDutyCycle, _fertigationEvent.ebbSpeed);
        analogWrite(ENA, dutyCycle);
        digitalWrite(IN1, HIGH);
        digitalWrite(IN2, LOW);
    } else {
        client.publish(MQTT_TOPIC_FE_EP_RUN, _fertigationEvent.commandID.c_str()); 
        _fertigationEvent.ebbPumpState = MaintainingSpeed;
        _fertigationEvent.cafeStartMillis = _fertigationEvent.currentTime; 
    }
break; 

case MaintainingSpeed: 
    if (!_fertigationEvent.isEbbPumpStopRequested) {
        analogWrite(ENA, _fertigationEvent.ebbSpeed);
        digitalWrite(IN1, HIGH);
        digitalWrite(IN2, LOW);
    } else {
        _fertigationEvent.ebbPumpState = RampingDown;
        _fertigationEvent.cafeStartMillis = _fertigationEvent.currentTime; 
    }
break; 

case RampingDown: 
    if (_fertigationEvent.elapsedTime < _fertigationEvent.ebbAntiShockRamp / 2) {
        int dutyCycle = map(_fertigationEvent.elapsedTime, 0, _fertigationEvent.ebbAntiShockRamp / 2, _fertigationEvent.ebbSpeed, minDutyCycle);
        analogWrite(ENA, dutyCycle);
        digitalWrite(IN1, HIGH);
        digitalWrite(IN2, LOW);
    } else {        
    // Stop the motor
        analogWrite(ENA, 0);
        client.publish(MQTT_TOPIC_FE_EP_DONE, _fertigationEvent.commandID.c_str());
        _fertigationEvent.isEbbPumpRunRequested = false;
    }
break;
}
}
 
Where these are the defined constants the you'll see sprinkled in the client.publish calls :
const char* MQTT_TOPIC_FE_EP_ACK = "yargbot/FE_ebbPump_ACK"; //ebb pump acknowledge fertigationEvent
const char* MQTT_TOPIC_FE_EP_RUN = "yargbot/FE_ebbPump_RUN"; //ebb pump ramped up and running
const char* MQTT_TOPIC_FE_EP_DONE = "yargbot/FE_ebbPump_DONE"; // ebb pump ramped down and stopped

Back on the server again, we'll listen for the ebbPump_RUN and _DONE messages and update the database from the commandID guid in the payload.

Told you there was nothing to it.

In the coming weeks, I'll be sorting out the other 6 areas of concern for the fertigation events and throwing more code on the ESP32s; maybe we'll finally get to chase that bucket of water for real.

Chris Ross's avatar

Security

Last week saw a rather low-key launch of the code on the raspberry pi 3 and scripts to update the IP address with Dynu to bring it all out in the wilds of the public-facing internet. This of course was followed by a rather quick installation of Fail2ban (a linux package that serves to monitor logs; in our case, nginx access logs) to protect the pi against brute force attacks and other sus activity. Horse, meet cart.

Implementing a Content Security Policy was required in order to close that attack vector; which turned into code cleanup (I was meaning to come around to this regardless) and separating the scripts out, making better design choices, improving readability. The scripts were decorated with nonce (a way to ensure that they are actually written by us) and sha-384 integrity hash were determined for stylesheets via powershell. So it also turns out that Plotly and CSP do not play nice together, even if plotly-strict.min.js is used. (plotly-sctrict was supposed to have dealt with this issue, however I was still unable to make it work after puttering about with it. Ymmv.) Plotly will behave normally if we introduce 'unsafe-inline' in the headers, admittedly this is less than ideal from a security standpoint.

Other steps have been taken to secure the site, such as the use of SSL now. This was achieved by certbot and LetsEncrypt. We also need to take a mental note that the SSL certificate is only good for the current year, so this will need to be revisited in January. Nginx was set up with a new yarg.webredirect.org configuration file, and the Startup.cs file looks like this in the end :

                                
app.Use(async (context, next) =>
{
context.Response.Headers.Add("Content-Security-Policy", $"default-src 'self'; img-src 'self' data:; script-src 'self' 'unsafe-inline'; style-src 'self' 'unsafe-inline'");
context.Response.Headers.Add("X-Content-Type-Options", "nosniff");
context.Response.Headers.Add("X-Frame-Options", "DENY");
context.Response.Headers.Add("Strict-Transport-Security", "max-age=31536000; includeSubDomains");
context.Response.Headers.Add("Referrer-Policy", "strict-origin-when-cross-origin");
context.Response.Headers.Add("Permissions-Policy", "geolocation=(self), microphone=(), camera=()");

await next();
});
                        

After all is said and done, we’re left with a .NET app running securely and an attaboy from Security Headers and SSL Labs Server Test. I’ll gladly chalk that up as a win.

Deployed code on the RPI3 can be here - https://yarg.webredirect.org/

Chris Ross's avatar

Sharing is Caring

Hurricane Lee came and went, leaving us without power for about 30 hours. When power was restored it was soon discovered that the foot valve in my well required immediate attention; work on YARG was rather limited this past week.

More polishing of the landing page – I feel like Porkins (‘…almost…there…’) when it comes to coding it. The language selector is now visible in the navbar for those visitors that remain anonymous; there’s a few more positional dimensional changes of the widgets, slowly making it more suitable to a browser’s 100% zoom level.

A few things I need to note – this default page, although lovingly made with Bootstrap, is not very mobile friendly. Partly because mobile-first was not a priority – this app will primarily be displayed on a desktop; and partly due to the Plotly graphs being a static size, there’s issues with some of the css I’m using, … truth is, my css skills are not quite, nor ever will likely be, ‘there’. CSS to me is very much like a CTE (common table expression) or regex; I can take a day with Google to relearn it and massage it enough to get it to do what I need; but I simply do not use it often enough for it to stick in my old memory banks. By the time I need it again, it's been purged from the system. Cut me some slack, I also turned fifty this past week. Now where are my back pills? <shakes cane in frustration />

The web app now adheres to most of the best practices regarding HTTP headers; of notable exception is Content-Security-Policy. I need some time to r&d a viable method to display the Plotly scripting eye candy (I believe the answers I seek lay within ‘nonce’).

The app is nestled in the confines of nginx on the raspberry pi 3; however I’m still not entirely sure how to deal with nginx and an ssl cert + C# app, so it’s doing it’s thing on port 80, sans SSL. I need to circle back to this, but if y’all are okay with everything and promise not to try and smash everything all to hell, you can see the app yourself at http://yarg.webredirect.org. One of the other things I managed to get running (and verified to work after power restoration from Lee) is a script to update the dynamic DNS entry with dynu.org, and a port forwarding rule on my router relays port 80 traffic to the RPI3 web app.)

Source code can be found here https://github.com/FlyingRossolini/YARG. Note that this is fresh out of the skillet; worts, dead code, et all. Python and arduino code can be found in the IoT folder, but between you and me, it’s older code. Arduino code compiles much more smoothly on my wife’s laptop then mine; I’ll update that bit in a bit. Database schema for YargDB and YargIdentityDB will be generated and uploaded shortly as well. I’m not quick and nimbly with Github (yet) – your patience is appreciated.

With that out of the way, just a few notes here so I don’t lose mental focus. The fertigation events are driven by the WateringSchedule table. The data in the WateringSchedule table is just that, a representation of the fertigation events (the time part is what’s actually important here) that will occur daily. It will be recalculated on the last day of the week for the next’s weeks daily schedule.

vwWateringSchedule is a view that applies some logic with the current date to the times in WateringSchedule; this made it easier to deal with the Plotly fertigation schedule on the landing page, and readability is so much better. I need a little more time with the SQL, there’s a few issues like when the grow season start date is set in the future, issues toward the end of a grow season, etc.

Still very much a work in progress.

Chris Ross's avatar

Recipe Management

We are going to be dealing with a lot of different information for our system, defining every aspect of our growth process on a week-to-week basis. I often return to my analogy that we're essentially following a recipe, albeit one that spans months. So, here's what I've come up with — a three-layer deep object.

At the top, we have Recipe. It has a name field, and that's pretty much it. It's as simple as that.

Recipe has two children — the first is a list of various chemicals (RecipeChemList) that will be required at some point during the growth process. A chemical is associated with a ChemicalType and is stored in a jar (our real-world representation). After all, we can have multiple chemicals, but we only have a limited number of jars to draw these chemicals from.

The second child of the Recipe is the RecipeStep. This represents a growing week for our system. On a week-by-week basis, we define the number of hours of daylight per day, how many times to perform the ebb and flow process, the soak duration, and whether we want a morning or evening sip (a sip being a short duration soak, just enough to moisten the roots).

A RecipeStep also has two children. These are RecipeStepAmount, which defines the quantity of chemical (from our RecipeChemList) to use during a particular week when it's time to mix a fresh batch of nutrients, and RecipeStepLimit, which defines the lower control limit (LCL) and upper control limit (UCL) parameters for whatever we're measuring.

The database design model presented here utilizes sequential GUIDs as the primary key identifier. In our MariaDB database, these GUIDs are stored as binary(16) fields and are processed using hex/unhex operations through our stored procedures. Additionally, the model includes other fields related to business logic, such as createdBy, createDate, changedBy, changeDate, and occasionally isActive.

As Lee starts to make landfall here, I'll wrap this post up with a few more pics of the setup. I was |-this-| close on nailing down internal logic on the fertigation scheduling component, and we lost power before I could test it out. Grabbed the laptop, found power at MIL, so it's going to be a relaxing documentation kind of day.

Chris Ross's avatar

Hydro Hypothesis

Before embarking on this project, I conducted research into various hydroponic techniques and settled on an ebb and flow style system. One noteworthy observation I made was that a larger reservoir is almost always employed. This larger reservoir offers several advantages, including more consistent pH and nutrient solution measurements and reduced maintenance requirements, such as hand mixing nutrients and less frequent cleaning.

To streamline the process and eliminate the manual labor, we'll be automated pH and EC measurements using Atlas Scientific EZO sensors, employ an array of peristaltic pumps to ensure proper mixing of the nutrients and establish a weekly cleaning schedule that involves running diluted hydrogen peroxide throughout the entire system. In theory, these measures should negate the need for a large reservoir.

Typically, ebb and flow systems flood an entire table of crops or a set of net-cups in buckets simultaneously. However, I believe we can further reduce the reservoir capacity requirements by flooding each bucket individually, completely separate from one another. While this approach will undoubtedly necessitate more frequent flushing and mixing of fresh nutrient batches, the process will be entirely automated, rendering this point irrelevant.

For my proof of concept, I intend to test four 20-liter buckets, each fertigated individually from a single reservoir of approximately 25 liters. To grossly oversimplify the situation, I'm chasing a bucket of water.

In addition to challenging conventional hydroponic practices, I'm aiming to eliminate the requirement for air stones or diffusers by incorporating a spillway waterfall design that returns water to the reservoir. <shrugs... just because>

Regarding the application side, it's important to note that the infrastructure you choose does not matter. By promoting a black box design for the application, we ensure scalability and compatibility. While I am pursuing a minimalist approach with a small reservoir, but there's nothing preventing you from using a 50-gallon reservoir and a large flood table; it all depends on how you configure the application.

In recent developments, the user interface for the recipe section displayed above is still in its early stages, and I had originally intended to make it more user-friendly. The screenshot provided here is shown at 90% zoom, yet it's still unable to display the row in its entirety. My initial goal was to create an in-line editable spreadsheet interface, but it seems I may need to shift towards using tabs to better organize the data. Managing this wealth of information with Bootstrap has proven to be quite challenging.

As I delved deeper into this screen during an evening of programming, I noticed that I had overlooked a crucial distinction between day and night humidity levels for the growing habitat. This prompted some reflection. The database architecture I've designed is highly granular (more on that in a later post); I only needed to define two new measurementTypes, and the logic for the recipes fell into place seamlessly. From the perspective of our remote probes (specifically, the humidity sensor in the field), all we needed was a method to determine whether it's currently day or night and apply it to our newly defined measurementType. This logic is now encapsulated in a database stored procedure, which I also modified at the same time to retrieve additional information for the landing page.

Before tackling the recipe page again, I polished up the System Health (landing) page you see above. The next week or so should see the last outstanding items fixed, the recipe book UI will get some love, and we'll finish up the fertigation automation.

Chris Ross's avatar

System Intelligence

Segmenting responsibilities of the real world work (stir this chemical, run this pump, turn on this solenoid, etc.) means that we'll need to be clever about networking and ensuring our little esp32s and raspberry pis are doing alright on the long term. Microprocessors and single board computers need love too, so let's give them some smarts.

When a esp32 establishes network connectivity (it's on the wifi and it communicating to the mosquito server); either after booting up for the first time or when it finally re-connects via other worldly events, it will send a Hello message to the YARG app. It's more or less a 'Sir, reporting for duty, sir!' message to our app, with the payload including the following -

  • _uptimeMillis: Uptime in milliseconds.
  • _macAddress: MAC address
  • _hostname: Hostname
  • _cpuFreqMHz: CPU frequency in MHz.
  • _flashChipSize: Flash chip size.
  • _flashChipSpeed: Flash chip speed.
  • _vccVoltage: VCC voltage.
  • _freeFlash: Free flash space.

Yeah, rocket science. While most of this information is purely informational, take note of the uptime in milliseconds. This will tell us if the esp32 is experiencing network connectivity, or if it has resumed comms because of a power reset. This is all stored in the database where we'll keep an eye on it and display some information to the user.

Every 15 minutes thereafter, the esp32 will broadcast out a Heartbeat message that consists of ... well, as the name suggests, health related items.

  • _uptimeMillis: This parameter records the uptime of the ESP32 device in milliseconds. It indicates how long the device has been running since its last restart.
  • _task: This parameter is used to store information about the current task or operation being performed by the ESP32 device. It can help track what the device is doing at the time of the heartbeat.
  • _stackHighWaterMark: This parameter represents the high-water mark of the stack memory on the ESP32 device. It provides information about stack memory usage.
  • _vccVoltage: This parameter records the VCC voltage, which is the supply voltage for the ESP32 device. Monitoring voltage can help ensure stable operation.
  • _rssi: This parameter captures the received signal strength indicator (RSSI), which is often used in wireless communication to measure signal quality or strength.
  • _freeHeap: This parameter indicates the amount of free heap memory available on the ESP32 device. It provides insights into memory usage.
  • _heapSize: This parameter represents the total heap size available on the ESP32 device. It complements the information about free heap memory.
  • _temperature: Temperature of the ESP32 device.

Tracking memory usage over the long term will help ensure we're not creating memory leaks. Other items like temp and vcc voltage... maybe overjkill? Since I was in there plugging away at the code, I figured why not.

Moving on to the Raspberry Pis, (in this system we have 2 so far - a rpi3 that we have installed our .Net YARG app on, and a rpi4 that handles the database and mosquito server thingies). Information coming from the pis are via a python script and it's broadcasting MQTT messages to the subscribing YARG app. That Hello payload looks something like this:

  • _macAddress: See above.
  • _hostname: ...
  • _osName: Operating system running on the Raspberry Pi.
  • _osVersion: This parameter records the version of the operating system on the Raspberry Pi, providing additional information about the software configuration.
  • _bootloaderFirmwareVersion: This parameter stores the version of the bootloader or firmware on the Raspberry Pi. It can be important for tracking firmware updates.
  • _cpuModel: This parameter captures the model of the Raspberry Pi's CPU, providing information about the hardware configuration.
  • _cpuCores: This parameter represents the number of CPU cores on the Raspberry Pi. It indicates the processing capabilities of the device.
  • _cpuTemperature: This parameter records the CPU temperature of the Raspberry Pi, providing insights into thermal conditions.
  • _cpuSerialNumber: This parameter stores the serial number associated with the Raspberry Pi's CPU. It can be useful for device identification.
  • _totalRAM: This parameter indicates the total amount of RAM (memory) available on the Raspberry Pi device.
  • _totalDiskSpace: This parameter represents the total disk space or storage capacity of the Raspberry Pi.
  • _totalUsedDiskSpace: This parameter captures the total amount of disk space that has been used on the Raspberry Pi, providing insights into storage usage.
  • _uptimeMillis: Similar to the previous procedures, this parameter records the uptime of the Raspberry Pi device in milliseconds, indicating how long the device has been running since its last restart.
  • _firstBootDateTime: This parameter stores the date and time of the first boot of the Raspberry Pi device. It can be valuable for tracking the device's operational history.

Again, a lot of 'huh, well thats kinda neat' bits of info. And the Heartbeat message for the pis looks like this -

  • _macAddress: sigh
  • _hostname: ...
  • _cpuUsage: This parameter records the CPU usage percentage on the Raspberry Pi, providing insights into the device's processing load.
  • _memoryUsage: This parameter indicates the memory (RAM) usage percentage on the Raspberry Pi, offering information about the device's memory usage.
  • _diskUsage: This parameter captures the disk usage percentage on the Raspberry Pi, giving insights into storage utilization.
  • _uptimeMillis: Similar to previous procedures, this parameter records the uptime of the Raspberry Pi device in milliseconds, indicating how long the device has been running since its last restart.
  • _temperature: This parameter stores the temperature of the Raspberry Pi, providing information about thermal conditions.
  • _loadAverage: This parameter records the load average on the Raspberry Pi. Load average is a measure of system activity and can help gauge system performance.
  • _voltage: Vulture level.

This give us valuable insight and gives us the opportunity to act well before tragedy strikes. After all, we wouldn't want to ruin a crop over a hard drive filling up, would we?

Specific information getting scrapped from the pis include last MariaDB backup time, and YARG app service information, such as task count, task limits, uptime, etc.

When an esp32 says Hello (or maybe the LWT message... mental note - I need to look into that) the app will know immediately that something has reset. Regardless of what step we were in at the time (fertigating, mixing a new batch of nutrients, at rest recirculating the reservoir...) we need to 'home' the system and get it in a ready state. Home, in YARGs case, means moving all the water back into the reservoir and seeing where to go from there.

In the case of the a total system reset, (the app or the raspberry pi hosting the app) restarts, the app dusts itself off, determines if there's a growing season active, and how long it was out of commission. Blah, blah, blah, <nonchalant hand gestures in air >, continue operations as necessary.

Not sure if this covers all the bases, but it seems like a decent start. We're a lot better armed for troubleshooting issues when they crop up (pun totally intended).

Chris Ross's avatar

Staying In The Lines

Screenshot of the landing page

Yet Another Landing Page...

I've been busy fixing up the stale codebase for awhile, mostly in the business object and data access layers. I like carving out logic and bringing 1s and 0s to life, but sometimes you just need a little color in your life.

Over the past 3 weeks, stress testing efforts have been underway to see where performance bottlenecks may lurk. Information has been streaming in from the esp32s and raspberry pis in order to see how much punishment the database can handle (quite a bit, so it would seem). Mbs of mock data are finally filling the tables.

While I had placeholders on the landing page where I sorta kinda maybe knew what I wanted to display, I took a few hours late last night and started to plumb in this live mock data. It's starting to really come together quite nicely.

At a glance, we can quickly see what the 'weather' is like (flooding, sunny, nighttime etc), growing conditions, reservoir measurements, and the fertigation schedule for the day. The page will refresh itself every 60 seconds of no user activity which presents up to date information to the user at all times. This will eventually be used by an separate rpi in kiosk mode and a wall embedded touchscreen.

Things to be added to the page include system stats of the bots and pis, alerts and notifications for the admin, ORP and DO probes, current nutrient recipe being used for this week, and a way to view measurement history.

Stay tuned.

Chris Ross's avatar

Fertigation Event Theory

Sketchy 2am sketches

Sketchy

Putting 2am ideas to paper...

In order to get the water from reservoir to a bucket and back again, we need to orchestrate a combined effort from a number of bots (esp32s). It's unrealistic to have every single I/O component on a single microcontroller (but be my guest... it doable I suppose). For the purpose of my theory here, it's easier to think of each component as controlled by an individual bot.

What components? On the ebb side, we need a water pump, flow meter, solenoids, moisture detector (overflow detection at the bucket - did we ebb too damned much). On the flow side, we also have a pump, flow meter, and solenoids. For simplicity, let's just call it ebb solenoid and flow solenoid (in r/l, it's multiple. Don't get caught up in minor details). What was I saying.... oh yes, we have a total of 7 thingies to take into consideration. Onwards to the theory -

At some point, the app will determine it's time to water. A MQTT message is broadcast (FE; fertigationEvent). This is just information for the 7 bots above, each parses the data for it's part, and sends an Acknowledge back to the app. Once the app has collected all 7 acks, it will send a message to start the automation; otherwise someone is sleeping on the job and we'll alert someone somewhere.

The fertigationEvent message contains the following in the payload:

  • CommandID: A unique identifier for the specific fertigation event. This is used to track and manage individual events.
  • EbbSpeed: An integer value representing the PWM (pulse width modulation) signal used to control the speed of the ebb pump during the fertigation process.
  • EbbAmount: An integer value representing the number of pulses from the ebb flow meter that need to be counted to achieve a specific amount of water. This value is related to the volume of water to be pumped (e.g., 20L).
  • AntiShockRamp: The duration in milliseconds for a ramp-up and ramp-down logarithmic period for the ebb and flow pump's speed. This is meant to prevent sudden pressure changes in the piping.
  • SoakDuration: The duration in milliseconds to wait before starting the flow pumps.
  • FlowSpeed: An integer value representing the PWM signal used to control the speed of the flow pump during the fertigation process.
  • ExpectedEbbFlowRate: A float value representing the expected flow rate of the ebb pump.
  • ExpectedFlowFlowRate: A float value representing the expected flow rate of the flow pump.
  • PumpErrorThreshold: A float value representing a threshold below which the flow rate is considered an error. If the actual flow rate falls below this threshold, it might indicate a blockage or malfunction.

Once the bot gets ahold of the fertigationEvent message, it will add additional parameters related to the internal state of the process, such as EbbStartMillis (timestamp when ebb pumping started), IsEbbCounting (flag indicating whether ebb flow meter counting is active), IsEbbOverflow (flag indicating that we ebb'd too much and need to back it off a smidge), IsCalculatingFlowRate (flag indicating whether flow rate calculations are active), IsStopSent (flag indicating whether we sent a STOP command to the pump), and more depending on what the bot needs to do during this dance.

The app will send a CAFE message after the 7 bots ack back (Command Authorized; Fertigation Event). That's the starting gun.

  • Ebb solenoid turns on; ebb pump starts ramp up; ebb flow meter starts counting.
  • Ebb pump fully ramped up, ebb flow meter compares flow rate every second (if under threshold, stops the system. Possible blockage, requires human intervention). Ebb flow meter broadcasts msg when count is reached. Ebb flow meter is also listening for an OVERFLOW message from the moisture detector on the bottom of the bucket - in an overflow situation, it will broadcast back a smug message back to the app that it needs to tone it down a little.
  • The ebb pump will ramp down from either the overflow message, or ebb flow meter done message. Once ramped down and off, it broadcasts a message that it's finished it's part. Solenoids are turned off.
  • Ebb flow meter waits for the pump to finish ramping down, and send a message that it's also done, and a message for the app to record a work log of the ebb pump. This will provide us with a runtime history of the pump, track maintenance, etc.
  • The soak time completes.
  • Turn on flow solenoids, ramp up flow pump.
  • Flow pump ramps up to 100% of commanded speed, broadcasts a message that it's running.
  • Flow flow meter (sounds weird in my head) monitors the flow from the bucket; bucket drained, broadcast message to stop.
  • Flow pump gets message to stop, ramps down until stopped.
  • The app will collect up 7 DONE messages, and marks it completed in the database.
  • Once complete, we'll let the system settle out and measure how much we have in the reservoir.

See? Nothing to it.